NestJS or LoopBack: Which is best? Is there a best?

Choosing between Node frameworks is super confusing, especially when there are so many great options. Picking the right one requires an understanding of not only the project you’re working on, but of both frameworks and when to use them.
I previously wasn’t a fan of using frameworks to build backend Node apps. You could say we had a love-hate relationship, but a couple of years back I tried using NestJS and was amazed! After that, I thought Nest was the best out there…
…until I started experimenting with LoopBack 4. Now I’m torn!
In this article, we’ll compare NestJS with LoopBack across various attributes and features. We’ll also cover which of the two is best in different scenarios. Though I can’t definitively point out which is better, I can analyze which is best depending on a few important factors. We’ll go over these in the article below!
NestJS is a Node.js framework used to build efficient, scalable, and enterprise-level server-side applications. It uses progressive JavaScript and has full support for TypeScript.
Nest uses the default Express.js but can be configured using alternatives such as Fastify.
Nest aims to solve the problems of software architecture. It’s worth noting that the architecture is heavily inspired by Angular, a frontend platform and framework for creating single-page applications. Thanks to its software architecture, Nest enables teams and developers to create easily maintainable, testable, scalable, and loosely coupled server-side applications.
LoopBack is an innovative, award-winning Node.js framework. It enables software engineers to quickly create APIs and microservices with backend systems, such as databases and REST or SOAP services.
LoopBack is highly extensible, has out-of-the-box support for TypeScript, and is built on top of Express.
LoopBack makes it super simple to build modern API applications with little to no coding. It’s open source, is strongly supported by IBM and StrongLoop, and is driven by OpenAPI. Loopback also follows the OpenAPI standard, which is becoming widely accepted in the industry.
I don’t know about you, but just defining these two frameworks doesn’t quite convince me of which is best. Let’s try to compare them!
NestJS is a full-stack Node framework, while LoopBack is a microframework. The former is powerful and very easy to use, while the latter is considered when Database, REST API, AAA, and Swagger are needed. Both of these frameworks are open source.
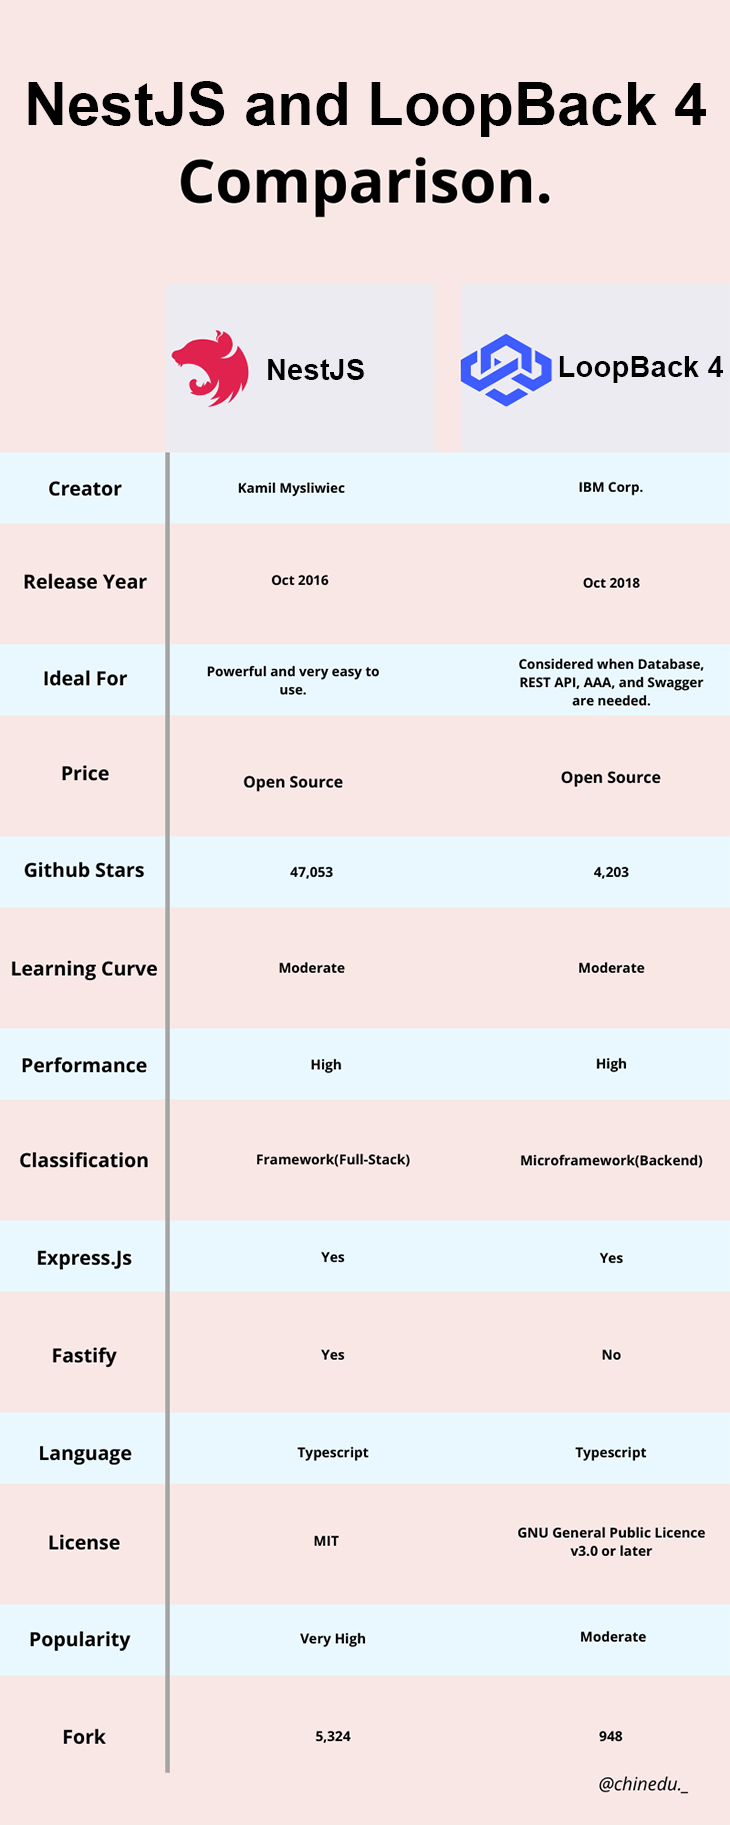
Both frameworks have acquired popularity amongst developers and in various tech communities.
At the time of writing this article, LoopBack has 4.2k GitHub stars and 947 forks, while NestJS has 47k stars and about 5.3k forks. You can see in the graph below that both frameworks have growing interest over time on Google.
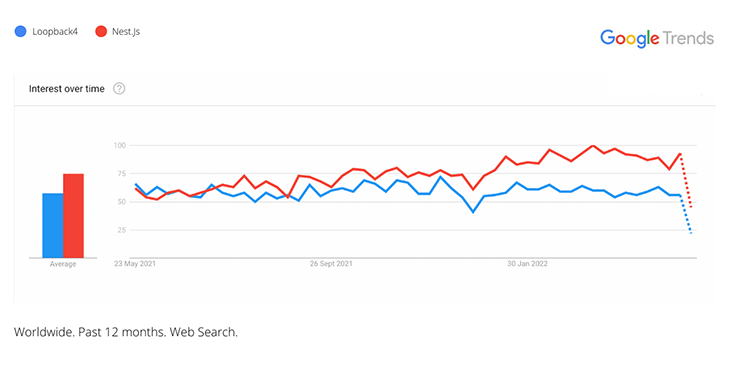
As previously mentioned, LoopBack is a microframework (backend), while NestJS is a framework (full-stack). This could be one reason why NestJS has more GitHub stars than LoopBack.
Another reason behind the disparity between GitHub stars and for the general popularity of NestJS could be because NestJS software is highly opinionated. It’s also strongly backed and easily adopted by the Angular community.
Looking at the comparison infographic and seeing which framework has a higher GitHub star count still doesn’t cut it for me. Let’s continue with other factors.
Performance is the bread and butter of a good framework. It’s no surprise that NestJS is very popular amongst developers or that LoopBack has won awards for being one of the most innovative frameworks.
The LoopBack benchmark measures how fast we can create new records and fetch data. This test was carried out on a mid-2015 MacBook Pro with a 22.5 GHz Intel Core i7 processor, 16GB of memory, and 1600 MHz DDR3.
The average results for fetching data were 4,569 requests per second, while it took 348 requests per second to create a new record.
When we look at latency, the average time to fetch data in milliseconds was 1.68, while it took 28.27 milliseconds to create a new one.
While LoopBack tried to use a real-world working scenario to test and measure requests per second, NestJS used a “Hello World” application to test, which, according to the NestJS code checks benchmark, shows that a NestJS and Fastify application handles about 30,001 requests per second.
The scalability of a web app is its ability to handle an increasing number of concurrent users.
NestJS is scalable for large apps because of its application architecture. It allows software developers to build easily maintainable, highly testable, and loosely coupled applications.
Further, the use of HTTP server frameworks like Express (the default) or Fastify greatly improve its scalability for large apps. The fact that it’s built with TypeScript is also a big plus.
LoopBack is also very scalable for building complex Node.js apps. It solves a huge problem with loosely coupled apps: different parts have to work seamlessly together, without knowing much about each other, to introduce patterns that help solve these problems.
LoopBack gives control to software engineers. It enables problem solving, allowing developers to bring in more capabilities without breaking the app’s core foundation.
We can also compose a set of actions into a meaningful flow/sequence with LoopBack, such as setting up an efficient pipeline for processing HTTP requests and responses.
LoopBack is built on the Express framework and uses TypeScript, making it highly scalable for building apps with extensibility, composability, and great flexibility.
Now, we’ll compare some of the features of both NestJS and LoopBack 4.
Unsurprisingly, the popularity of NestJS is due to its amazing features that have taken the tech community by storm.
Here are some of them, to name a few:
Although LoopBack’s popularity is nowhere compared to NestJS, LoopBack has some amazing, innovative features that we can’t turn a blind eye to. Here are some of them:
Even after looking at their features, we can’t overlook performance, scalability, ease of getting started, and ease of testing web applications built on these frameworks. All of these factors are integral decisions for software engineers to make to get the most out of these technologies and really achieve developmental goals.
Now, let’s evaluate creating a project in each of these frameworks.
Let’s look at how to create a simple project in both frameworks.
N.B, According to the NestJS documentation it is advised that Node.js v10.13.0 and later, except v13, is installed in your operating system.
First, we need to install the NestJS Command Line Interface.
npm i -g @NestJS/cli
Then, in the terminal of our operating system, we use the below commands to create a new project:
nest hello-world-app
A directory for hello-world-app will be created. The necessary boilerplates, as well as Node modules, will be installed, and the src/ directory will be populated.
Below is an image of the files that populate the src/ directory:
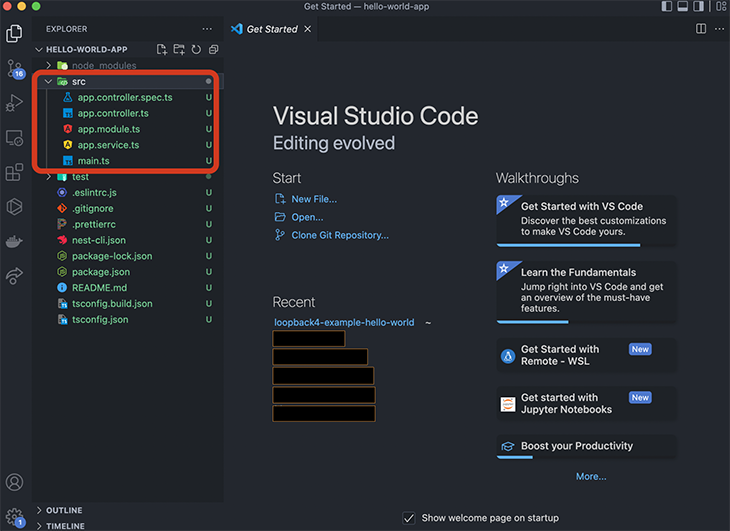
After the installation process, we can run the npm run start:dev command to start the app.
Once the app is running, if we open our browser and visit http://localhost:3000/, we will see “Hello World!” in the browser!
Note: In order for this app to work, we need Node.js v10 or later to be installed.
First, we have to install the LoopBack CLI toolkit globally:
npm i -g @loopback/cli
Then, when we create a new project, the CLI installs all the dependencies and configures a TypeScript Compiler. The CLI will create a scaffold of the project, and to do so we will run the CLI and answer the prompts:
lb4 app
Answer the prompts as shown in the photo below:
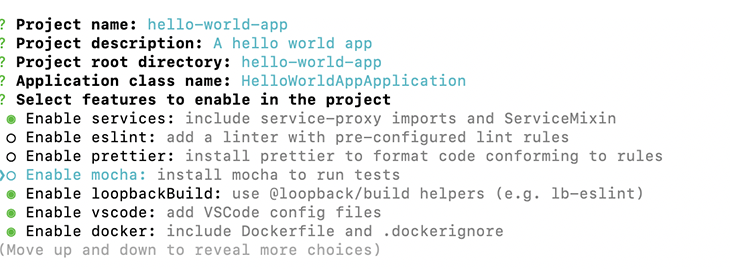
The scaffold creation is now in progress.
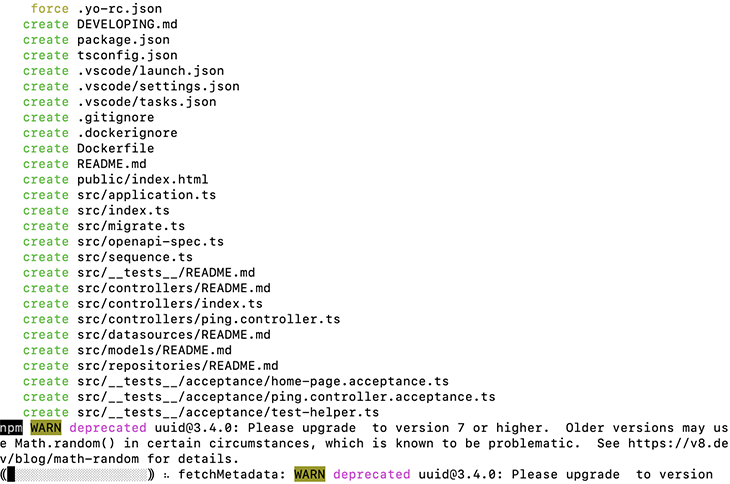
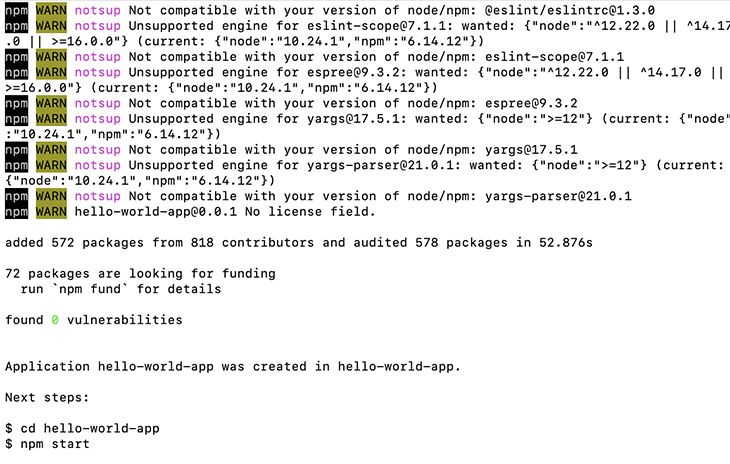
After scaffolding, the project comes with a route of its own: /ping. To try it out, we cd into our project and run it:
cd hello-world-app
npm start
In our browser, we can visit http://[::1]:3000/ping to see the results:
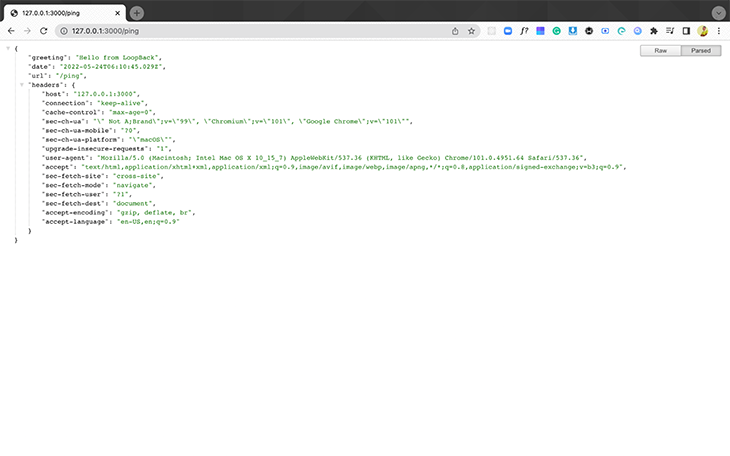
We can also see that our server runs on http://[::1]:3000:
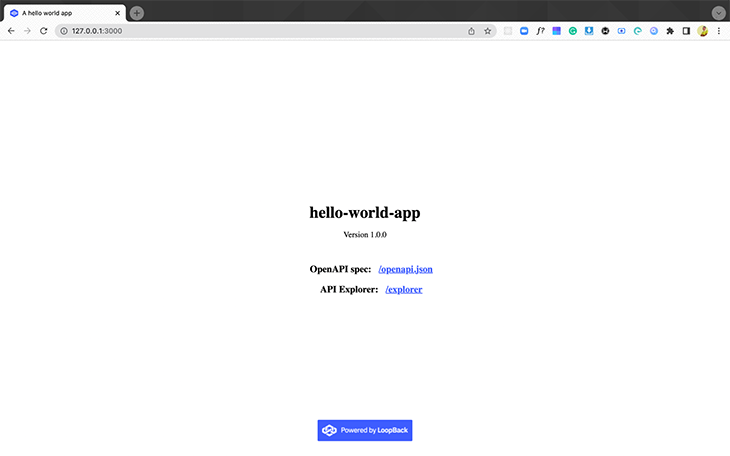
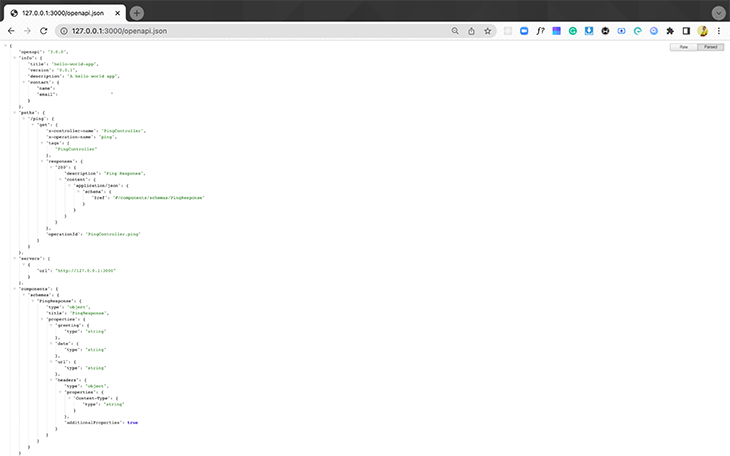
We can see our Open API spec at http://127.0.0.1:3000/openapi.json:
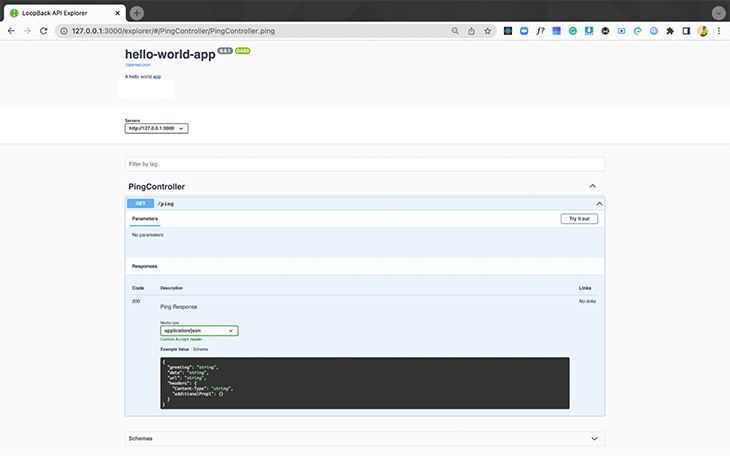
And finally, our API Explorer on http://127.0.0.1:3000/explorer/:
Now that we have created the scaffold for our app, let’s go ahead and add a simple controller for “Hello World.”
First, we need to stop the application with Control + C if it’s still running.
Then, we need to run the below command for our controller:
lb4 controller
Next, we’ll answer the prompt like below:

In order to create the “Hello World” route, we’ll paste the below code in src/controllers/hello.controller.ts:
import {get} from '@loopback/rest';

export class HelloController {
  @get('/hello')
  hello(): string {
    return 'Hello world!!!';
  }
}
Finally, we can start the app using npm start.
When we visit http://127.0.0.1:3000/hello, we see “Hello World”.
NestJS supports automated testing, which can be very important for software development.
Automation makes sure that tests are run at very critical development stages, such as feature integration, version release, and source code control check in.
The former includes features that enable developers and teams to automate and build tests.
NestJS is integrated with SuperTest and Jest, provides its own default tooling, and automatically scaffolds default unit tests for components and end-to-end tests for apps.
NestJS also makes it easy to use any testing framework.
LoopBack comes with a thoroughly automated test suite that helps speed up development. It also helps both new and experienced developers understand different parts of the application codebase. When bugs are fixed and new features are implemented, LoopBack helps prevent regressions and ensures that applications built on LoopBack work as expected.
LoopBack has recommended the use of Mocha. Mocha is a JavaScript test framework that runs on Node.js, as well as the browser, and makes asynchronous testing simple.
However, LoopBack’s automated test suite needs a test runner in order for it to execute the test and produce a summarized report. Hence, Mocha to the rescue.
In addition to a test runner, the automated test suites also require a library for creating test doubles. Sinon.JS is used for this.
An assertion library like Should.js, as well as a library for making HTTP calls and verifying their results like SuperTest, are recommended.
The @loopback/testlab module automatically integrates with these packages, making them easy to use with LoopBack and, in turn, making testing for LoopBack apps extremely quick and simple to set up.
We’ve gotten to the point where we have to answer this very important question. Well…
At the beginning of this article, I asked a question that I felt you might have in mind. Is there really a best between these two?
Well, every framework has its pros and cons, as with everything in life.
I’ve found that picking one technology and sticking to it is king. But, of course, you have to make that decision based on the requirements of the project you are working on and the team behind it.
Ultimately, both technologies have done a great job of building a solid foundation to help software engineers build fast, scalable, highly efficient, and maintainable web applications.
Comparing these two technologies was no easy feat because they are both amazing and very innovative.
We went from defining these frameworks to comparing their popularity and growth. We looked at their features and how they scale, as well as how easy and fast it is to set up a “Hello World” application using both frameworks. Finally, we looked at testing and how easy it is to set it up in both frameworks.
This has been a long piece, and if you have stayed to this point I must say a big thank you! All in all, I hope you enjoyed this piece as much as I enjoyed writing it. Once again, thanks for sticking with me thus far! Happy coding, comrades!
Install LogRocket via npm or script tag. LogRocket.init() must be called client-side, not
server-side
$ npm i --save logrocket

// Code:

import LogRocket from 'logrocket';
LogRocket.init('app/id');
// Add to your HTML:

<script src="https://cdn.lr-ingest.com/LogRocket.min.js"></script>
<script>window.LogRocket && window.LogRocket.init('app/id');</script>
Can AI refactor legacy CSS without breaking your layout? We benchmarked 5 top AI assistants across cascade order, specificity ties, and stacking traps.

Learn how to offload long-running Gemini AI requests to Trigger.dev background jobs in Next.js using Server Actions and real-time React hooks.

Learn how to use Google’s LiteRT.js to build a browser-based OCR receipt scanner with WebGPU acceleration and on-device LLM structuring via LiteRT-LM.
Learn how to use the TypeScript Compiler API and AST traversal to extract imports and build a file dependency graph CLI.
Would you be interested in joining LogRocket's developer community?
Join LogRocket’s Content Advisory Board. You’ll help inform the type of content we create and get access to exclusive meetups, social accreditation, and swag.
Sign up now


 Learn more →