Modern web applications increasingly rely on AI features that can take several seconds, or even minutes, to complete. Running those operations directly inside a Next.js route or Server Action can become unreliable once they approach platform execution limits.

Trigger.dev moves long-running work into a dedicated background runtime. Instead of keeping an HTTP request open while the work finishes, your application queues a task, tracks its progress, and retrieves the result when processing completes.
In this tutorial, we’ll build a text summarizer with Next.js, Trigger.dev, and the Google Gemini API. Along the way, you’ll learn how to define durable background tasks, trigger them from a Server Action, configure automatic retries, and send real-time run updates back to a React frontend.
The same pattern works for longer AI workflows, media processing, webhook handling, scheduled work, and other jobs that shouldn’t depend on a single request staying alive.
Trigger.dev is an open source background job platform for running asynchronous and long-running workflows without maintaining your own queue and worker infrastructure.
It provides:
Three concepts are useful to understand before we start:
| Concept | What it represents |
|---|---|
| Task | A function that defines a unit of background work |
| Run | One execution of a task, including its status, logs, output, and retries |
| Trigger | The event that starts a task, such as a Server Action, webhook, HTTP request, or schedule |
In our application, the summarization logic is the task, each submitted document creates a run, and the Next.js Server Action provides the trigger.
You’ll need:
We’ll use Trigger.dev to move the Gemini request out of the Next.js request lifecycle.
If you don’t already have a Next.js application, create one with TypeScript, Tailwind CSS, and the App Router:
npx create-next-app@latest text-summarizer --typescript --tailwind --app
Move into the project directory:
cd text-summarizer
Open the Trigger.dev dashboard and create a new project. For this example, we’ll call it AI Summarizer.
The project acts as the workspace for your background tasks. Trigger.dev records each run there, including execution history, logs, retries, metadata, and output.
After creating the project, the dashboard provides an initialization command for your application:
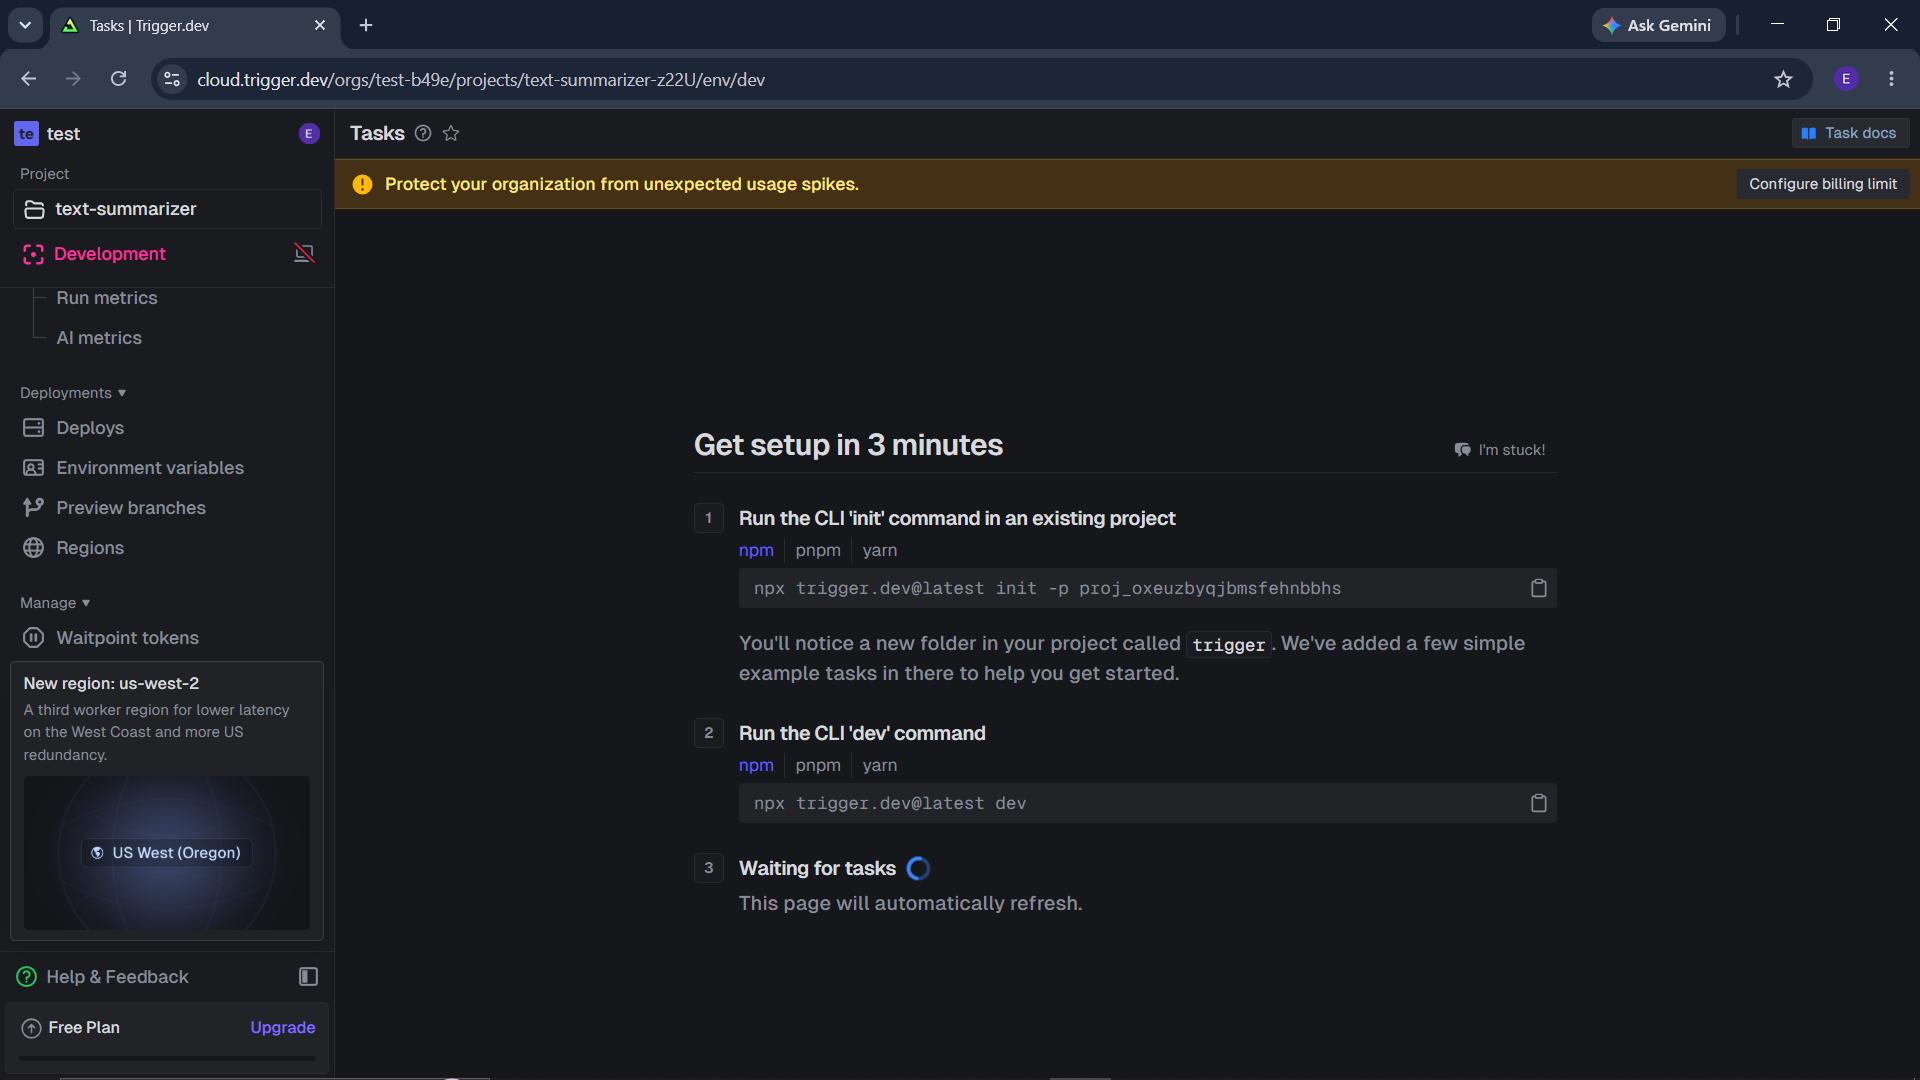
Copy the command and run it from the root of your Next.js project:
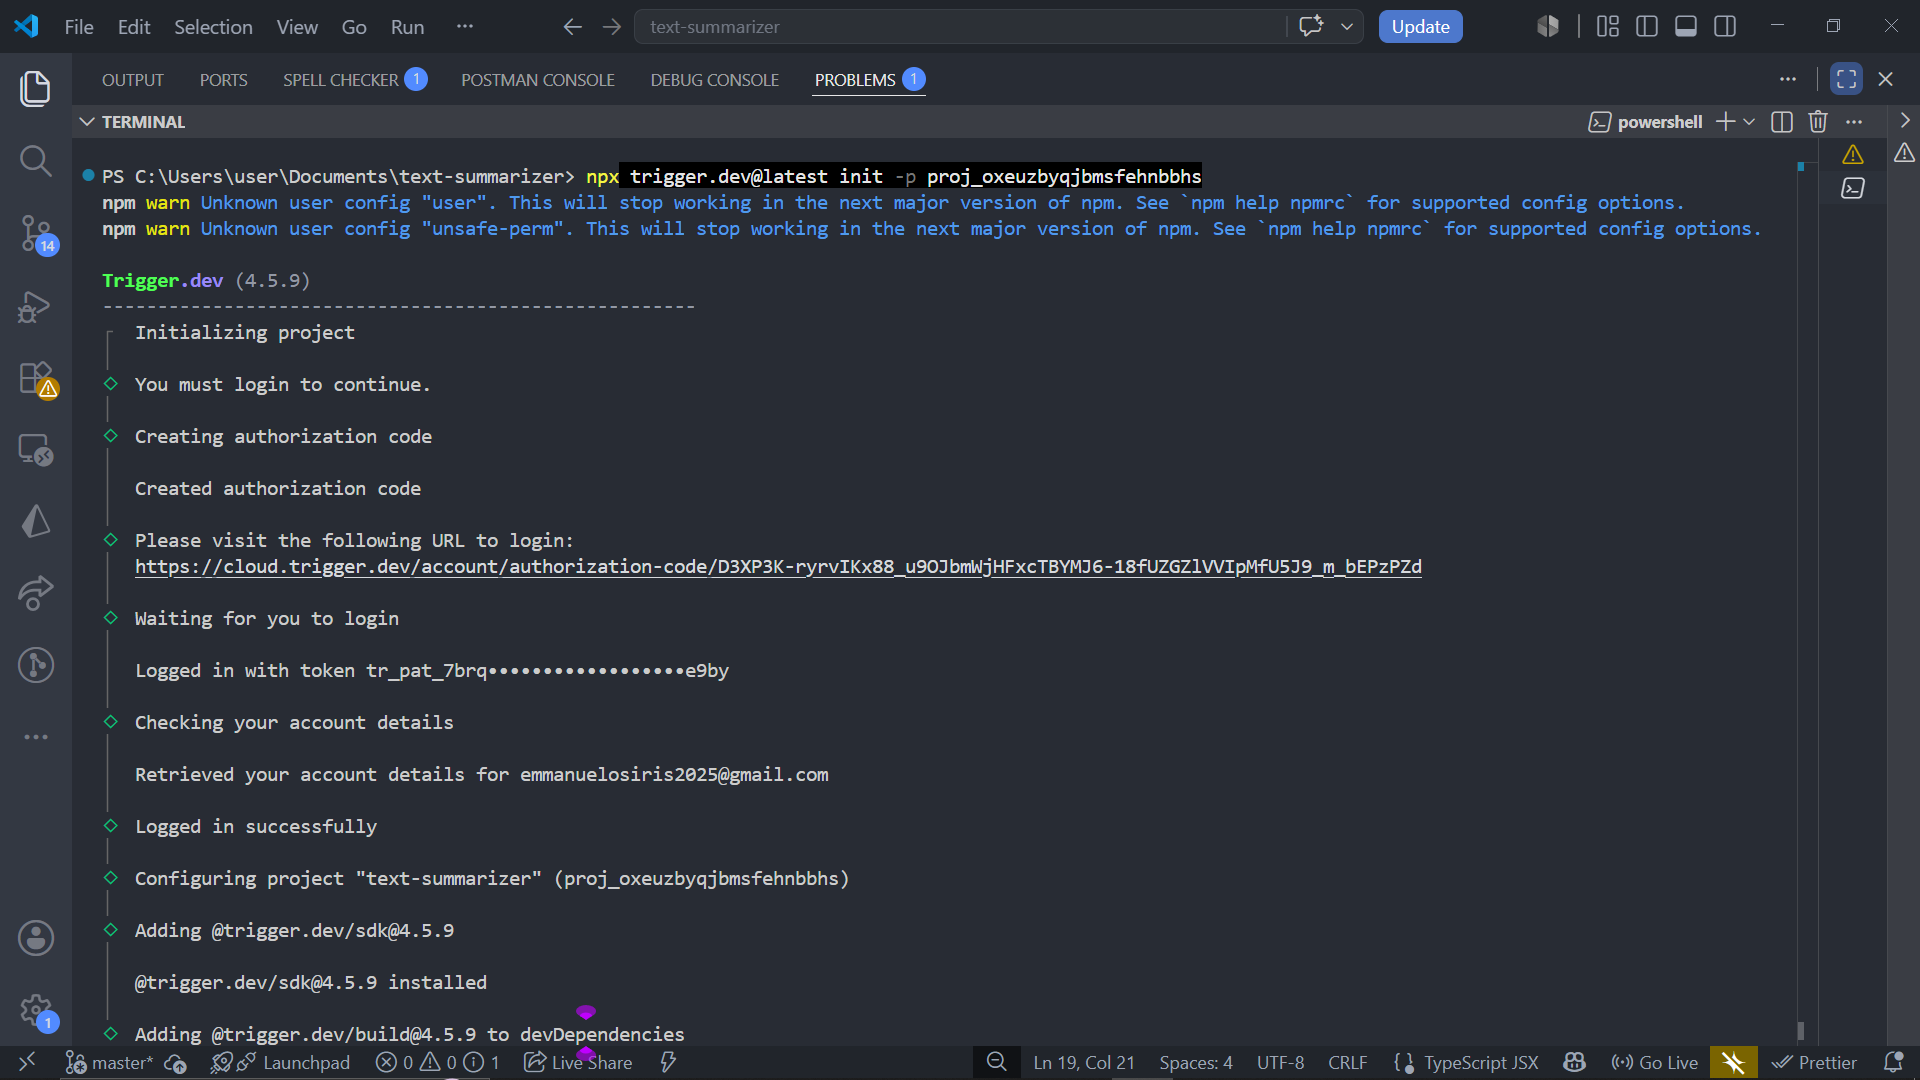
Follow the prompt to authorize the CLI with your Trigger.dev account.
Initialization adds the Trigger.dev configuration and task directory to your project:
src/trigger/trigger.config.tsWe’ll also use Trigger.dev’s React hooks to subscribe to run updates from the client. If you’re using pnpm or another package manager, adjust the install commands accordingly:
npm install @trigger.dev/react-hooks
Install the Google GenAI SDK as well:
npm install @google/genai
During local development, both the Next.js server and the Trigger.dev development worker need to be running.
You can run them in separate terminals. To keep the workflow in one terminal, install concurrently:
npm install concurrently
Then update the scripts section of package.json
{
  "scripts": {
    "trigger:dev": "npx trigger.dev@latest dev",
    "dev": "concurrently --kill-others --names \"next,trigger\" --prefix-colors \"yellow,blue\" \"next dev\" \"npm run trigger:dev\""
  }
}
Start both development processes with:
npm run dev
The Next.js application and Trigger.dev worker now run side by side.
We’ll build the application in three steps:
First, add the required environment variables.
Create .env.local
TRIGGER_SECRET_KEY=tr_dev_your_trigger_secret
GEMINI_API_KEY=AIzaSy_your_gemini_api_key
Keep both values server-side. The browser will receive a scoped public access token for subscribing to the individual Trigger.dev run later.
Create src/trigger/summarize.ts
import { schemaTask, logger, metadata } from "@trigger.dev/sdk";
import { GoogleGenAI } from "@google/genai";

export interface SummarizePayload {
  text: string;
}

export interface SummarizeOutput {
  summary: string;
}

export const summarizeTask = schemaTask({
  id: "summarize-text",
  retry: {
    maxAttempts: 5,
    minTimeoutInMs: 2000,
    maxTimeoutInMs: 10000,
    factor: 2,
    randomize: true,
  },
  schema: (data: unknown): SummarizePayload => {
    if (!data || typeof data !== "object") {
      throw new Error("Payload must be an object");
    }

    const { text } = data as { text?: unknown };

    if (typeof text !== "string") {
      throw new Error("Text must be a string");
    }

    const trimmed = text.trim();

    if (trimmed.length < 20) {
      throw new Error(
        "Text is too short. Minimum length is 20 characters."
      );
    }

    if (trimmed.length > 10000) {
      throw new Error(
        "Text is too long. Maximum length is 10,000 characters."
      );
    }

    return { text: trimmed };
  },

  run: async (
    payload: SummarizePayload,
    { ctx }
  ): Promise<SummarizeOutput> => {
    logger.log("Starting text summarization task", {
      textLength: payload.text.length,
      attempt: ctx.attempt.number,
    });

    metadata.set("progress", {
      percentage: 10,
      status: "Initializing task",
    });

    const apiKey = process.env.GEMINI_API_KEY;

    if (!apiKey) {
      metadata.set("progress", {
        percentage: 10,
        status: "Configuration error",
      });

      throw new Error(
        "GEMINI_API_KEY environment variable is not configured."
      );
    }

    metadata.set("progress", {
      percentage: 30,
      status: "Contacting Gemini AI",
    });

    const ai = new GoogleGenAI({ apiKey });

    const response = await ai.models.generateContent({
      model: "gemini-3-flash-preview",
      contents:
        `Summarize the following text for a busy developer. ` +
        `Keep it concise and actionable.\n\n` +
        `Text to summarize:\n${payload.text}`,
    });

    metadata.set("progress", {
      percentage: 80,
      status: "Processing response",
    });

    const summary = response.text?.trim();

    if (!summary) {
      throw new Error("Gemini returned an empty response.");
    }

    metadata.set("progress", {
      percentage: 100,
      status: "Done",
    });

    return { summary };
  },
});
The task is registered under the unique ID summarize-text.
Its retry policy allows up to five attempts. The delay between retries increases exponentially from a minimum of 2s to a maximum of 10s, with randomization to prevent multiple failed jobs from retrying at exactly the same time.
The schema validates the incoming payload before the task runs. In this example, the input must contain a text string between 20 and 10,000 characters.
Inside run, the task initializes Gemini, sends the summarization request, and records progress through Trigger.dev metadata. If Gemini returns an empty result or the request fails, the task throws an error and Trigger.dev can retry it according to the policy above.
The important part is where this function executes. The Gemini request runs in Trigger.dev’s worker environment rather than inside the Next.js request that started it. This is the same principle that makes multi-turn AI agents practical — decoupling execution from the original HTTP request.
Next, create app/actions.ts
The Server Action validates the user’s input and queues the Trigger.dev task:
"use server";

import { tasks } from "@trigger.dev/sdk";
import type { summarizeTask } from "../src/trigger/summarize";

function getErrorMessage(error: unknown): string {
  if (error instanceof Error && error.message) {
    return error.message;
  }

  return "An unexpected error occurred.";
}

export async function triggerSummaryAction(text: string) {
  if (!text || typeof text !== "string") {
    return {
      success: false,
      error: "Text must be a valid string.",
    };
  }

  const trimmed = text.trim();

  if (trimmed.length < 20) {
    return {
      success: false,
      error: "Text is too short. Please provide at least 20 characters.",
    };
  }

  if (trimmed.length > 10000) {
    return {
      success: false,
      error: "Text is too long. Please limit your input to 10,000 characters.",
    };
  }

  try {
    const handle = await tasks.trigger<typeof summarizeTask>(
      "summarize-text",
      {
        text: trimmed,
      }
    );

    return {
      success: true,
      runId: handle.id,
      publicAccessToken: handle.publicAccessToken,
    };
  } catch (error: unknown) {
    console.error("Failed to trigger background task:", error);

    return {
      success: false,
      error: getErrorMessage(error),
    };
  }
}
The Server Action performs a fast validation pass before calling tasks.trigger().
Triggering the task doesn’t wait for Gemini to finish. Instead, Trigger.dev returns a handle containing the new run’s ID and a public access token.
The client uses those values to subscribe to the run without exposing the project’s Trigger.dev secret key.
You’ll notice that the input is validated twice: once in the Server Action and again inside the task. The Server Action can return useful validation errors before queueing unnecessary work, while the task still validates its own payload so it remains safe when triggered from another source later.
Now build the client interface. When it comes to optimizing React app performance, minimizing the JavaScript sent to the client matters — here, the polling logic lives in Trigger.dev’s hook rather than custom client code.
Replace app/page.tsx
"use client";

import { useState } from "react";
import { useRealtimeRun } from "@trigger.dev/react-hooks";
import type { summarizeTask } from "../src/trigger/summarize";
import { triggerSummaryAction } from "./actions";

export default function Home() {
  const [text, setText] = useState("");
  const [runId, setRunId] = useState<string | null>(null);
  const [publicAccessToken, setPublicAccessToken] =
    useState<string | null>(null);
  const [triggerError, setTriggerError] =
    useState<string | null>(null);

  const {
    run,
    error: realtimeError
  } = useRealtimeRun<typeof summarizeTask>(
    runId ?? "",
    {
      accessToken: publicAccessToken ?? "",
      enabled: Boolean(runId && publicAccessToken),
    }
  );

  const handleSummarize = async () => {
    const result = await triggerSummaryAction(text);

    if (
      !result.success ||
      !result.runId ||
      !result.publicAccessToken
    ) {
      setTriggerError(
        result.error || "Failed to queue job."
      );
      return;
    }

    setRunId(result.runId);
    setPublicAccessToken(result.publicAccessToken);
    setTriggerError(null);
  };

  return (
    <main>
      <textarea
        value={text}
        onChange={(e) => setText(e.target.value)}
      />

      <button onClick={handleSummarize}>
        Summarize Text
      </button>

      {triggerError && <p>{triggerError}</p>}
      {realtimeError && <p>{realtimeError.message}</p>}

      {run?.status === "COMPLETED" && (
        <pre>{run.output?.summary}</pre>
      )}
    </main>
  );
}
useRealtimeRun subscribes the browser to the Trigger.dev run represented by runId.
As the background job moves through its lifecycle, the hook receives updated run state and causes the component to re-render. Once the status becomes COMPLETED, the result is available through run.output.
This separates the workflow into four parts:
useRealtimeRun watches itWe’re already writing percentage and status values into run metadata from the task:
metadata.set("progress", {
  percentage: 30,
  status: "Contacting Gemini AI",
});
The current UI only displays the completed result.
If the development environment isn’t already running, start it with:
npm run dev
Next.js runs at http://localhost:3000, while the Trigger.dev development process handles the background task.
Open the application and submit text for summarization:
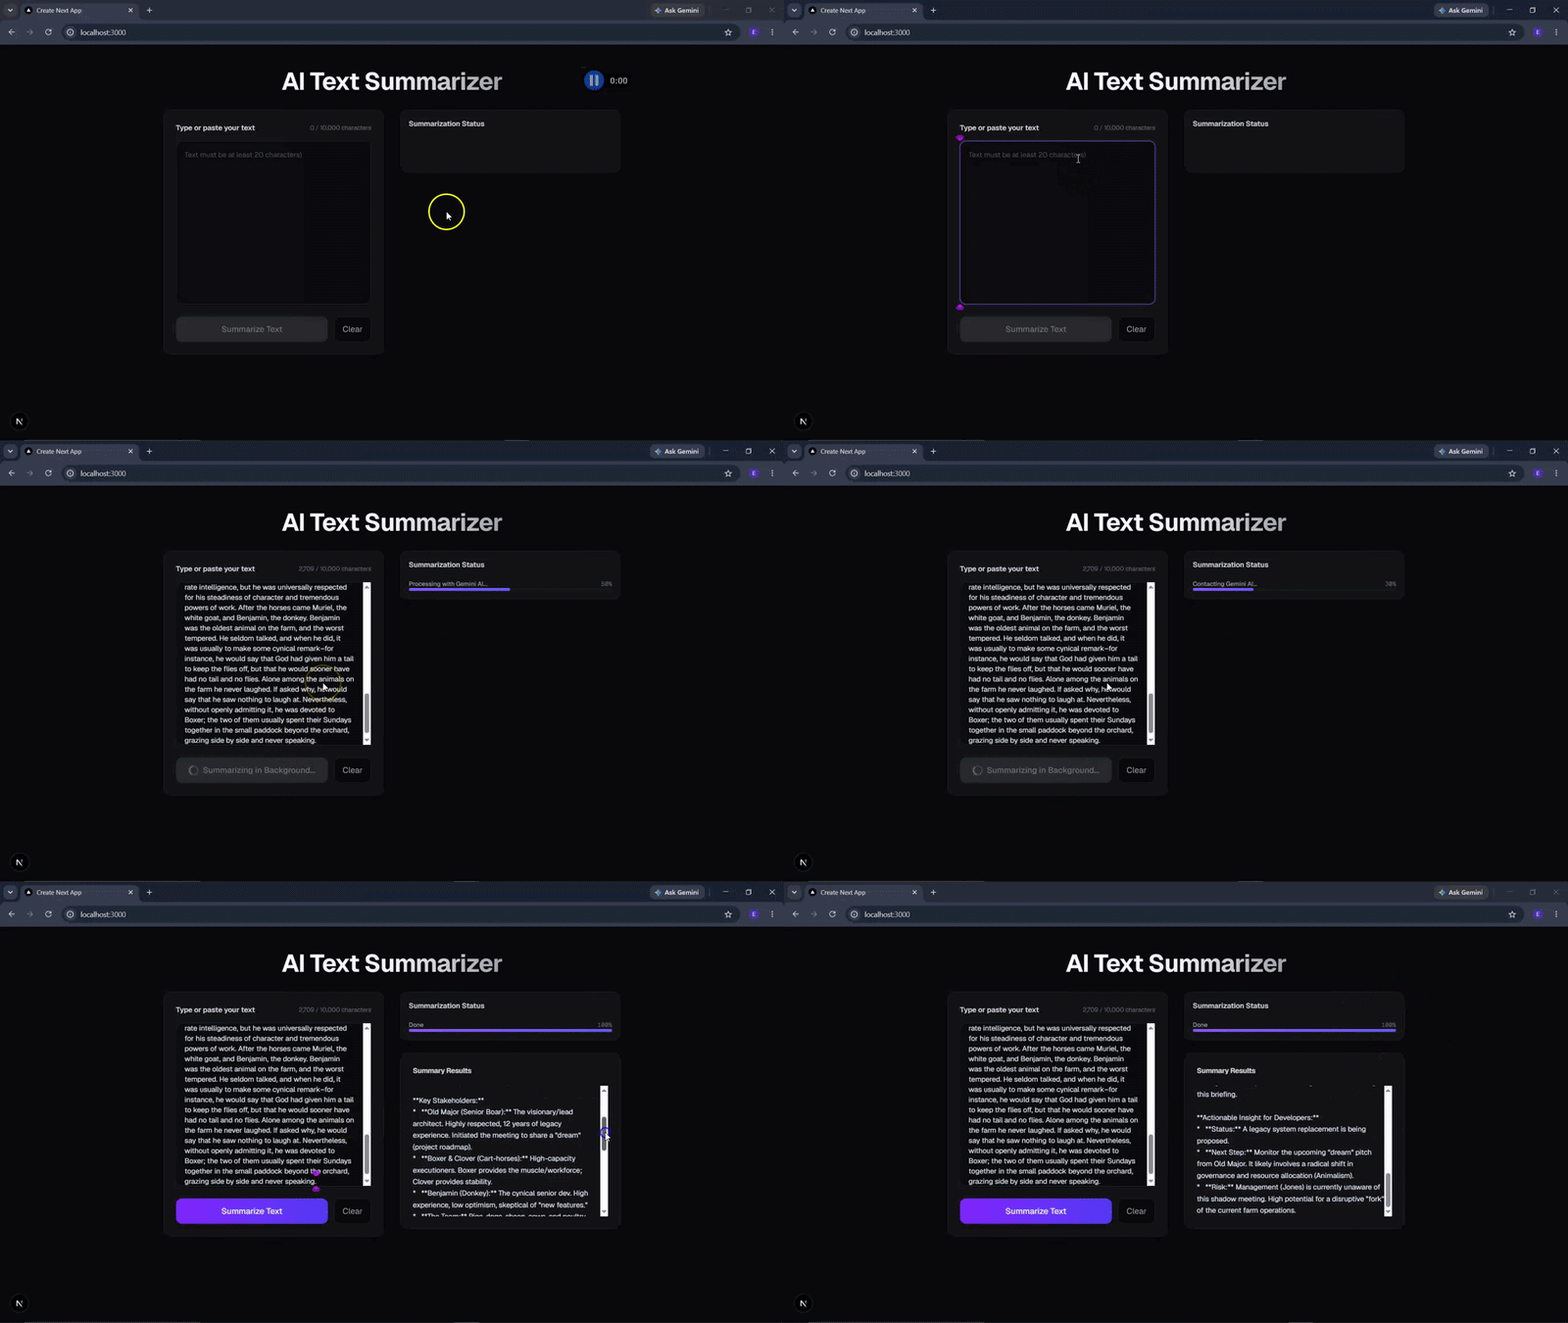
You can inspect the corresponding task run in the Trigger.dev dashboard:
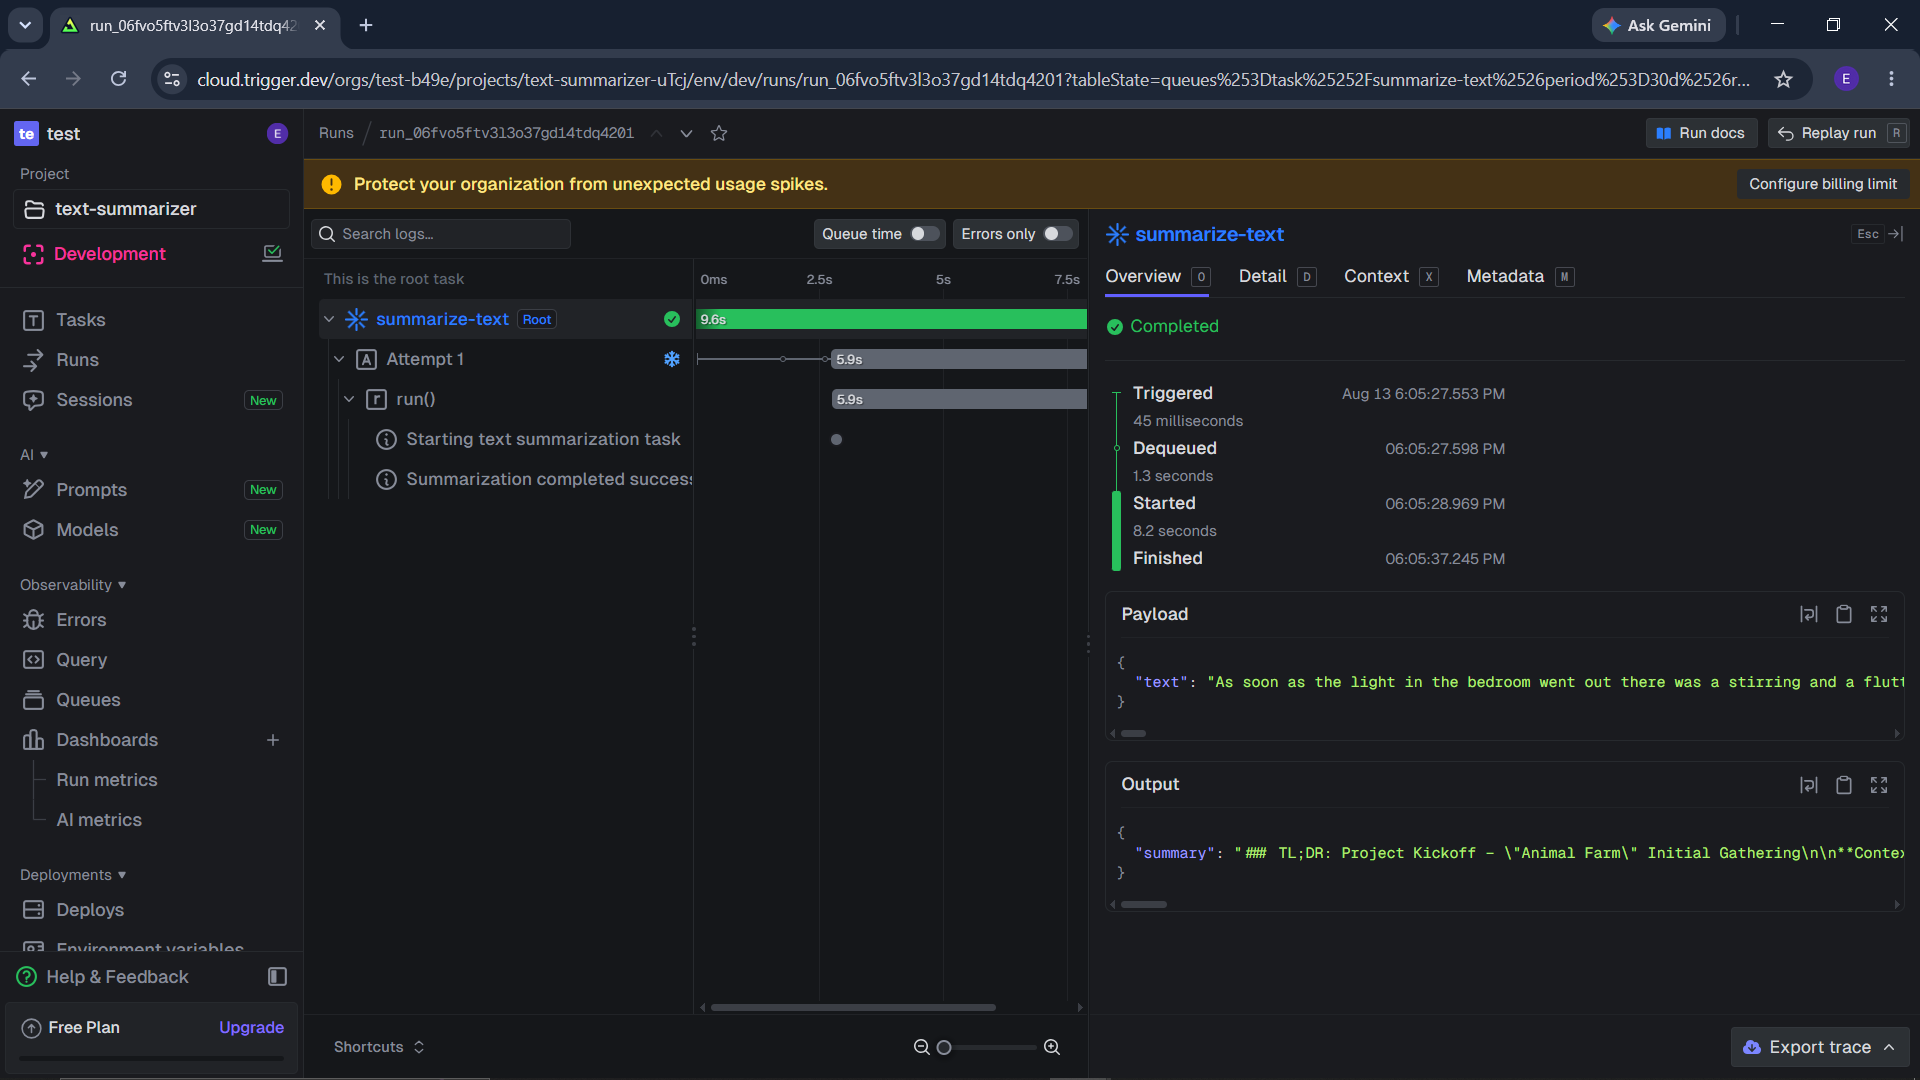
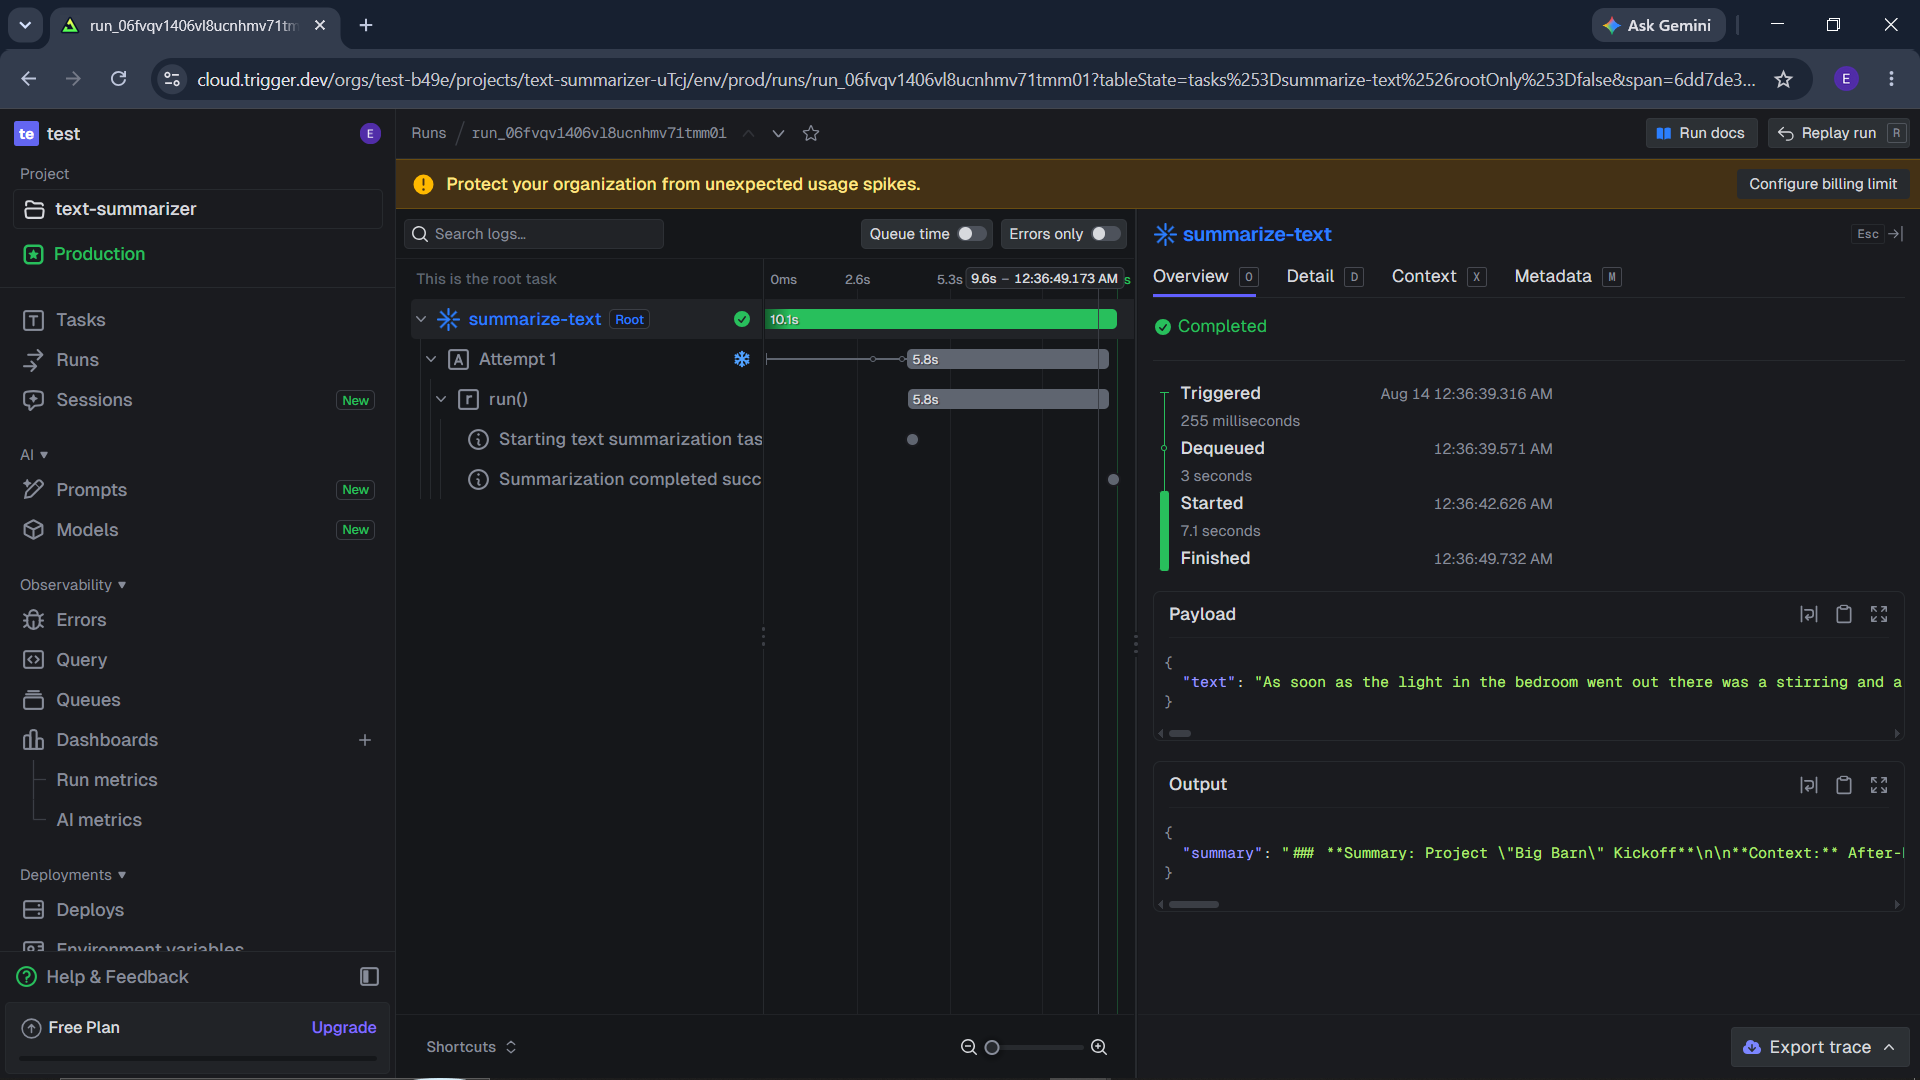
The dashboard gives you visibility into the run’s status, logs, metadata, retries, and output, which becomes particularly useful when a task fails outside the application’s normal request lifecycle.
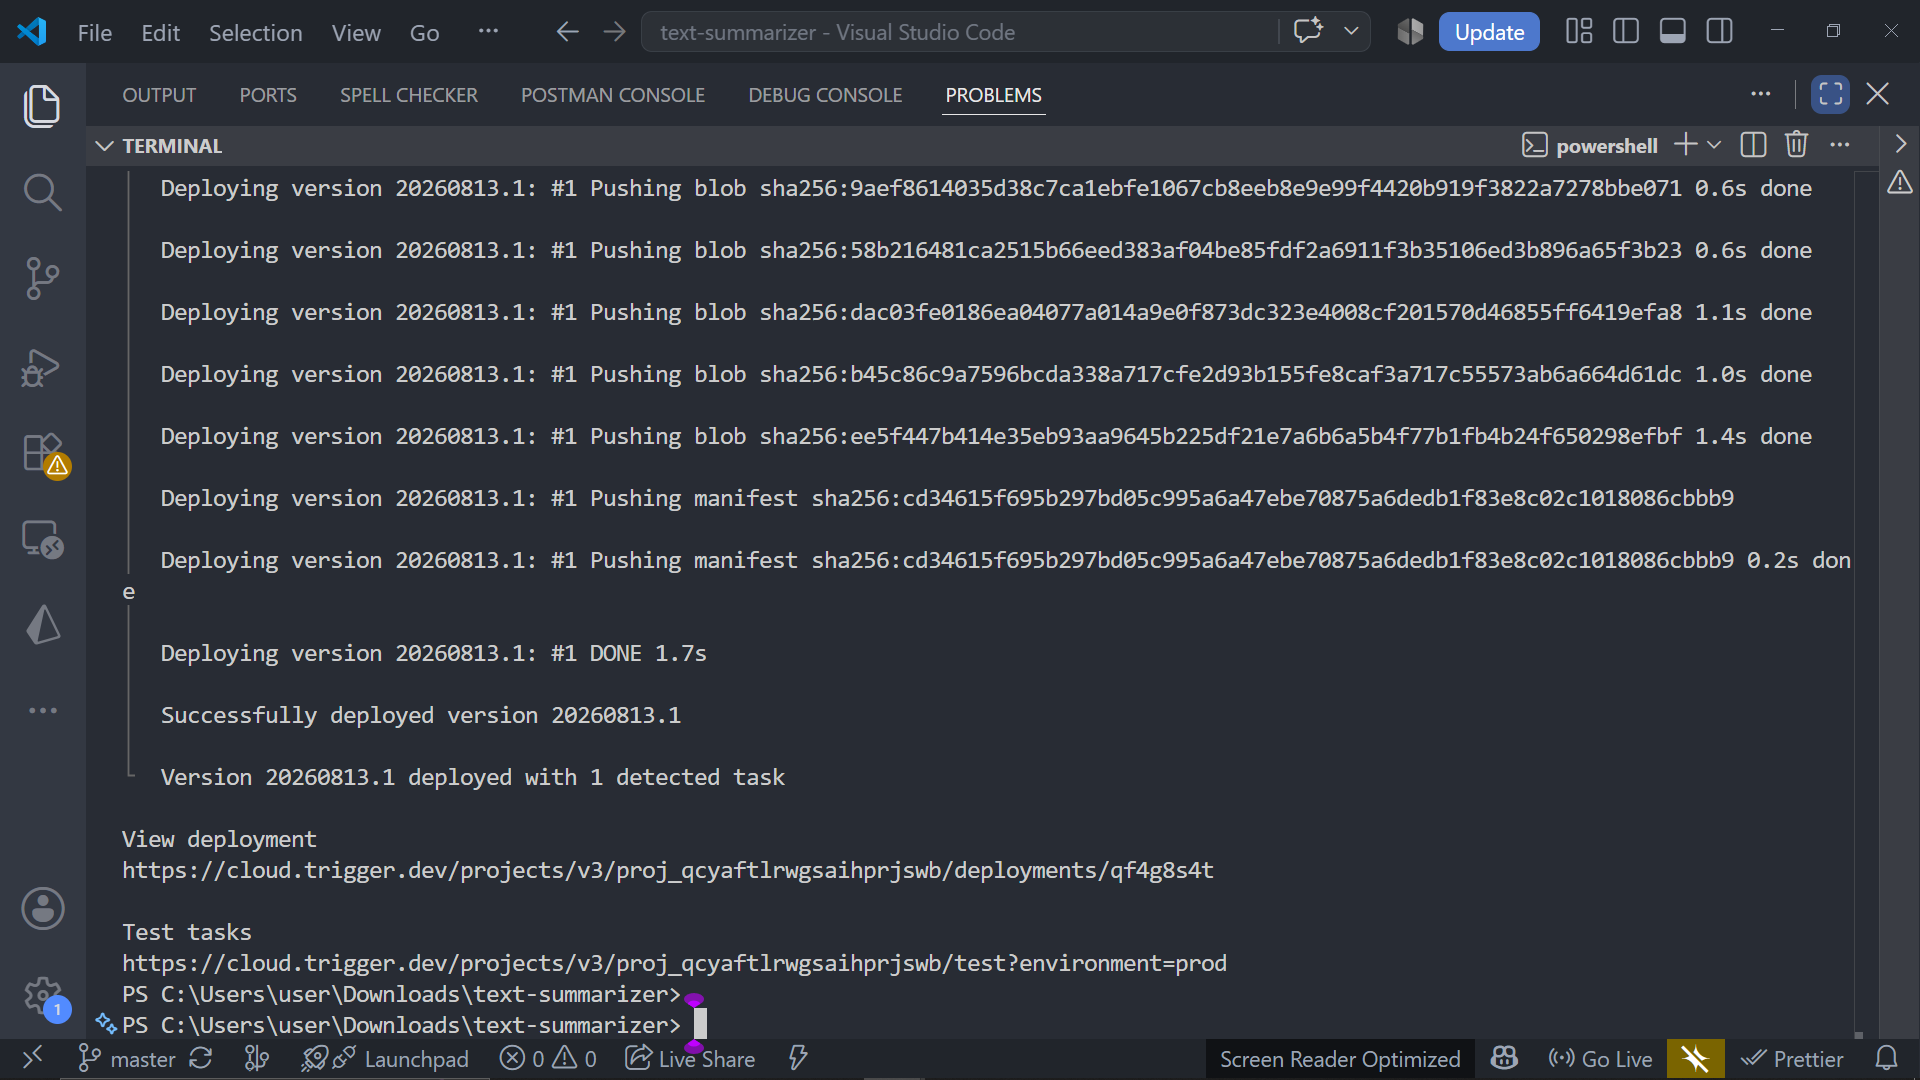
When you’re ready to deploy the background tasks, run:
npx trigger.dev@latest deploy
Trigger.dev packages and deploys the tasks to its cloud runtime.
A successful deployment should look similar to this:
Then configure the production environment.
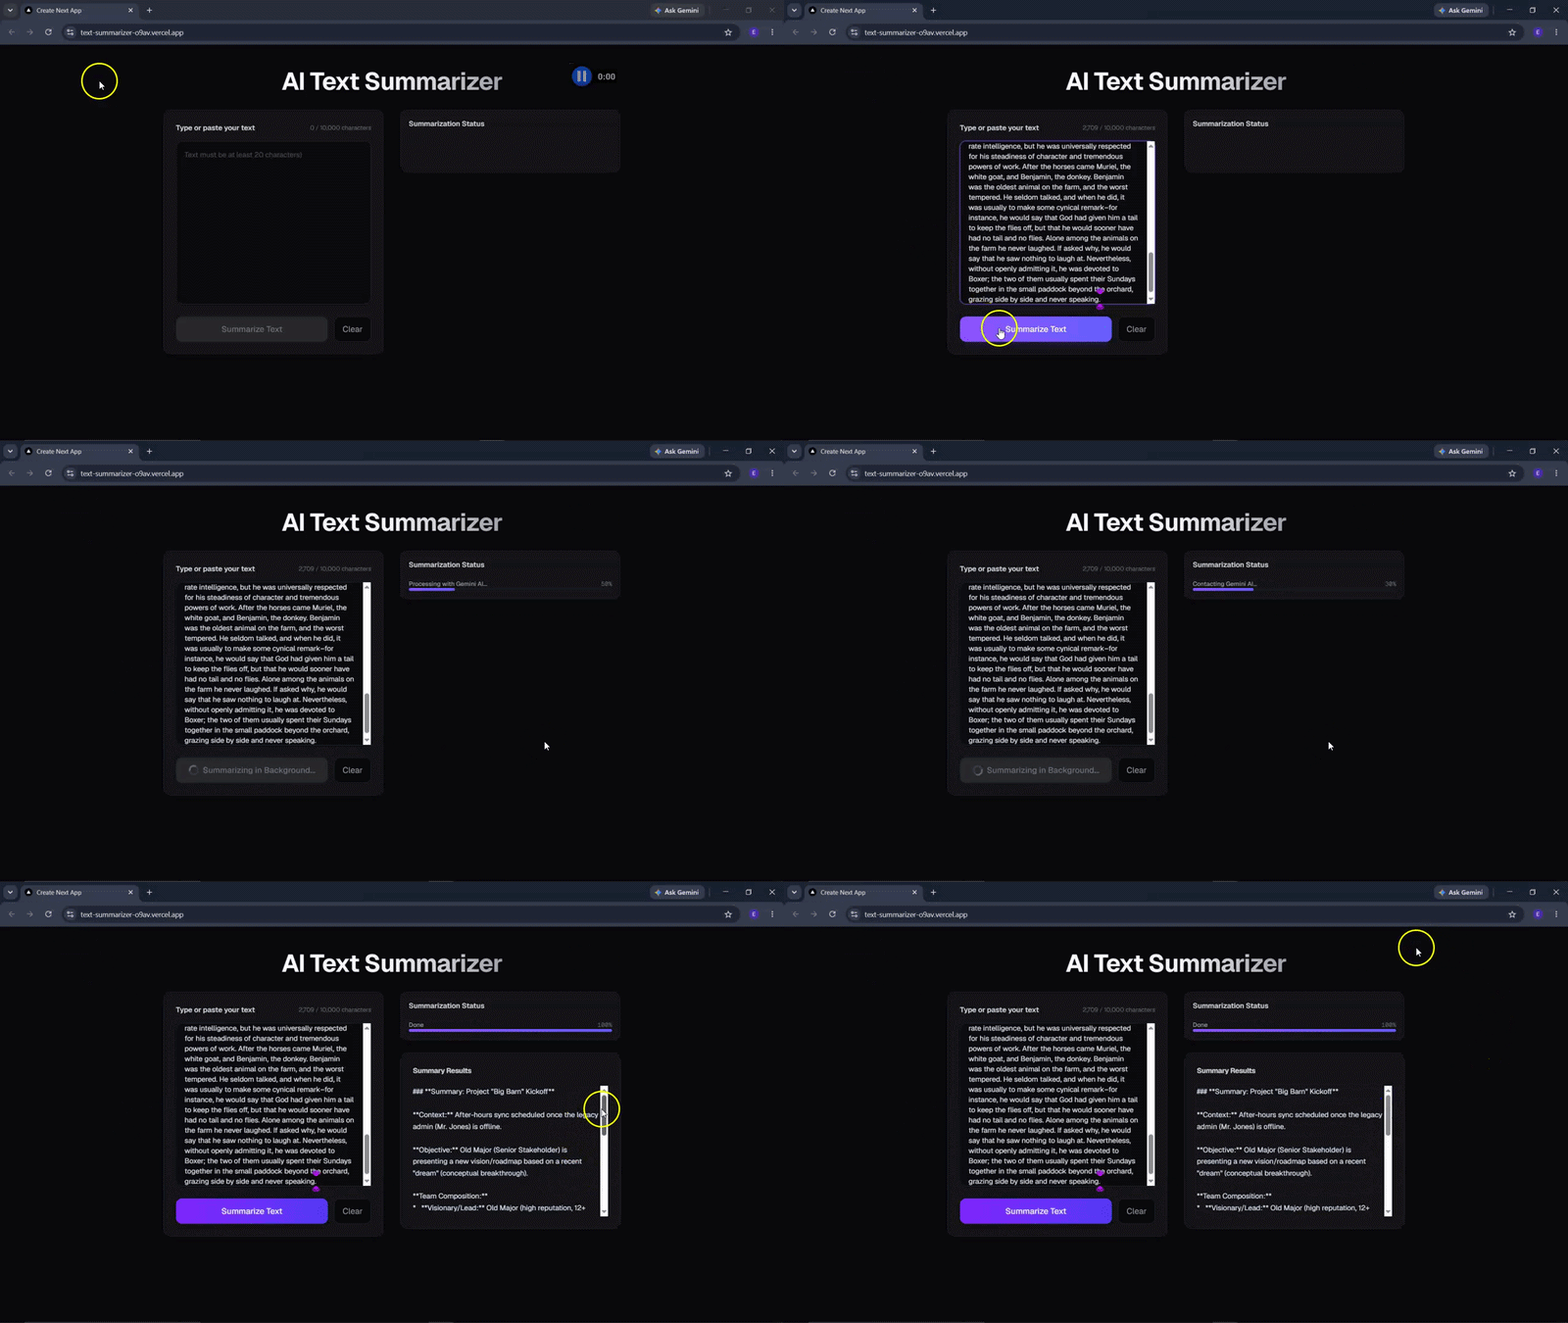
Connect the application repository through the Trigger.dev dashboard and add the required production credentials to your hosting provider. For this demo, the Next.js application is deployed to Vercel, so the Trigger.dev and Gemini keys are configured there as environment variables. If you need to secure your project against supply chain risks, it’s also worth reviewing why npm dependencies can be a bigger security risk than your own code.
The deployed application looks like this:
Runs from the production application now appear in Trigger.dev:
You can try the deployed text summarizer or view the complete project in the GitHub repository.
Moving work to a background runtime introduces another service into the application’s architecture, so not every asynchronous operation needs it.
A simple rule is to keep short, request-bound work in Next.js and move work whose lifecycle should be independent from the user’s request into a background job. The decision mirrors how React Server Components shift work to the server — the goal is keeping expensive operations away from the client request.
| Keep it synchronous | Use a background job |
|---|---|
| Fast database reads and writes | Long-running AI generation |
| Operations that must return immediately | Tasks that may exceed request limits |
| Simple API calls with predictable latency | Calls that need automatic retries |
| Small user-driven mutations | Scheduled or delayed execution |
| Work already handled by an internal queue | Multi-step workflows |
| Webhooks requiring reliable processing | |
| Jobs that need execution history and progress tracking |
Trigger.dev is particularly useful when failures should be retried independently of the original web request or when users need to leave the page without canceling the underlying work. For teams building more complex pipelines, comparing AI agent sandbox platforms can help identify where Trigger.dev fits alongside other execution environments.
In this tutorial, we built a Next.js text summarizer that sends long-running Gemini requests to Trigger.dev instead of tying them to the application’s request lifecycle.
The background task validates its input, tracks progress through metadata, and retries transient failures. A Server Action queues the task and returns a run ID, while useRealtimeRun lets the React client follow the run through completion.
The broader pattern matters more than the summarizer itself. Expensive or failure-prone work doesn’t need to share the lifecycle of the HTTP request that initiated it. Moving that work into a dedicated background runtime gives it its own retry behavior, execution history, logs, and state while keeping the Next.js request short.
You can find the complete example in the project repository.

Learn how to use Google’s LiteRT.js to build a browser-based OCR receipt scanner with WebGPU acceleration and on-device LLM structuring via LiteRT-LM.
Learn how to use the TypeScript Compiler API and AST traversal to extract imports and build a file dependency graph CLI.

Stop generating AI slop with Claude Code. Discover 5 actionable developer tips to manage context windows, enforce rules with hooks, and improve code quality.

Choosing between skills and MCP tools comes down to auditability versus flexibility. By building the exact same capability twice, this guide reveals when your agent needs a deterministic tool and when it needs an interpretive skill.
Would you be interested in joining LogRocket's developer community?
Join LogRocket’s Content Advisory Board. You’ll help inform the type of content we create and get access to exclusive meetups, social accreditation, and swag.
Sign up now


 Learn more →