Editor’s Note: This article was updated on 20 November 2021 to include information on Redux Toolkit.

Firebase is a popular BaaS (backend-as-a-service), which allows web and mobile developers to implement common backend tasks like user authentication, storage, and creating databases.
Redux, on the other hand, is a predictable state container for JavaScript applications and is used to manage application state more efficiently. It is popularly used with React, a component-based UI library.
react-redux-firebase is a library that provides Redux bindings for Firebase, thereby making it easier to use Firebase with Redux and React. It also comes with some Hooks to make it easier to implement some Firebase functionality.
In this article, we will learn how to use react-redux-firebase to build a simple to-do app with Firebase’s Cloud Firestore, and we’ll add user authentication while we’re at it.
Note: Redux now recommends using Redux Toolkit for new projects. For your ease, we’ll add an RTK alternative wherever necessary.



There are some things you need to know beforehand for you to follow along with this article:
Firstly, create a new React project:
npx create-react-app overcomplicated-todo-app
Now, install the following dependencies:
Run these commands in your terminal to install these dependencies:
npm install --save react-redux-firebase firebase
npm install --save redux react-redux
npm install --save redux-firestore@latest
npm install react-router-dom
Once the dependencies have been installed, we need to set up Firebase.
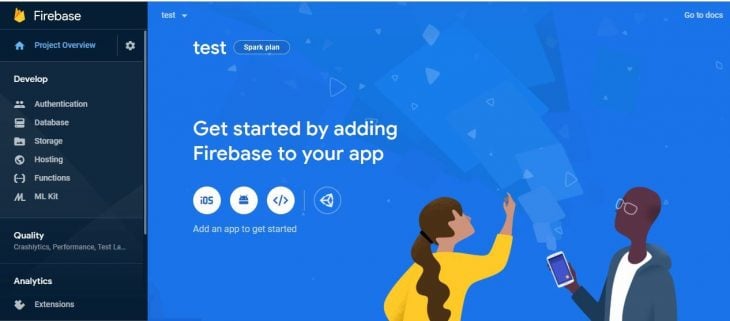
Go to the Firebase website and click on Get started. You will be taken to a page where you can create a new project. Once you are done, you should be taken to a dashboard page similar to the image below.
We will be using two Firebase services for this project: the authentication service and the Cloud Firestore service. Let’s set up Cloud Firestore first.
Select the Database option from the side menu. You should be able to choose either of the two database services that Firebase provides: Cloud Firestore or the Realtime Database. In this article, we will use Cloud Firestore.

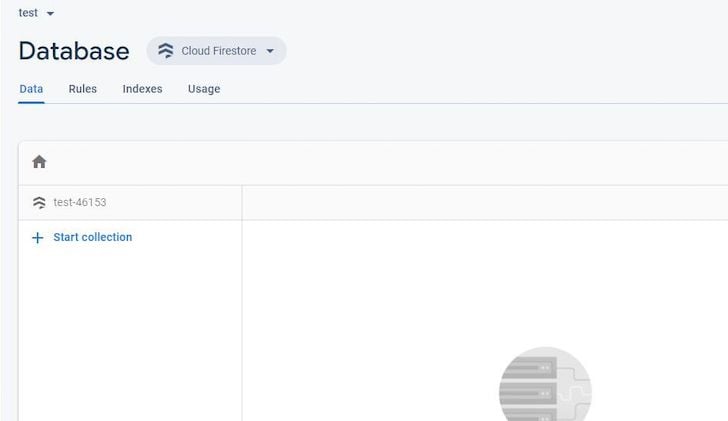
Now create a Cloud Firestore database. You should see a modal for setting the security rules of your database. Choose Start in test mode. You should have an empty database ready for use. It should look like this:
Now that we have our database ready, let’s set up authentication. From the side menu, select the Authentication option. Now, select the Sign-in method tab. You should have something like this:
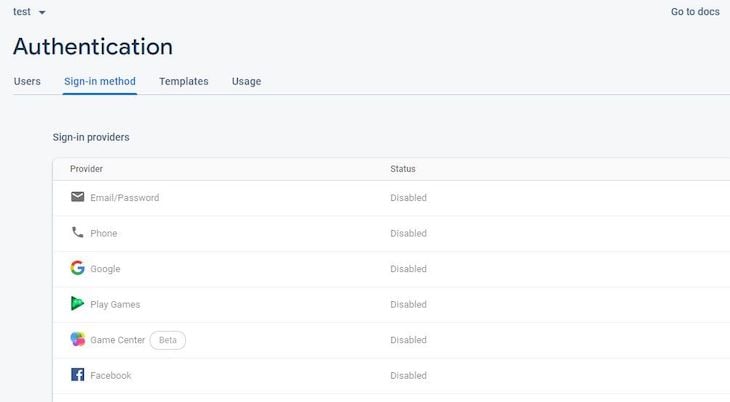
Here, you can set up authentication for different providers, including Google, Facebook, and GitHub. In our app, we want to enable Google authentication and email/password authentication. Let’s set up Google authentication first, so click on the Google option.
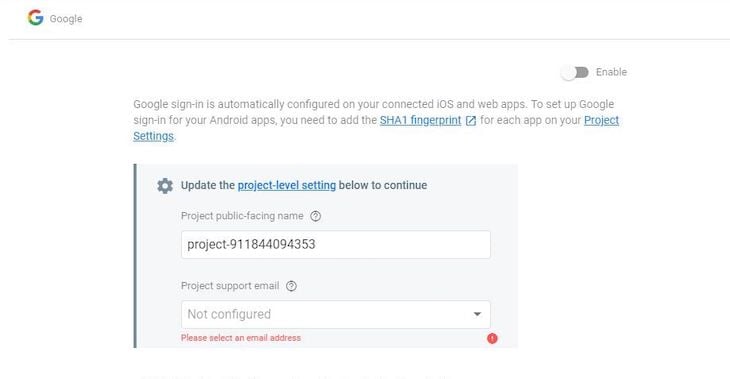
You can now enable Google authentication by toggling the button on the upper right-hand side. You also need to provide a project support email.
Now that Cloud Firestore and authentication have been set up, we need to get our project’s configuration details. We need this to link our code to our Firebase project.
To get our Firebase configuration details, go back to the project overview page and add a web app to the Firebase project. After registering the app, you should get the configuration details in the form of a JavaScript object:
const firebaseConfig = {
  apiKey: 'AIzaXXXXXXXXXXXXXXXXXXXXXXX',
  authDomain: 'test-XXXX.firebaseapp.com',
  databaseURL: 'https://test-XXXXXX.firebaseio.com',
  projectId: 'test-XXXX',
  storageBucket: 'test-XXXX.appspot.com',
  messagingSenderId: 'XXXXXXX',
  appId: "XXXXXXXXXXXXXXXXXXXXXXXXXXXXXXXXXXXX"
};
Now open your index.js file and initialize your Firebase project there. We also need to initialize Firestore:
import firebase from "firebase/app";
import "firebase/auth";
import "firebase/firestore";

const firebaseConfig = {
  ...firebaseConfigurationDetails
};

firebase.initializeApp(firebaseConfig);
firebase.firestore();
Note that if you are creating a product that will depend on Firebase, it’s generally more secure to store your Firebase configuration details as environment variables.
Now it’s time to code. This is the project structure:
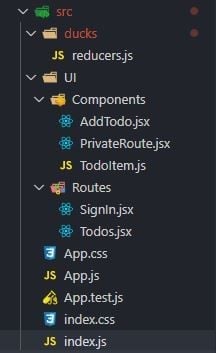
You can choose to structure your project however you like, but this is what works for me.
As you can see, we have a file for our reducers called reducers.js. This is where we will combine our reducers into one and export it as the root reducer for our Redux store.
For our project to work, we need two more reducers besides those we create ourselves (in this case, none). These are firebaseReducer from react-redux-firebase and firestoreReducer from redux-firestore. If you’re using the same project structure as I am, your reducers.js should look like this:
import {combineReducers} from "redux";
import {firebaseReducer} from "react-redux-firebase";
import {firestoreReducer} from "redux-firestore";
export const rootReducer = combineReducers({
    firebase: firebaseReducer,
    firestore: firestoreReducer
});
For projects using Redux Toolkit, we’ll create a store.js file in src/ directory that will look like the following:
import { configureStore } from '@reduxjs/toolkit'
import {actionTypes, firebaseReducer} from "react-redux-firebase";
import {firestoreReducer} from "redux-firestore";

export const store = configureStore({
  reducer: {
    firebaseReducer,
    firestoreReducer,
  },
  middleware: (getDefaultMiddleware) => getDefaultMiddleware({
    serializableCheck: {
        ignoredActions: [actionTypes.LOGIN, actionTypes.AUTH_LINK_ERROR]
    }
  }),
})
Now, open the index.js file so we can fully set up react-redux-firebase. First, let’s write out our configuration for react-redux-firebase (RRF). For that, we will create an object called rrfConfig. RRF stores authenticated users’ data in either Cloud Firestore or in Firebase’s Realtime Database, whichever you choose to use.
In rrfConfig, we can decide the name of the collection or object literal in which to store this data. Let’s call our collection users.
Also, because we want to use Cloud Firestore to store the users’ data, we have to set the useFirestoreForProfile property to true. Our rrfConfig should now look like this:
const rrfConfig = {
  userProfile: "users",
  useFirestoreForProfile: true,
};
As is common with apps using Redux, we have to create a Redux store to hold our app state. This store takes the root reducer and the initial state as arguments. Now, we have to import the Provider component, the ReactReduxFirebaseProvider component and the BrowserRouter component from react-redux, react-redux-firebase, and react-router-dom, respectively.
These components will wrap the App component. We now have to define the props for ReactReduxFirebaseProvider, which we will write as an object and spread out appropriately later. Our index.js file should now look like this:
import React from "react";
import ReactDOM from "react-dom";
import firebase from "firebase/app";
import "firebase/auth";
import "firebase/firestore";
import { createStore } from "redux";
import { Provider } from "react-redux";
import { ReactReduxFirebaseProvider } from "react-redux-firebase";
import { createFirestoreInstance } from "redux-firestore";
import { rootReducer } from "./ducks/reducers";
import App from "./App";
import { BrowserRouter } from "react-router-dom";

const firebaseConfig = {
  ...firebaseConfigurationDetails
};

const rrfConfig = {
  userProfile: "users",
  useFirestoreForProfile: true,
};

firebase.initializeApp(firebaseConfig);
firebase.firestore();

const initialState = {};
const store = createStore(rootReducer, initialState);

const rrfProps = {
  firebase,
  config: rrfConfig,
  dispatch: store.dispatch,
  createFirestoreInstance, //since we are using Firestore
};

ReactDOM.render(
  <React.StrictMode>
    <Provider store={store}>
      <ReactReduxFirebaseProvider {...rrfProps}>
        <BrowserRouter>
          <App />
        </BrowserRouter>
      </ReactReduxFirebaseProvider>
    </Provider>
  </React.StrictMode>,
  document.getElementById("root")
);
Now that we’ve set up RRF, I would like to list the various components and routes and define their functions.
AddTodo component allows a user to add a new to-do itemPrivateRoute component prevents its child components from being accessed by unauthenticated usersTodoItem component defines the appearance and functionality of each to-do itemSignIn route allows the user to sign in with GoogleTodos route displays the list of to-do items for the authenticated userSignIn routeAs we discussed above, this is where the user will sign in using Google. We will use the useFirebase Hook, which RRF provides a firebase object. With this, we can implement some basic Firebase functionality, such as pushing to a database and logging in with a different auth providers.
We will use the login method of this object to implement the Google sign-in functionality. This method will take, as an argument, an object in which the provider and method of signing in will be defined.
We will use the useHistory Hook from react-router to programmatically navigate to the todos route after the user has been logged in. Your SignIn component should be very similar to this:
import React from "react";
import { useFirebase } from "react-redux-firebase";
import { useHistory } from "react-router-dom";
const SignIn = () => {
  const firebase = useFirebase();
  const history = useHistory();

  const signInWithGoogle = () => {
    firebase
      .login({
        provider: "google",
        type: "popup",
      })
      .then(() => {
        history.push("/todos");
      });
  };
  return (
    <div>
      <h1>Sign In</h1>
      <button
        onClick={(event) => {
          event.preventDefault();
          signInWithGoogle();
        }}
      >
        Sign In with Google
      </button>
    </div>
  );
};
export default SignIn;
PrivateRoute componentThis route will only render its component when a user has authenticated, so we need a way to determine whether a user has signed in. RRF has two functions we can use for this: isLoaded and isEmpty.
isLoaded checks whether the auth has been loaded, and we can use isEmpty to check whether the auth is empty. PrivateRoute will render a route component, which will in turn render its children if the user has signed in, and a redirect component from react-router if not.
Here’s what PrivateRoute should look like:
import React from "react";
import { Route, Redirect } from "react-router-dom";
import { isLoaded, isEmpty } from "react-redux-firebase";
import { useSelector } from "react-redux";
const PrivateRoute = ({ children, ...remainingProps }) => {
  const auth = useSelector(state => state.firebase.auth);
  return (
    <Route
      {...remainingProps}
      render={({ location }) =>
        isLoaded(auth) && !isEmpty(auth) ? (
          children
        ) : (
          <Redirect
            to={{
              pathname: "/",
              state: { from: location },
            }}
          />
        )
      }
    />
  );
};
export default PrivateRoute;
Notice that we used react-redux’s useSelector Hook to get the auth object. A selector is merely a function that takes in Redux state as an argument and returns data derived from that state.
AddTodo componentBecause RRF creates a document for each authenticated user in a users collection, we will create another collection called todos inside each user document. There, each to-do item can be stored as a document with its own unique ID.
If you’re unfamiliar with how documents, collections, etc., work in Firestore, you can check out the Firebase docs. We will use another RRF Hook called useFirestore, which returns a firestore object we can use to perform Firestore operations.
Each to-do item will contain three properties:
isDone: to indicate whether or not the to-do task has been accomplishedtitle: the title of the to-do itemtodoID: a unique ID used to identify each to-do itemSo, after a new to-do item has been added, we will grab the ID assigned by Firebase to that item’s document and set it as the value for the to-do item’s todoID property. Here’s what AddTodo should look like:
import React, { useState } from "react";
import { useFirestore } from "react-redux-firebase";
import { useSelector } from "react-redux";
const AddTodo = () => {
  const [presentToDo, setPresentToDo] = useState("");
  const firestore = useFirestore();
  const { uid } = useSelector((state) => state.firebase.auth);
  const handleChange = ({ currentTarget: { name, value } }) => {
    if (name === "addTodo") {
      setPresentToDo(value);
    }
  };
  const addNewTodo = (todo) => {
    firestore
      .collection("users")
      .doc(uid)
      .collection("todos")
      .add({
        title: todo,
        isDone: false,
      })
      .then((docRef) => {
        docRef.update({
          todoID: docRef.id,
        });
      });
    setPresentToDo("");
  };
  return (
    <div>
      <form action="">
        <input
          type="text"
          name="addTodo"
          value={presentToDo}
          onChange={handleChange}
        />
        <button
          onClick={(event) => {
            event.preventDefault();
            addNewTodo(presentToDo);
          }}
        >
          Add Todo
        </button>
      </form>
    </div>
  );
};
export default AddTodo;
TodoItem componentThe TodoItem component consists of the to-do item’s title and a checkbox to indicate whether the to-do item task has been accomplished. When a user checks the checkbox, the todoItem is updated in Cloud Firestore. Your TodoItem component should look like this:
import React, { useState } from "react";
import { useFirestore } from "react-redux-firebase";
import { useSelector } from "react-redux";
const ToDoItem = ({ isDone, title, todoID }) => {
  const [isTodoItemDone, setTodoItemDone] = useState(isDone);
    const firestore = useFirestore();
    const {uid} = useSelector(state => state.firebase.auth);
  console.log(isTodoItemDone);
  const handleChange = (event) => {
    if (event.currentTarget.type === "checkbox") {
      setTodoItemDone(!isTodoItemDone);
      firestore.collection("users").doc(uid).collection("todos").doc(todoID).update({
          isDone: !isTodoItemDone
      })
    }
  };
  return (
    <div style={{
        textDecoration: isTodoItemDone && "line-through",
        opacity: isTodoItemDone ? 0.5 : 1,

    }}>
      <input
        type="checkbox"
        name=""
        id=""
        onChange={handleChange}
        checked={isTodoItemDone}
      />
      {title}
    </div>
  );
};
export default ToDoItem;
Todos routeThe Todos route displays the user’s name and a list of all the to-do items. To get all the to-do items, we will use a Hook called useFirestoreConnect, which takes an object as an argument, listens/unlistens to the provided Cloud Firestore path, and makes the data available in our Redux state. We can then access this data from the Redux state with the useSelector Hook.
Because we are listening to a subcollection, we have to use the storeAs property of the object we are passing to our useFirestoreConnect Hook.
The object will then have a collection property where the value is the path of the collection we are listening for. The Todos route will also contain the AddTodo component. Below is the code for the Todos route:
import React from "react";
import { useSelector } from "react-redux";
import AddTodo from "../Components/AddTodo";
import { useFirestoreConnect } from "react-redux-firebase";
import ToDoItem from "../Components/TodoItem";
const Todos = () => {
  const { displayName, uid } = useSelector((state) => state.firebase.auth);
  useFirestoreConnect({
    collection: `users/${uid}/todos`,
    storeAs: "todos",
  });
  const todos = useSelector((state) => state.firestore.data.todos);
  console.log(todos);
  return (
    <div>
      <h3>Hello {displayName}</h3>
      <h4>Todos</h4>
      <AddTodo />
      <ul
        style={{
          listStyleType: "none",
        }}
      >
        {todos &&
          Object.values(todos).map((todo) => (
            <li>
              <ToDoItem
                title={todo.title}
                isDone={todo.isDone}
                todoID={todo.todoID}
              />
            </li>
          ))}
      </ul>
    </div>
  );
};
export default Todos;
Now we can piece all the components and routes together in our App.js file:
import React from 'react';
import PrivateRoute from "./UI/Components/PrivateRoute";
import Todos from "./UI/Routes/Todos";
import SignIn from "./UI/Routes/SignIn";
import {Switch, Route} from "react-router-dom";
function App() {
  return (
    <div style = {{
      textAlign: "center"
    }}>
      <h1>Redux Todo App</h1>
      <Switch>
        <PrivateRoute path = "/todos">
          <Todos />
        </PrivateRoute>
        <Route path = "/">
        <SignIn />
        </Route>
      </Switch>

    </div>
  );
}
export default App;
With that, we’re done! Users should be able to log in to add to-do items and check those to-do items once they have accomplished the task.
Note that in an actual app, you should set security rules to further ensure that users’ data are secure. If you would like to explore this library more, you can check out the documentation. You can find the repository for this project here, the Redux Toolkit fork here, and the live project here.
Install LogRocket via npm or script tag. LogRocket.init() must be called client-side, not
server-side
$ npm i --save logrocket

// Code:

import LogRocket from 'logrocket';
LogRocket.init('app/id');
// Add to your HTML:

<script src="https://cdn.lr-ingest.com/LogRocket.min.js"></script>
<script>window.LogRocket && window.LogRocket.init('app/id');</script>
Can AI refactor legacy CSS without breaking your layout? We benchmarked 5 top AI assistants across cascade order, specificity ties, and stacking traps.

Learn how to offload long-running Gemini AI requests to Trigger.dev background jobs in Next.js using Server Actions and real-time React hooks.

Learn how to use Google’s LiteRT.js to build a browser-based OCR receipt scanner with WebGPU acceleration and on-device LLM structuring via LiteRT-LM.
Learn how to use the TypeScript Compiler API and AST traversal to extract imports and build a file dependency graph CLI.
Would you be interested in joining LogRocket's developer community?
Join LogRocket’s Content Advisory Board. You’ll help inform the type of content we create and get access to exclusive meetups, social accreditation, and swag.
Sign up now


 Learn more →