

The @ModelAttribute annotation in Spring MVC is used to bind request parameters to a Java object and automatically add that object to the model. It simplifies form handling by eliminating the need to manually create objects and add them to the Model.
- Binds form data directly to a Java object.
- Automatically adds the object to the Spring MVC model.
- Commonly used for form handling and two-way data binding.
Syntax
@RequestMapping("/home")
public String showHomePage(
@ModelAttribute("student") Student student) {
return "home";
}
Steps to implements @ModelAttribute Annotation In Spring Mvc
Step 1: Create a Maven Web Project
- Open STS IDE.
- Click File - New - Maven Project.
- Select Create a simple project (Select archetype ) and click Next.

Then Enter the following details:
- Group Id: com.gfg
- Artifact Id: simple-calculator.geeksforgeeks.org
- Packaging: war
Click Finish.
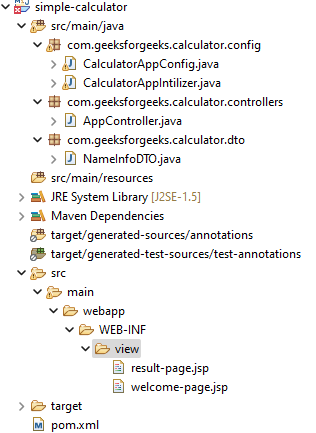
Below is the final project structure of the Spring MVC project after creating *.java and *.jsp files also.
Step 2: Add Required Dependencies
Add the following maven dependencies and plugin to your pom.xml file.
<project xmlns="https://maven.apache.org/POM/4.0.0"
    xmlns:xsi="https://www.w3.org/2001/XMLSchema-instance"
    xsi:schemaLocation="https://maven.apache.org/POM/4.0.0 https://maven.apache.org/xsd/maven-4.0.0.xsd">
    <modelVersion>4.0.0</modelVersion>
    <groupId>com.geeksforgeeks</groupId>
    <artifactId>simple-calculator</artifactId>
    <packaging>war</packaging>
    <version>0.0.1-SNAPSHOT</version>
    <name>simple-calculator Maven Webapp</name>
    <url>http://maven.apache.org</url>

    <dependencies>
        <dependency>
            <groupId>junit</groupId>
            <artifactId>junit</artifactId>
            <version>3.8.1</version>
            <scope>test</scope>
        </dependency>

        <!-- https://mvnrepository.com/artifact/org.springframework/spring-webmvc -->
        <dependency>
            <groupId>org.springframework</groupId>
            <artifactId>spring-webmvc</artifactId>
            <version>5.3.18</version>
        </dependency>

        <!-- https://mvnrepository.com/artifact/javax.servlet/javax.servlet-api -->
        <dependency>
            <groupId>javax.servlet</groupId>
            <artifactId>javax.servlet-api</artifactId>
            <version>4.0.1</version>
            <scope>provided</scope>
        </dependency>
    </dependencies>

    <build>
        <finalName>simple-calculator</finalName>
        <plugins>
            <plugin>
                <groupId>org.apache.maven.plugins</groupId>
                <artifactId>maven-war-plugin</artifactId>
                <version>2.6</version>
                <configuration>
                    <failOnMissingWebXml>false</failOnMissingWebXml>
                </configuration>
            </plugin>
        </plugins>
    </build>
</project>
Step 3: Configure DispatcherServlet(CalculatorAppIntilizer.java)
Create a class that extends AbstractAnnotationConfigDispatcherServletInitializer. This class replaces the traditional web.xml file and registers the Spring DispatcherServlet.
package com.geeksforgeeks.calculator.config;

import org.springframework.web.servlet.support.AbstractAnnotationConfigDispatcherServletInitializer;

public class CalculatorAppIntilizer extends AbstractAnnotationConfigDispatcherServletInitializer {

    @Override
    protected Class<?>[] getRootConfigClasses() {
        // TODO Auto-generated method stub
        return null;
    }

    // Registering the Spring config file
    @Override
    protected Class<?>[] getServletConfigClasses() {
        Class aClass[] = { CalculatorAppConfig.class };
        return aClass;
    }

    // Add mapping url
    @Override
    protected String[] getServletMappings() {
        String arr[] = { "/geeksforgeeks.org/*" };
        return arr;
    }

}
Step 4: Create Spring Configuration (CalculatorAppConfig.java)
Create the Spring configuration class to enable Spring MVC and scan the controller package for Spring-managed components.
@Configuration
@EnableWebMvc
@ComponentScan(basePackages = "com.geeksforgeeks.calculator.controllers")
public class CalculatorAppConfig {

}
Step 5: Configure ViewResolver(Updated CalculatorAppConfig.java)
Add a ViewResolver bean to map logical view names returned by controllers to JSP files stored inside the WEB-INF/view directory.
package com.geeksforgeeks.calculator.config;

import org.springframework.context.annotation.Bean;
import org.springframework.context.annotation.ComponentScan;
import org.springframework.context.annotation.Configuration;
import org.springframework.web.servlet.ViewResolver;
import org.springframework.web.servlet.config.annotation.EnableWebMvc;
import org.springframework.web.servlet.view.InternalResourceViewResolver;

@EnableWebMvc
@Configuration
@ComponentScan(basePackages = "com.geeksforgeeks.calculator.controllers")
public class CalculatorAppConfig {

    // setup ViewResolver
    @Bean
    public InternalResourceViewResolver viewResolver() {
        InternalResourceViewResolver viewResolver = new InternalResourceViewResolver();
        viewResolver.setPrefix("/WEB-INF/view/");
        viewResolver.setSuffix(".jsp");
        return viewResolver;
    }

}
Step 6: Create the DTO Class(NameInfoDTO.java)
Create a DTO class to store the form data. Spring automatically binds the submitted values to this object using the @ModelAttribute annotation.
package com.geeksforgeeks.calculator.dto;

public class NameInfoDTO {

    // Provided some static values
    // inside the variable
    // And we are going to read these values
    private String firstName = "Anshul";
    private String lastName = "Aggarwal";

    public String getFirstName() {
        return firstName;
    }

    public void setFirstName(String firstName) {
        this.firstName = firstName;
    }

    public String getLastName() {
        return lastName;
    }

    public void setLastName(String lastName) {
        this.lastName = lastName;
    }

    @Override
    public String toString() {
        return "NameInfoDTO [firstName=" + firstName + ", lastName=" + lastName + "]";
    }

}
Step 7: Create the Controller(AppController.java)
Create a controller to handle incoming requests. The @ModelAttribute annotation automatically creates the DTO object, binds request parameters, and adds it to the model.
package com.geeksforgeeks.calculator.controllers;

import org.springframework.stereotype.Controller;
import org.springframework.web.bind.annotation.ModelAttribute;
import org.springframework.web.bind.annotation.RequestMapping;

import com.geeksforgeeks.calculator.dto.NameInfoDTO;

@Controller
public class AppController {

    @RequestMapping("/home")
    public String showHomePage(
            @ModelAttribute("nameInfo") NameInfoDTO nameInfoDTO) {

        return "welcome-page";
    }

    @RequestMapping("/process-homepage")
    public String showResultPage(
            @ModelAttribute("nameInfo") NameInfoDTO nameInfoDTO) {

        return "result-page";
    }
}
Step 8: Create the JSP Form(welcome-page.jsp)
Create a JSP page containing a Spring form. The modelAttribute attribute connects the form with the NameInfoDTO object.
<%@ taglib prefix="form" uri="http://www.springframework.org/tags/form"%>

<html>
<head>
</head>
<body>

    <hr />

    <form:form action="process-homepage" method="get" modelAttribute="nameInfo">

        <div align="center">

<p>
                <label for="name1">Enter First Name : </label>
                <form:input id="name1" path="firstName" />
            </p>


<p>
                <label for="name2">Enter Last Name : </label>
                <form:input id="name2" path="lastName" />
            </p>


            <input type="submit" value="Bind Data" />

        </div>

    </form:form>
</body>
</html>
Step 9: Create Result Page(result-page.jsp)
Create another JSP page to display the values entered by the user after the form is submitted.
<html>
<head>
</head>
<body>
    <hr />

<p>First Name is: ${nameInfo.firstName}</p>


<p>Last Name is: ${nameInfo.lastName}</p>

</body>
</html>
Step 10: Run the Application
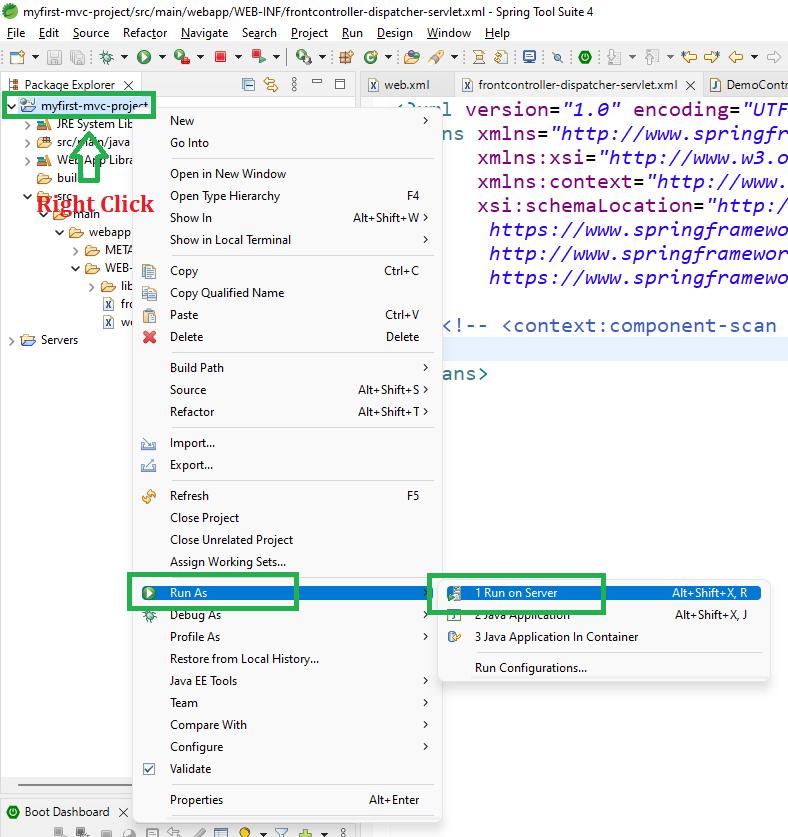
To run our Spring MVC Application right-click on your project > Run As > Run on Server. And run your application as shown in the below image as depicted below as follows:
After that use the following URL to run your controller
http://localhost:8080/simple-calculator/geeksforgeeks.org/homeOutput:

When you open the application, the default values are displayed because Spring automatically binds the DTO object to the form. After entering new values (for example, Amiya and Rout) and clicking Bind Data, the following URL is generated.
http://localhost:8080/simple-calculator/geeksforgeeks.org/process-homepage?firstName=Amiya&lastName=Rout
The submitted values are then displayed on the result page.

