

Traditionally, Spring MVC applications use the web.xml deployment descriptor to configure the DispatcherServlet. Since Servlet 3.0, Java-based configuration has become the recommended approach, allowing applications to be configured entirely in Java without requiring a web.xml file.
- Eliminates the need for the web.xml deployment descriptor.
- Configures DispatcherServlet using Java.
- Supports Servlet 3.0+ annotation-based initialization.
Using Java configuration reduces XML configuration, improves readability, and makes Spring MVC applications easier to maintain.
Why We Remove web.xml?
| With web.xml | Without web.xml |
|---|---|
| XML-based configuration | Java-based configuration |
| More XML code | Less XML configuration |
| Manual servlet registration | Automatic Java configuration |
| Harder to maintain | Easier to maintain |
Prerequisites
Steps to Create Spring MVC Application Without web.xml
Follow these steps below to implements Spring Mvc without web.xml
Step 1: Create a Maven Project
- Open STS IDE / ECLIPSE IDE
- Click File -> New -> Maven Project.

Select Create a simple project (Select archetype ) and click Next.
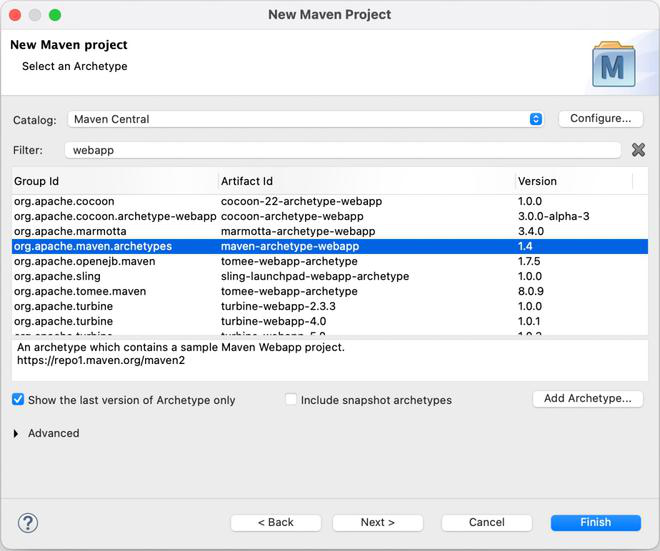
Then Enter the following details:
- Group Id: com.gfg
- Artifact Id: SpringMVC
- Packaging: war
Click Finish.

Step 2: Add Required Dependencies
Add the following maven dependencies and plugin to your pom.xml file.
<project xmlns="https://maven.apache.org/POM/4.0.0"
    xmlns:xsi="https://www.w3.org/2001/XMLSchema-instance"
    xsi:schemaLocation="https://maven.apache.org/POM/4.0.0 https://maven.apache.org/xsd/maven-4.0.0.xsd">
    <modelVersion>4.0.0</modelVersion>
    <groupId>com.geeksforgeeks</groupId>
    <artifactId>spring-calculator</artifactId>
    <packaging>war</packaging>
    <version>0.0.1-SNAPSHOT</version>
    <name>spring-calculator Maven Webapp</name>
    <url>http://maven.apache.org</url>
    <dependencies>
        <dependency>
            <groupId>junit</groupId>
            <artifactId>junit</artifactId>
            <version>3.8.1</version>
            <scope>test</scope>
        </dependency>
        <!-- https://mvnrepository.com/artifact/org.springframework/spring-webmvc -->
        <dependency>
            <groupId>org.springframework</groupId>
            <artifactId>spring-webmvc</artifactId>
            <version>5.3.18</version>
        </dependency>
        <!-- https://mvnrepository.com/artifact/javax.servlet/javax.servlet-api -->
        <dependency>
            <groupId>javax.servlet</groupId>
            <artifactId>javax.servlet-api</artifactId>
            <version>4.0.1</version>
            <scope>provided</scope>
        </dependency>
    </dependencies>
    <build>
        <finalName>spring-calculator</finalName>
        <plugins>
        <plugin>
            <groupId>org.apache.maven.plugins</groupId>
            <artifactId>maven-war-plugin</artifactId>
            <version>2.6</version>
            <configuration>
                <failOnMissingWebXml>false</failOnMissingWebXml>
            </configuration>
        </plugin>
    </plugins>
    </build>
</project>
Below is the complete code for the pom.xml file after adding these dependencies.

Step 3: Create Spring Configuration File (application-config.xml)
This file stores the Spring bean configuration and component scanning configuration.
<?xml version="1.0" encoding="UTF-8"?>
<beans xmlns="http://www.springframework.org/schema/beans/"
    xmlns:xsi="https://www.w3.org/2001/XMLSchema-instance"
    xmlns:context="http://www.springframework.org/schema/context/"
    xsi:schemaLocation="http://www.springframework.org/schema/beans/
        https://www.springframework.org/schema/beans/spring-beans.xsd
        http://www.springframework.org/schema/context/
        https://www.springframework.org/schema/context/spring-context.xsd">

</beans>
Step 4: Create Java Configuration Class
This class replaces web.xml. It creates the Spring application context, registers the DispatcherServlet, and maps incoming requests.
// Java Program to Illustrate
// CalculatorApplicationInitializer Class

package com.geeksforgeeks.calculator.config;

// Importing required classes
import javax.servlet.ServletContext;
import javax.servlet.ServletException;
import javax.servlet.ServletRegistration;
import org.springframework.web.WebApplicationInitializer;
import org.springframework.web.context.support.XmlWebApplicationContext;
import org.springframework.web.servlet.DispatcherServlet;

// Class
public class CalculatorApplicationInitializer
    implements WebApplicationInitializer {

    public void onStartup(ServletContext servletContext)
        throws ServletException
    {

        XmlWebApplicationContext webApplicationContext
            = new XmlWebApplicationContext();
        webApplicationContext.setConfigLocation(
            "classpath:application-config.xml");

        // Creating a dispatcher servlet object
        DispatcherServlet dispatcherServlet
            = new DispatcherServlet(webApplicationContext);

        // Registering Dispatcher Servlet with Servlet
        // Context
        ServletRegistration
            .Dynamic myCustomDispatcherServlet
            = servletContext.addServlet(
                "myDispatcherServlet", dispatcherServlet);

        // Setting load on startup
        myCustomDispatcherServlet.setLoadOnStartup(1);

        // Adding mapping url
        myCustomDispatcherServlet.addMapping("/gfg.com/*");
    }
}
Step 5: Create Controller
This controller handles the incoming /welcome request and returns a simple response.
// Java Program to Illustrate GfgController Class

package com.geeksforgeeks.calculator.controllers;

// Importing required classes
import org.springframework.stereotype.Controller;
import org.springframework.web.bind.annotation.RequestMapping;
import org.springframework.web.bind.annotation.ResponseBody;

// Class
@Controller
public class GfgController {

    @RequestMapping("/welcome")
    @ResponseBody

    // Method
    public String helloGfg()
    {
        return "Welcome to GeeksforGeeks!";
    }
}
Step 6: Enable Component Scanning
Before running the application add the below lines to the application-config.xml file.
<?xml version="1.0" encoding="UTF-8"?>
<beans xmlns="http://www.springframework.org/schema/beans/"
    xmlns:xsi="https://www.w3.org/2001/XMLSchema-instance"
    xmlns:context="http://www.springframework.org/schema/context/"
    xsi:schemaLocation="http://www.springframework.org/schema/beans/
        https://www.springframework.org/schema/beans/spring-beans.xsd
        http://www.springframework.org/schema/context/
        https://www.springframework.org/schema/context/spring-context.xsd">

  <context:component-scan base-package="com.geeksforgeeks.calculator.controllers"></context:component-scan>

</beans>
Step 7: Run The Application
- Right-click the project.
- Select Run As -> Run on Server.
- Choose Apache Tomcat Server.
- Click Finish.
Now run your spring MVC application and hit the following URL
http://localhost:8080/spring-calculator/gfg.com/welcomeOutput:
we can see the output as shown in the below image.

Explanation: When the application starts, CalculatorApplicationInitializer creates and registers the DispatcherServlet. The dispatcher loads application-config.xml, scans the controller package, and routes the /welcome request to GfgController, which returns the response.
