In a microservices architecture, services often need to communicate with each other to exchange data and perform business operations. In Spring Boot, RestTemplate provides a simple way to implement synchronous communication between microservices using REST APIs. Although RestTemplate has been deprecated in favor of WebClient and OpenFeign, it is still widely used in many existing enterprise applications.
- RestTemplate enables synchronous communication between microservices using HTTP requests.
- It provides convenient methods such as getForObject(), postForObject(), exchange(), and put().
- It is commonly used in legacy Spring Boot microservices applications.
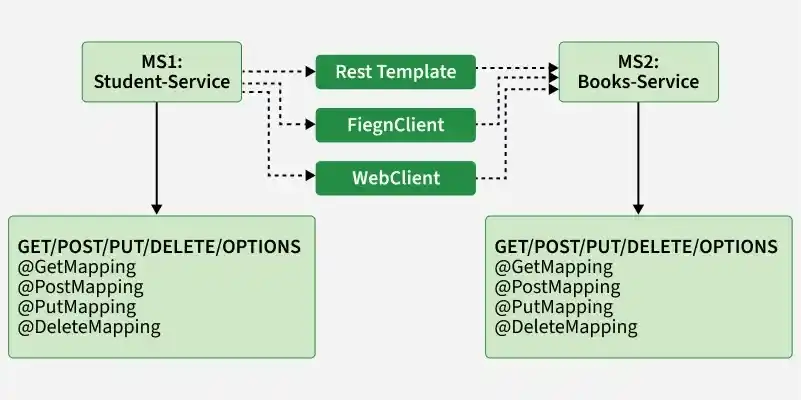
RestTemplate
RestTemplate is a synchronous HTTP client provided by Spring Framework that simplifies communication with RESTful web services. It offers a template-based API for sending HTTP requests and processing responses.
- Supports all HTTP methods such as GET, POST, PUT, DELETE, and PATCH.
- Automatically converts JSON responses into Java objects.
- Provides exception handling and customizable request processing.
Example Definition
public class RestTemplate
extends InterceptingHttpAccessor
implements RestOperations {
..............
..............
}
In this article, we are going to communicate two microservices using RestTemplate.getForObject() method. The syntax for RestTemplate.getForObject() method is given below.
Syntax of RestTemplate.getForObject()
@Nullable
public <T> T getForObject(String url, Class<T> responseType, Object... uriVariables)
throws RestClientException {
RequestCallback requestCallback = this.acceptHeaderRequestCallback(responseType);
HttpMessageConverterExtractor<T> responseExtractor =
new HttpMessageConverterExtractor(responseType, this.getMessageConverters(), this.logger);
return this.execute(url, HttpMethod.GET, requestCallback, responseExtractor, (Object[]) uriVariables);}
Let's understand the whole thing by developing two microservices and let's communicate with each other.
How RestTemplate Works in Microservices
In this project, we are going to develop two Microservices. The Employee Service will call the Address Service using RestTemplate and combine both responses.
- Employee-service: Responsible for managing employee information.
- Address-service: Responsible for managing address information.
Step-by-Step Flow of Application
Follow these beleo steps to communicate microservices using RestTemplate.
Developing Employee-Service
Step 1: Create Employee Service Project
Create a Spring Boot project named employee-service using Spring Initializr.
Add Following Dependency
- Spring Web
- Spring Data JPA
- MySQL Driver
- OpenFeign
- Spring Boot DevTools
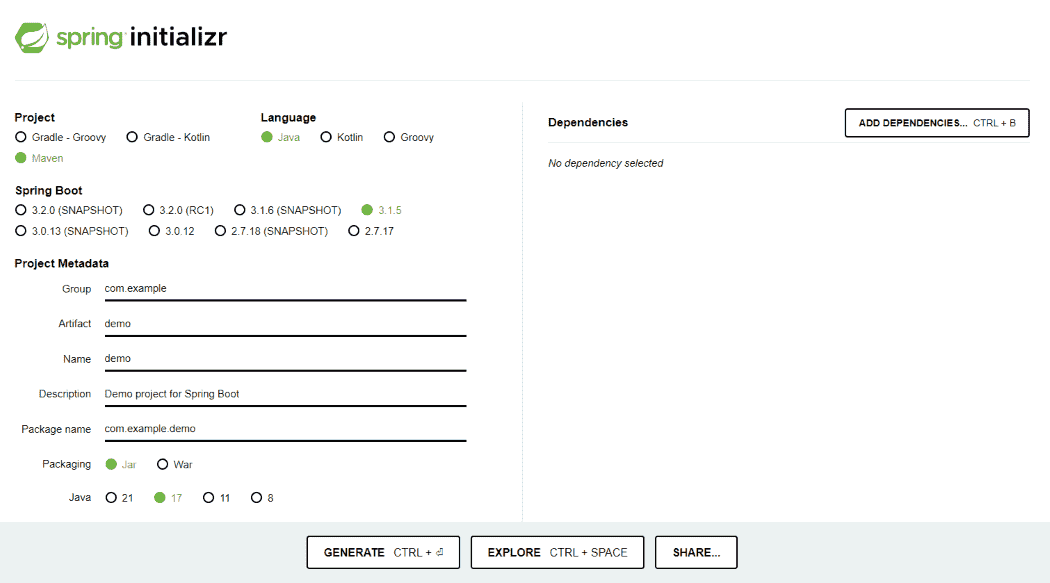
Generate the project and run it in IntelliJ IDEA/Eclipse IDE by referring to the above article.
Step 2: Review the Generated pom.xml File.
The generated pom.xml file should contain the Following Dependency.
<?xml version="1.0" encoding="UTF-8"?>
<project xmlns="https://maven.apache.org/POM/4.0.0"
         xmlns:xsi="https://www.w3.org/2001/XMLSchema-instance"
    xsi:schemaLocation="https://maven.apache.org/POM/4.0.0
                        https://maven.apache.org/xsd/maven-4.0.0.xsd">
    <modelVersion>4.0.0</modelVersion>
    <parent>
        <groupId>org.springframework.boot</groupId>
        <artifactId>spring-boot-starter-parent</artifactId>
        <version>3.0.2</version>
        <relativePath/> <!-- lookup parent from repository -->
    </parent>
    <groupId>com.gfg.employeaap</groupId>
    <artifactId>employee-service</artifactId>
    <version>0.0.1-SNAPSHOT</version>
    <name>employee-service</name>
    <description>Employee Service</description>
    <properties>
        <java.version>17</java.version>
    </properties>
    <dependencies>
        <dependency>
            <groupId>org.springframework.boot</groupId>
            <artifactId>spring-boot-starter-data-jpa</artifactId>
        </dependency>
        <dependency>
            <groupId>org.springframework.boot</groupId>
            <artifactId>spring-boot-starter-web</artifactId>
        </dependency>

        <dependency>
            <groupId>org.springframework.boot</groupId>
            <artifactId>spring-boot-devtools</artifactId>
            <scope>runtime</scope>
            <optional>true</optional>
        </dependency>
        <dependency>
            <groupId>com.mysql</groupId>
            <artifactId>mysql-connector-j</artifactId>
            <scope>runtime</scope>
        </dependency>
        <dependency>
            <groupId>org.springframework.boot</groupId>
            <artifactId>spring-boot-starter-test</artifactId>
            <scope>test</scope>
        </dependency>
        <dependency>
            <groupId>org.modelmapper</groupId>
            <artifactId>modelmapper</artifactId>
            <version>3.1.1</version>
        </dependency>
    </dependencies>

    <build>
        <plugins>
            <plugin>
                <groupId>org.springframework.boot</groupId>
                <artifactId>spring-boot-maven-plugin</artifactId>
            </plugin>
        </plugins>
    </build>

</project>
Step 2: Create Database Schema
Go to your MySQL Workbench and create a schema named gfgmicroservicesdemo and inside that create a table called employee and put some sample data as shown in the below image. Here we have created 4 columns and put some sample data.
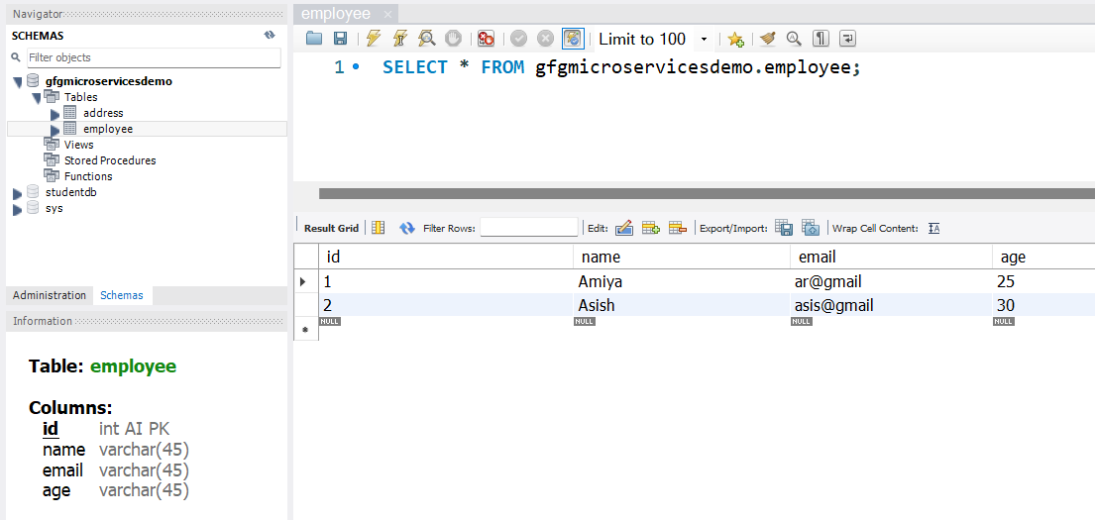
Before moving to IntelliJ IDEA let's have a look at the complete project structure for our Microservices.
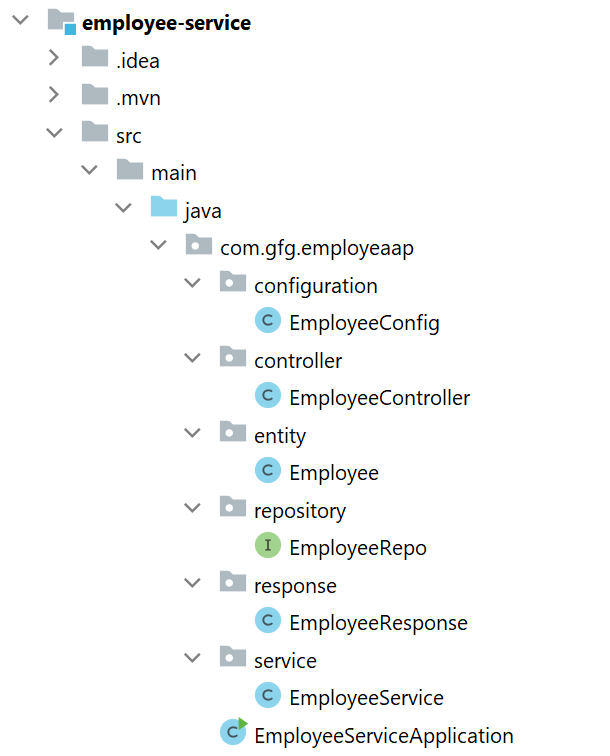 Step 3: Configure application.properties
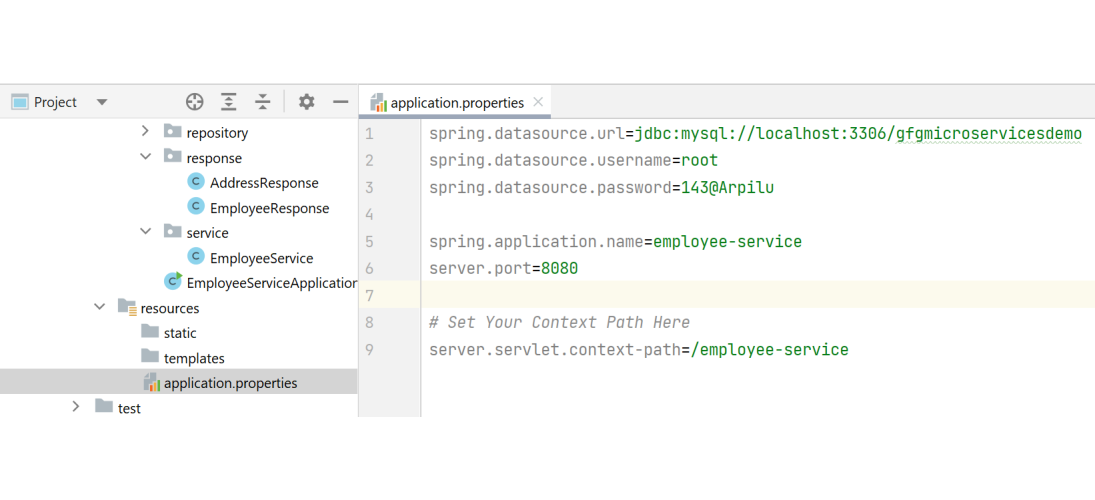
Now make the following changes in your application.properties file.
spring.application.name=employee-service
server.port=8080
server.servlet.context-path=/employee-service
spring.datasource.url=jdbc:mysql://localhost:3306/gfgmicroservicesdemo
spring.datasource.username=root
spring.datasource.password=password
You may also refer to the below image
Step 4: Create Employee Entity
Go to the src > main > java > entity and create a class Employee and put the below code. This is our model class.
package com.gfg.employeaap.entity;

import jakarta.persistence.*;

@Entity
@Table(name = "employee")
public class Employee {

    @Id
    @GeneratedValue(strategy = GenerationType.IDENTITY)
    @Column(name = "id")
    private int id;

    @Column(name = "name")
    private String name;

    @Column(name = "email")
    private String email;

    @Column(name = "age")
    private String age;

    public int getId() {
        return id;
    }

    public void setId(int id) {
        this.id = id;
    }

    public String getName() {
        return name;
    }

    public void setName(String name) {
        this.name = name;
    }

    public String getEmail() {
        return email;
    }

    public void setEmail(String email) {
        this.email = email;
    }

    public String getAge() {
        return age;
    }

    public void setAge(String age) {
        this.age = age;
    }
}
Step 5: Create Employee Repository
Go to the src > main > java > repository and create an interface EmployeeRepo and put the below code. This is our repository where we write code for all the database-related stuff.
package com.gfg.employeaap.repository;

import com.gfg.employeaap.entity.Employee;
import org.springframework.data.jpa.repository.JpaRepository;

@Repository
public interface EmployeeRepo extends JpaRepository<Employee, Integer> {

}
Note: Please refer to this article to know more about JpaRepository.
Step 6: Create EmployeeResponse DTO
Go to the src > main > java > response and create a class EmployeeResponse and put the below code.
package com.gfg.employeaap.response;

public class EmployeeResponse {

    private int id;
    private String name;
    private String email;
    private String age;

    public int getId() {
        return id;
    }

    public void setId(int id) {
        this.id = id;
    }

    public String getName() {
        return name;
    }

    public void setName(String name) {
        this.name = name;
    }

    public String getEmail() {
        return email;
    }

    public void setEmail(String email) {
        this.email = email;
    }

    public String getAge() {
        return age;
    }

    public void setAge(String age) {
        this.age = age;
    }
}
Step 7: Create Service Class
Go to the src > main > java > service and create a class EmployeeService and put the below code. This is our service class where we write our business logic.
package com.gfg.employeaap.service;

import com.gfg.employeaap.entity.Employee;
import com.gfg.employeaap.repository.EmployeeRepo;
import com.gfg.employeaap.response.EmployeeResponse;
import org.modelmapper.ModelMapper;
import org.springframework.beans.factory.annotation.Autowired;

import java.util.Optional;

@Service
public class EmployeeService {

    @Autowired
    private EmployeeRepo employeeRepo;

    @Autowired
    private ModelMapper mapper;

    public EmployeeResponse getEmployeeById(int id) {
        Optional<Employee> employee = employeeRepo.findById(id);
        EmployeeResponse employeeResponse = mapper.map(employee, EmployeeResponse.class);
        return employeeResponse;
    }

}
Step 8: Create an Employee Controller
Go to the src > main > java > controller and create a class EmployeeController and put the below code. Here we are going to create an endpoint "/employees/{id}" to find an employee using id.
package com.gfg.employeaap.controller;

import com.gfg.employeaap.response.EmployeeResponse;
import com.gfg.employeaap.service.EmployeeService;
import org.springframework.beans.factory.annotation.Autowired;
import org.springframework.http.HttpStatus;
import org.springframework.http.ResponseEntity;
import org.springframework.web.bind.annotation.GetMapping;
import org.springframework.web.bind.annotation.PathVariable;
import org.springframework.web.bind.annotation.RestController;

@RestController
public class EmployeeController {

    @Autowired
    private EmployeeService employeeService;

    @GetMapping("/employees/{id}")
    private ResponseEntity<EmployeeResponse> getEmployeeDetails(@PathVariable("id") int id) {
        EmployeeResponse employee = employeeService.getEmployeeById(id);
        return ResponseEntity.status(HttpStatus.OK).body(employee);
    }

}
Step 9: Create a Configuration Class
Go to the src > main > java > configuration and create a class EmployeeConfig and put the below code.
package com.gfg.employeaap.configuration;

import com.gfg.employeaap.service.EmployeeService;
import org.modelmapper.ModelMapper;
import org.springframework.context.annotation.Bean;
import org.springframework.context.annotation.Configuration;

@Configuration
public class EmployeeConfig {

    @Bean
    public ModelMapper modelMapperBean() {
        return new ModelMapper();
    }

}
Step 10: Run Employee Service
To run your Employee Microservice src > main > java > EmployeeServiceApplication and click on the Run button. If everything goes well then you may see the following screen in your console. Please refer to the below image.

Step 11: Test Your Endpoint in Postman
Now open Postman and hit the following URL
GET: http://localhost:8080/employee-service/employees/1
And you can see the following response
{
"id": 1,
"name": "Amiya",
"email": "ar@gmail",
"age": "25"
}
Developing Address-Service
Step 1: Create Employee Service Project
Create a Spring Boot project named employee-service using Spring Initializr.
Add Following Dependency
- Spring Boot DevTools
- Spring Data JPA
- MySQL Driver
- Spring Web
Generate the project and run it in IntelliJ IDEA by referring to the above article.
Step 2: Review the Generated pom.xml File.
The generated pom.xml file should contain the Following Dependency.
<?xml version="1.0" encoding="UTF-8"?>
<project xmlns="https://maven.apache.org/POM/4.0.0" xmlns:xsi="https://www.w3.org/2001/XMLSchema-instance"
    xsi:schemaLocation="https://maven.apache.org/POM/4.0.0 https://maven.apache.org/xsd/maven-4.0.0.xsd">
    <modelVersion>4.0.0</modelVersion>
    <parent>
        <groupId>org.springframework.boot</groupId>
        <artifactId>spring-boot-starter-parent</artifactId>
        <version>3.0.2</version>
        <relativePath/> <!-- lookup parent from repository -->
    </parent>
    <groupId>com.gfg.addressapp</groupId>
    <artifactId>address-service</artifactId>
    <version>0.0.1-SNAPSHOT</version>
    <name>address-service</name>
    <description>Address Service</description>
    <properties>
        <java.version>17</java.version>
    </properties>
    <dependencies>
        <dependency>
            <groupId>org.springframework.boot</groupId>
            <artifactId>spring-boot-starter-data-jpa</artifactId>
        </dependency>
        <dependency>
            <groupId>org.springframework.boot</groupId>
            <artifactId>spring-boot-starter-web</artifactId>
        </dependency>

        <dependency>
            <groupId>org.springframework.boot</groupId>
            <artifactId>spring-boot-devtools</artifactId>
            <scope>runtime</scope>
            <optional>true</optional>
        </dependency>
        <dependency>
            <groupId>com.mysql</groupId>
            <artifactId>mysql-connector-j</artifactId>
            <scope>runtime</scope>
        </dependency>
        <dependency>
            <groupId>org.springframework.boot</groupId>
            <artifactId>spring-boot-starter-test</artifactId>
            <scope>test</scope>
        </dependency>
        <dependency>
            <groupId>org.modelmapper</groupId>
            <artifactId>modelmapper</artifactId>
            <version>3.1.1</version>
        </dependency>
    </dependencies>

    <build>
        <plugins>
            <plugin>
                <groupId>org.springframework.boot</groupId>
                <artifactId>spring-boot-maven-plugin</artifactId>
            </plugin>
        </plugins>
    </build>

</project>
Step 2: Create Schema in MySQL Workbench
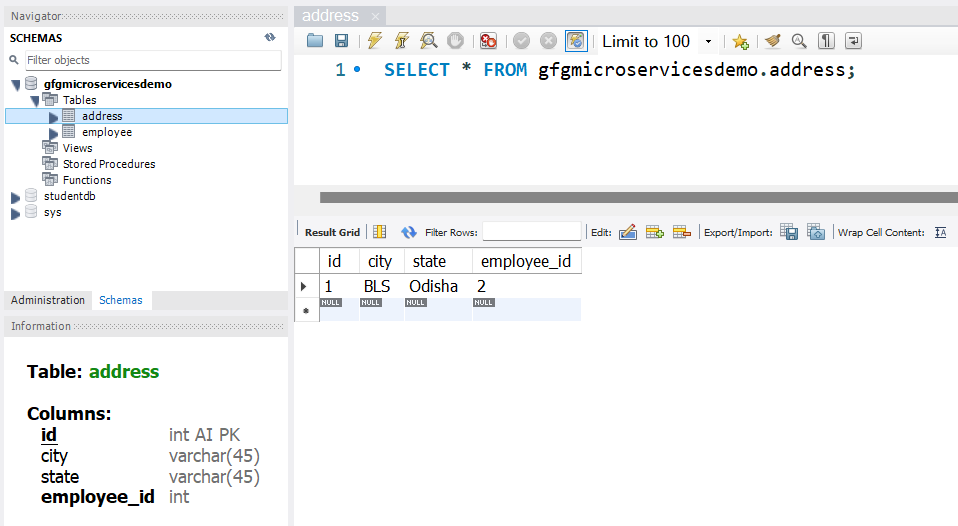
Go to your MySQL Workbench and create a schema named gfgmicroservicesdemo and inside that create a table called address and put some sample data as shown in the below image.
Note: In the Address table, employee_id is a foreign key so create it accordingly. We are going to perform a SQL join operation in our native SQL query. So create tables carefully.
Before moving to IntelliJ IDEA let's have a look at the complete project structure for our Microservices.
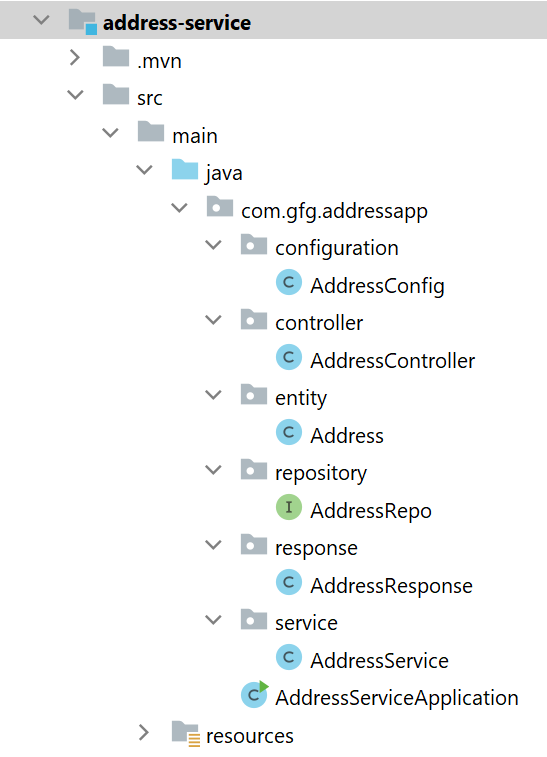
Step 3: application.properties
Now make the following changes in your application.properties file.
spring.application.name=address-service
server.port=8081
server.servlet.context-path=/address-service
spring.datasource.url=jdbc:mysql://localhost:3306/gfgmicroservicesdemo
spring.datasource.username=root
spring.datasource.password=password
Step 4: Create Address Entity
Go to the src > main > java > entity and create a class Address and put the below code. This is our model class.
package com.gfg.addressapp.entity;

import jakarta.persistence.*;

@Entity
@Table(name = "address")
public class Address {

    @Id
    @GeneratedValue(strategy = GenerationType.IDENTITY)
    @Column(name = "id")
    private int id;

    @Column(name = "city")
    private String city;

    @Column(name = "state")
    private String state;

    public int getId() {
        return id;
    }

    public void setId(int id) {
        this.id = id;
    }

    public String getCity() {
        return city;
    }

    public void setCity(String city) {
        this.city = city;
    }

    public String getState() {
        return state;
    }

    public void setState(String state) {
        this.state = state;
    }
}
Step 5: Create Repository Interface
Go to the src > main > java > repository and create an interface AddressRepo and put the below code. This is our repository where we write code for all the database-related stuff.
package com.gfg.addressapp.repository;

import com.gfg.addressapp.entity.Address;
import java.util.Optional;
import org.springframework.data.jpa.repository.JpaRepository;
import org.springframework.data.jpa.repository.Query;
import org.springframework.data.repository.query.Param;

@Repository
public interface AddressRepo extends JpaRepository<Address, Integer> {

    @Query(
        nativeQuery = true,
        value
        = "SELECT ea.id, ea.city, ea.state FROM gfgmicroservicesdemo.address ea join gfgmicroservicesdemo.employee e on e.id = ea.employee_id where ea.employee_id=:employeeId")
       Optional<Address> findAddressByEmployeeId(@Param("employeeId") int employeeId);
}
Note: Please refer to this article to know more about JpaRepository.
Step 6: AddressResponse DTO
Go to the src > main > java > response and create a class AddressResponse and put the below code.
package com.gfg.addressapp.response;

public class AddressResponse {

    private int id;
    private String city;
    private String state;

    public int getId() {
        return id;
    }

    public void setId(int id) {
        this.id = id;
    }

    public String getCity() {
        return city;
    }

    public void setCity(String city) {
        this.city = city;
    }

    public String getState() {
        return state;
    }

    public void setState(String state) {
        this.state = state;
    }
}
Step 7: Create Service Class
Go to the src > main > java > service and create a class AddressService and put the below code. This is our service class where we write our business logic.
package com.gfg.addressapp.service;

import com.gfg.addressapp.entity.Address;
import com.gfg.addressapp.repository.AddressRepo;
import com.gfg.addressapp.response.AddressResponse;
import org.modelmapper.ModelMapper;
import org.springframework.beans.factory.annotation.Autowired;
import org.springframework.stereotype.Service;

import java.util.Optional;

@Service
public class AddressService {

    @Autowired
    private AddressRepo addressRepo;

    @Autowired
    private ModelMapper mapper;

    public AddressResponse findAddressByEmployeeId(int employeeId) {
        Optional<Address> addressByEmployeeId = addressRepo.findAddressByEmployeeId(employeeId);
        AddressResponse addressResponse = mapper.map(addressByEmployeeId, AddressResponse.class);
        return addressResponse;
    }

}
Step 8: Create an Address Controller
Go to the src > main > java > controller and create a class AddressController and put the below code.
package com.gfg.addressapp.controller;

import com.gfg.addressapp.response.AddressResponse;
import com.gfg.addressapp.service.AddressService;
import org.springframework.beans.factory.annotation.Autowired;
import org.springframework.http.HttpStatus;
import org.springframework.http.ResponseEntity;
import org.springframework.web.bind.annotation.GetMapping;
import org.springframework.web.bind.annotation.PathVariable;
import org.springframework.web.bind.annotation.RestController;

@RestController
public class AddressController {

    @Autowired
    private AddressService addressService;

    @GetMapping("/address/{employeeId}")
    public ResponseEntity<AddressResponse> getAddressByEmployeeId(@PathVariable("employeeId") int employeeId) {
        AddressResponse addressResponse = addressService.findAddressByEmployeeId(employeeId);
        return ResponseEntity.status(HttpStatus.OK).body(addressResponse);
    }

}
Step 9: Create a Configuration Class
Go to the src > main > java > configuration and create a class AddressConfig and put the below code.
package com.gfg.addressapp.configuration;

import com.gfg.addressapp.service.AddressService;
import org.modelmapper.ModelMapper;
import org.springframework.context.annotation.Bean;
import org.springframework.context.annotation.Configuration;

@Configuration
public class AddressConfig {

    @Bean
    public ModelMapper modelMapperBean() {
        return new ModelMapper();
    }

}
Step 10: Run Address Service
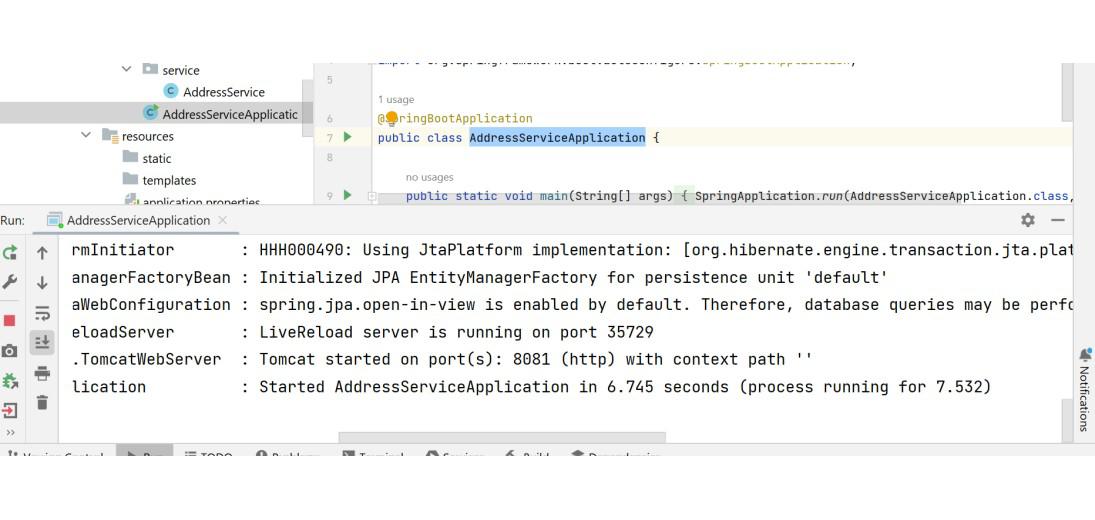
To run your Address Microservice src > main > java > AddressServiceApplication and click on the Run button. If everything goes well then you may see the following screen in your console.
Step 11: Test Your Endpoint in Postman
Now open Postman and hit the following URL
GET: http://localhost:8081/address-service/address/2
And you can see the following response
{"id": 1,
"city": "BLS",
"state": "Odisha"
}
Now Communicate Microservices using RestTemplate
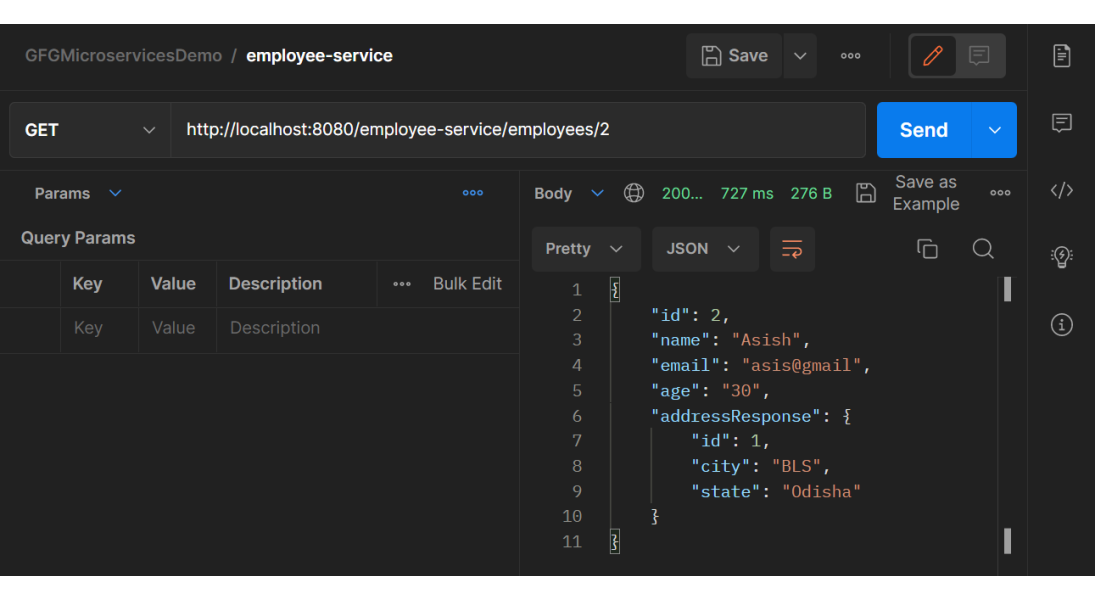
Let's communicate between two microservices using RestTemplate. So we are going to get the address data by the employeeId of an employee and when we communicate we are going to get a response like the below. So let's implement it.
{"id": 2,
"name": "Asish",
"email": "asis@gmail",
"age": "30",
"addressResponse": {
"id": 1,
"city": "BLS",
"state": "Odisha"
}
}
Here employee-service is going to consume data from the address-service. So let's write the logic in the employee-service.
Step 1: Create an AddressResponse Class
Go to the employee-service > src > main > java > response and create a class AddressResponse and put the below code.
package com.gfg.employeaap.response;

public class AddressResponse {

    private int id;
    private String city;
    private String state;

    public int getId() {
        return id;
    }

    public void setId(int id) {
        this.id = id;
    }

    public String getCity() {
        return city;
    }

    public void setCity(String city) {
        this.city = city;
    }

    public String getState() {
        return state;
    }

    public void setState(String state) {
        this.state = state;
    }
}
Step 2: Modify EmployeeResponse Class
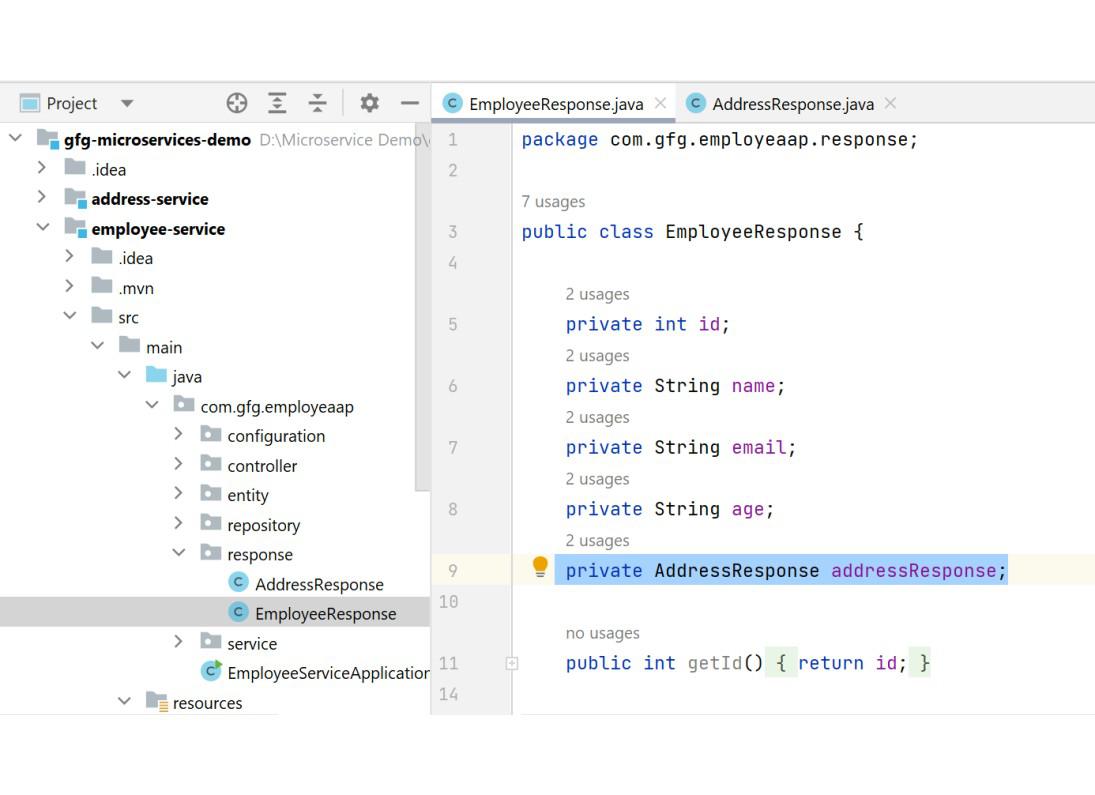
Also, go to the employee-service > src > main > java > response > EmployeeResponse and modify the EmployeeResponse class as below.
package com.gfg.employeaap.response;

public class EmployeeResponse {

    private int id;
    private String name;
    private String email;
    private String age;

    // Add AddressResponse Here
    private AddressResponse addressResponse;

    public int getId() {
        return id;
    }

    public void setId(int id) {
        this.id = id;
    }

    public String getName() {
        return name;
    }

    public void setName(String name) {
        this.name = name;
    }

    public String getEmail() {
        return email;
    }

    public void setEmail(String email) {
        this.email = email;
    }

    public String getAge() {
        return age;
    }

    public void setAge(String age) {
        this.age = age;
    }

    public AddressResponse getAddressResponse() {
        return addressResponse;
    }

    public void setAddressResponse(AddressResponse addressResponse) {
        this.addressResponse = addressResponse;
    }
}
Please refer to the below image.
Step 3: Modify EmployeeService Class
Now go to the employee-service > src > main > java > service > EmployeeService and modify the EmployeeService class as below.
package com.gfg.employeaap.service;

import com.gfg.employeaap.entity.Employee;
import com.gfg.employeaap.repository.EmployeeRepo;
import com.gfg.employeaap.response.AddressResponse;
import com.gfg.employeaap.response.EmployeeResponse;
import org.modelmapper.ModelMapper;
import org.springframework.beans.factory.annotation.Autowired;
import org.springframework.web.client.RestTemplate;

import java.util.Optional;

@Service
public class EmployeeService {

    @Autowired
    private EmployeeRepo employeeRepo;

    @Autowired
    private ModelMapper mapper;

    @Autowired
    private RestTemplate restTemplate;

    public EmployeeResponse getEmployeeById(int id) {

        Optional<Employee> employee = employeeRepo.findById(id);
        EmployeeResponse employeeResponse = mapper.map(employee, EmployeeResponse.class);

        AddressResponse addressResponse = restTemplate.getForObject("http://localhost:8081/address-service/address/{id}", AddressResponse.class, id);
        employeeResponse.setAddressResponse(addressResponse);

        return employeeResponse;
    }

}
Step 4: Modify EmployeeConfig Class
Go to the employee-service > src > main > java > configuration > EmployeeConfig and create the bean for RestTemplate.
package com.gfg.employeaap.configuration;

import com.gfg.employeaap.service.EmployeeService;
import org.modelmapper.ModelMapper;
import org.springframework.context.annotation.Bean;
import org.springframework.context.annotation.Configuration;
import org.springframework.web.client.RestTemplate;

@Configuration
public class EmployeeConfig {

    @Bean
    public ModelMapper modelMapperBean() {
        return new ModelMapper();
    }

    @Bean
    public RestTemplate restTemplateBean() {
        return new RestTemplate();
    }

}
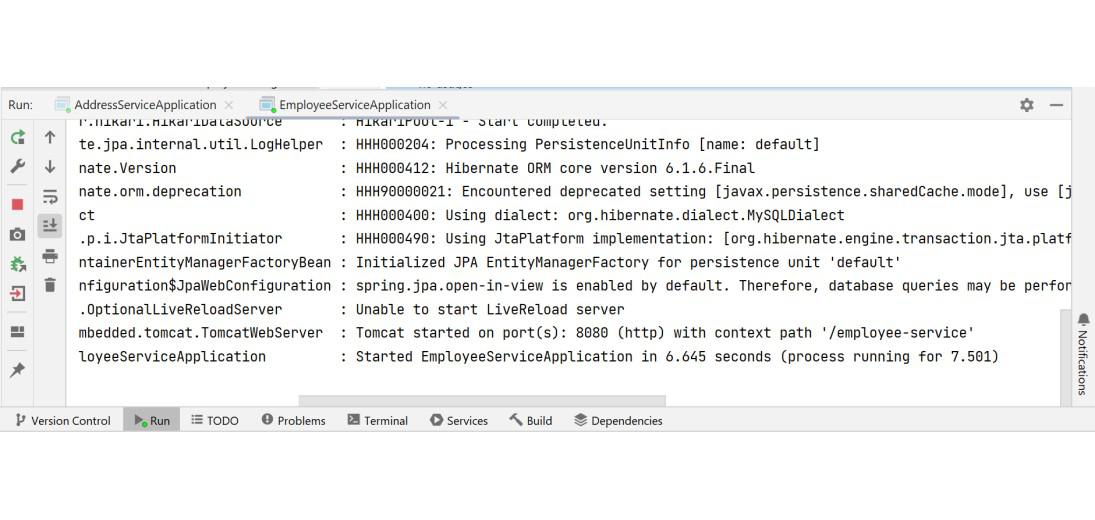
Step 5: Run Both Address and Employee Microservices
Now run your both Address and Employee Microservices. If everything goes well then you may see the following screen in your console. Please refer to the below image.
Step 6: Test Your Endpoint in Postman
Now open Postman and hit the following URL
GET: http://localhost:8080/employee-service/employees/2
And you can see the following response. Please refer to the below image.