The three panels in this guide solve the same problem at very different weights. Webmin is a 154 MB package that puts a web UI on top of an existing Debian server. Virtualmin turns that same server into a full hosting platform, pulling in Apache, MariaDB, Postfix, and PHP as one bundle. DirectAdmin is the commercial option: a paid license, a leaner footprint than cPanel, and a support contract behind it.
This guide installs each panel on Debian, with the exact commands, the real output you should see, and the resource cost measured after each install. It covers the current Webmin apt repository method (the old sources.list one-liner is deprecated), the Virtualmin install script with the LAMP bundle, and the DirectAdmin setup script. If none of the three fit, the same server runs ISPConfig, HestiaCP, or aaPanel instead.
Tested July 2026 on Debian 13 (Webmin 2.653 and Virtualmin 8); the Webmin path was also verified on Debian 12.
Webmin, Virtualmin, or DirectAdmin
Pick by what the server is for. Webmin administers one system: users, packages, firewall, services, cron. Virtualmin is Webmin plus the hosting layer, built for running many websites with separate owners, mail, and DNS. DirectAdmin competes with Virtualmin Pro and cPanel in the reseller and web host market.
| Panel | License | What it manages | Web UI port |
|---|---|---|---|
| Webmin | Free (BSD) | The server itself: users, services, firewall, packages | 10000 |
| Virtualmin GPL | Free (GPL) | Hosting: domains, mail, DNS, databases, LAMP/LEMP stack | 10000 |
| DirectAdmin | Commercial | Hosting accounts, resellers, mail, DNS, databases | 2222 |
One constraint applies to Virtualmin and DirectAdmin equally: both expect a clean, freshly installed OS. Their installers deploy and configure Apache, MariaDB or MySQL, Postfix, and PHP themselves, and they will misconfigure or refuse a server that already runs parts of that stack. Webmin has no such requirement; it manages whatever is already there. A wider comparison of the free options is in the open source control panel roundup.
Prepare the Debian Server
All three panels want a fully qualified hostname, and Virtualmin in particular uses it for the default virtual server, the mail configuration, and the SSL certificate request. Export it once and reuse it:
export SERVER_FQDN="panel.example.com"
sudo hostnamectl set-hostname "${SERVER_FQDN}"
echo "$(hostname -I | awk '{print $1}') ${SERVER_FQDN}" | sudo tee -a /etc/hosts
Then bring the package index and installed packages current:
sudo apt update && sudo apt upgrade -yFor a panel the reader will reach over the public internet, the DNS A record for ${SERVER_FQDN} should already point at the server before installing Virtualmin. The install script requests a Let’s Encrypt certificate for the hostname during setup, and that only succeeds when the name resolves to the machine.
Option 1: Install Webmin on Debian 13 / 12
Webmin ships its own apt repository, and the project provides a script that configures it correctly, including the signing key. This replaced the old manual sources.list edit and is now the method the Webmin developers recommend.
Add the Webmin repository
Download and run the repository setup script:
curl -fsSL -o webmin-setup-repo.sh https://raw.githubusercontent.com/webmin/webmin/master/webmin-setup-repo.sh
sudo sh webmin-setup-repo.sh
The script installs the developer signing key, writes the repository definition, and refreshes the package metadata:
  Installing required gnupg from OS repos ..
  .. done
  Downloading Webmin Developers key ..
  .. done
  Installing Webmin Developers key ..
  .. done
  Setting up Webmin stable repository ..
  .. done
  Cleaning repository metadata ..
  .. done
  Downloading repository metadata ..
  .. done
Webmin and Usermin can be installed with:
  apt-get install --install-recommends webmin usermin
Install and verify Webmin
Install from the new repository. The --install-recommends flag pulls in the Perl modules that some Webmin modules need at runtime:
sudo apt-get install --install-recommends webmin -yThe service starts and enables itself on install. Confirm it is running and listening:
sudo systemctl status webmin --no-pagerThe unit reports active with the miniserv.pl web server as the main process:
● webmin.service - Webmin server daemon
     Loaded: loaded (/usr/lib/systemd/system/webmin.service; enabled; preset: enabled)
     Active: active (running) since Tue 2026-07-28 15:09:46 UTC; 42min ago
   Main PID: 11439 (miniserv.pl)
      Tasks: 3 (limit: 3545)
     Memory: 132.3M (peak: 209.1M)
Port 10000 should be bound on all interfaces:
sudo ss -tlnp | grep 10000Both the IPv4 and IPv6 listeners belong to miniserv:
LISTEN 0  4096   0.0.0.0:10000  0.0.0.0:*  users:(("miniserv.pl",pid=11439,fd=5))
LISTEN 0  4096      [::]:10000     [::]:*  users:(("miniserv.pl",pid=11439,fd=6))
Open the firewall
A minimal Debian install does not ship UFW, so install it, allow SSH before anything else, then allow the Webmin port:
sudo apt install -y ufw
sudo ufw allow OpenSSH
sudo ufw allow 10000/tcp
sudo ufw enable
The status output confirms both rules before you disconnect:
Status: active

To                         Action      From
--                         ------      ----
OpenSSH                    ALLOW       Anywhere
10000/tcp                  ALLOW       Anywhere
Log in to Webmin
Open https://server-ip:10000 in a browser. Webmin serves HTTPS with a self-signed certificate on first boot, so the browser shows a certificate warning once; accept it to continue. Sign in as root, or as any user with full sudo rights.

After login, the dashboard reports the OS release, Webmin version, kernel, load, and pending package updates in one screen:

Everything Webmin manages lives in the left menu. The Software Packages module under System, for example, wraps apt so package installs and updates run from the browser:

To replace the self-signed certificate, Webmin has a built-in Let’s Encrypt client under Webmin Configuration then SSL Encryption; it needs the panel hostname to resolve publicly, same as any ACME HTTP validation. Webmin also runs on other systems if Debian is not your base, including FreeBSD.
Option 2: Install Virtualmin on Debian 13 / 12
Virtualmin installs through a single script that deploys the whole hosting stack, then manages it through a Webmin module. The current stable line is Virtualmin 8, and the script’s Grade A support list includes Debian 12 and 13 on amd64 and arm64. Run it only on a clean server; it will install and configure Apache, MariaDB, Postfix, Dovecot, PHP-FPM, and BIND itself.
Run the install script
The official one-liner fetches and runs the installer with the LAMP bundle:
sudo sh -c "$(curl -fsSL https://download.virtualmin.com/virtualmin-install.sh)" -- --bundle LAMP --yesSwap --bundle LAMP for --bundle LEMP to get Nginx instead of Apache, and drop --yes if you want the interactive confirmation that lists the supported systems first. The installer works through four phases and prints its progress:
▣◻◻◻ Phase 1 of 4: Check
▣▣◻◻ Phase 2 of 4: Setup
Installing Virtualmin 8 stable repository                              ✔
▣▣▣◻ Phase 3 of 4: Installation
Installing Virtualmin 8 and all related packages                       ✔
▣▣▣▣ Phase 4 of 4: Configuration
[19/20] Configuring Usermin                                            ✔
[20/20] Configuring Webmin                                             ✔
▣▣▣ Cleaning up
[SUCCESS] Installation Complete!
[SUCCESS] If there were no errors above, Virtualmin is ready to be configured
[SUCCESS] at https://panel.example.com:10000.
The run takes roughly ten minutes on a 2-vCPU machine, most of it in phase 3 while apt pulls in the stack. One cloud-specific note from our test on a Debian cloud image: the installer normally deploys firewalld and Fail2ban, but Debian’s firewalld package conflicts with the cloud-init package preinstalled on cloud images, so the installer skips both and prints an INFO line saying Fail2ban was disabled. On AWS or any provider with security groups, filter ports there; on an ISO-installed Debian, firewalld gets configured by the installer as normal. Either way, port 10000 must be reachable to log in.
Complete the post-install wizard
Browse to https://${SERVER_FQDN}:10000 and log in as root. On first login Virtualmin starts its post-installation wizard, which walks through memory preloading, virus and spam scanning, the database servers to enable, and the DNS configuration:

Two answers matter on a small server. Preloading Virtualmin libraries keeps them resident in RAM permanently in exchange for a faster UI, and enabling the ClamAV virus scanner adds the single heaviest memory consumer in the whole stack, so leave scanning off unless the server will actually host mail. The remaining screens are safe on their defaults. After the wizard, the dashboard shows the system status and the recheck button that validates the configuration:

Create the first virtual server
A virtual server in Virtualmin is a domain with its own Unix user, home directory, Apache vhost, DNS zone, mail domain, and optionally a MariaDB database. Create one from Create Virtual Server in the left menu:

Fill in the domain and an administration password, leave the enabled features on their defaults, and click Create Server. The same thing works from the shell with virtualmin create-domain --domain example.com --pass 'password' --default-features. Either way the new domain appears in the virtual servers list with its own Unix user:

Once created, the site’s document root is /home/username/public_html, and dropping an index.html there makes the domain serve immediately. Certificates for each virtual server live under Manage Virtual Server then Setup SSL Certificate, where the bundled Let’s Encrypt integration requests and renews them.
Error: “Failed to download utility function library”
If the install script exits immediately with Failed to download utility function library. Cannot continue., the server cannot reach download.virtualmin.com, which sits behind a CDN that a few networks fail to route to. We hit this on one lab network during testing. Confirm with curl -I https://download.virtualmin.com/; if that times out while other sites load fine, the problem is the network path, not the script. Fetching slib.sh from another machine and dropping it next to virtualmin-install.sh gets past this first error, because the installer prefers a local copy, but the apt repository lives on the same host, so an install from a network that cannot reach it will fail again at the package phase. The practical fix is to run the install from a server with clean routing to the CDN; our install completed without any of this on a stock AWS Debian instance.
Option 3: Install DirectAdmin on Debian
DirectAdmin is commercial, so the flow starts at the license. Buy one at directadmin.com, confirm it shows as active and verified in the client area, and note the license key. Debian is on the supported list for current licenses; the legacy license tier does not support Debian 13, so anything bought recently is fine but an old grandfathered license may need upgrading first.
The requirements are stricter than the free panels: a clean OS install with no Apache, PHP, or MySQL packages present, at least 4 GB of RAM plus 4 GB of swap, and 2 GB of free disk after the OS. With the license key in hand, the whole install is one command as root:
sh <(curl -fsSL https://download.directadmin.com/setup.sh) 'your-license-key-here'Run without the key argument and the script instead prints a URL where you enter the license in a browser. Either way it downloads DirectAdmin, builds the web stack through CustomBuild, and prints the admin username and password at the end, also saved in /usr/local/directadmin/conf/setup.txt. Log in at http://server-ip:2222, and switch the panel to HTTPS once a certificate is in place. If the server runs UFW, open the panel port first (install UFW and allow OpenSSH before enabling it, exactly as in the Webmin section):
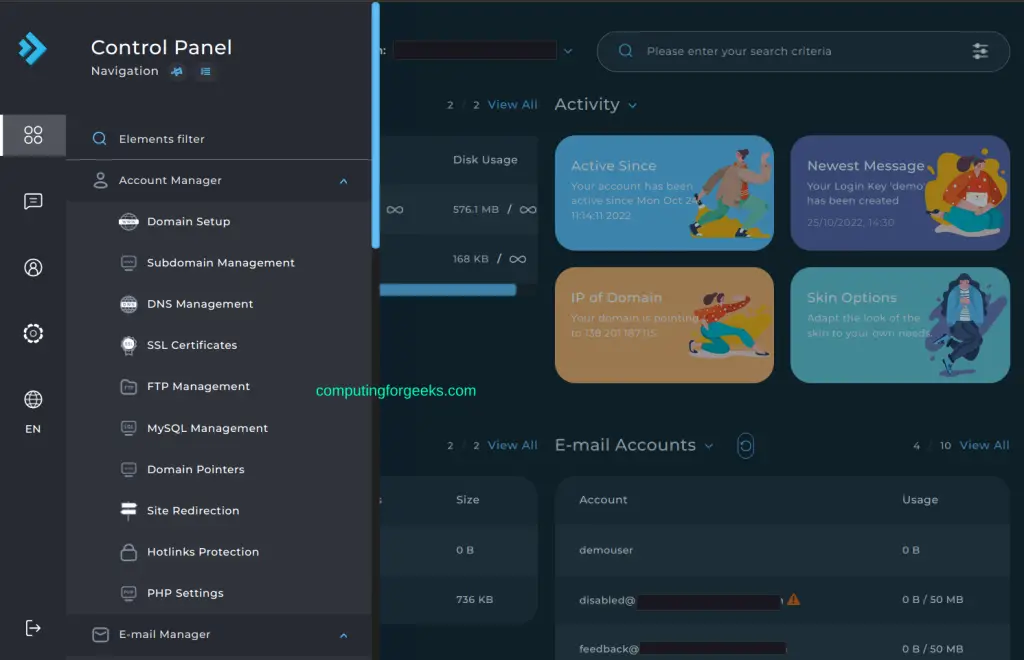
sudo ufw allow 2222/tcpThe panel ships with the Evolution skin, which puts accounts, domains, DNS, databases, and mail management in one left-hand tree:
Budget more time than the free panels: CustomBuild compiles parts of the stack, so expect a first install to take half an hour or more depending on CPU.
Measured Footprint: Webmin vs Virtualmin vs DirectAdmin
The number that matters when picking between these panels is what they leave running. Measured on the test machines after each install settled:
| Measured after install | Webmin only | Virtualmin LAMP bundle | DirectAdmin (vendor minimums) |
|---|---|---|---|
| Disk added | about 160 MB | about 2 GB | 2 GB free required after OS |
| RAM in use, whole idle system | about 410 MB | about 820 MB | 4 GB RAM plus 4 GB swap required |
| Panel service memory | 132 MB | 88 MB (panel) plus the stack | not measured, no license |
| Services left running | webmin | apache2, mariadb, postfix, dovecot, named, proftpd, php-fpm, usermin, clamav-freshclam, webmin | full stack via CustomBuild |
The gap is the stack, not the panel. Webmin alone adds one Perl process and nothing else, so it fits on a 1 GB VPS that is already doing something else. Virtualmin’s LAMP bundle brings Apache, MariaDB, Postfix, Dovecot, ClamAV-capable mail filtering, and BIND, which is why 2 GB is a realistic floor for hosting a handful of low-traffic sites and 4 GB or more is the comfortable production range once mail scanning and a few PHP-FPM pools are in play. DirectAdmin’s own minimum is the 4 GB plus swap noted above. Whichever panel you land on, the login port is the attack surface to guard: restrict 10000 or 2222 to known IPs at the firewall once the initial setup is done.