



 本文档介绍如何利用已训练好的车牌检测与识别模型,结合tkinter构建界面,实现实时车牌检测、识别及时间费用统计。主要内容包括修改YOLOv5检测函数以增加分类识别,设计用户界面,并展示检测结果。
在本专题前面相关博客中已经讲述了 车牌检测与车牌识别算法的模型训练操作步骤以及数据集的制作过程。
本博文将结合前面训练好的模型来实现车牌的检测与识别。并用tkinter实现界面。最终通过检测车牌检测的前后时间来实现 时间与费用的统计计算展示。
1)修改检测函数
在yolov5检测函数的基础上进行修改,增加识别车牌的功能
def detect(opt,source,save_path,save_img=False):
    classify, out,  det_weights, rec_weights, view_img, save_txt, imgsz = \
        opt.classify, opt.output,  opt.det_weights, opt.rec_weights,  opt.view_img, opt.save_txt, opt.img_size
    webcam = source == '0' or source.startswith('rtsp') or source.startswith('http') or source.endswith('.txt')

    # Initialize
    device = torch_utils.select_device(opt.device)
    if os.path.exists(out):
        shutil.rmtree(out)  # delete rec_result folder
    os.makedirs(out)  # make new rec_result folder
    half = device.type != 'cpu'  # half precision only supported on CUDA

    # Load yolov5 model
    model = attempt_load(det_weights, map_location=device)  # load FP32 model
    print("load det pretrained model successful!")
    imgsz = check_img_size(imgsz, s=model.stride.max())  # check img_size
    if half:
        model.half()  # to FP16

    # Second-stage classifier  也就是rec 字符识别
    if classify:
        modelc = LPRNet(lpr_max_len=8, phase=False, class_num=len(CHARS), dropout_rate=0).to(device)
        modelc.load_state_dict(torch.load(rec_weights, map_location=torch.device('cpu')))
        print("load rec pretrained model successful!")
        modelc.to(device).eval()

    # Set Dataloader
    vid_path, vid_writer = None, None
    if webcam:
        view_img = True
        cudnn.benchmark = True  # set True to speed up constant image size demo
        dataset = LoadStreams(source, img_size=imgsz)
    else:
        save_img = True
        dataset = LoadImages(source, img_size=imgsz)

    # Get names and colors
    names = model.module.names if hasattr(model, 'module') else model.names
    colors = [[random.randint(0, 255) for _ in range(3)] for _ in range(len(names))]

    # Run demo
    t0 = time.time()
    img = torch.zeros((1, 3, imgsz, imgsz), device=device)  # init img
    _ = model(img.half() if half else img) if device.type != 'cpu' else None  # run once
    lb = ""
    for path, img, im0s, vid_cap in dataset:
        img = torch.from_numpy(img).to(device)
        img = img.half() if half else img.float()  # uint8 to fp16/32
        img /= 255.0  # 0 - 255 to 0.0 - 1.0
        if img.ndimension() == 3:
            img = img.unsqueeze(0)

        # Inference
        t1 = torch_utils.time_synchronized()
        pred = model(img, augment=opt.augment)[0]
        # Apply NMS
        pred = non_max_suppression(pred, opt.conf_thres, opt.iou_thres, classes=opt.classes, agnostic=opt.agnostic_nms)


        # Apply Classifier
        if classify:
            pred, plat_num = apply_classifier(pred, modelc, img, im0s)

        t2 = torch_utils.time_synchronized()

        # Process detections

        for i, det in enumerate(pred):  # detections per image
            if webcam:  # batch_size >= 1
                p, s, im0 = path[i], '%g: ' % i, im0s[i].copy()
            else:
                p, s, im0 = path, '', im0s

            #save_path = str(Path(out) / Path(p).name)
            txt_path = str(Path(out) / Path(p).stem) + ('_%g' % dataset.frame if dataset.mode == 'video' else '')
            s += '%gx%g ' % img.shape[2:]  # print string
            gn = torch.tensor(im0.shape)[[1, 0, 1, 0]]  # normalization gain whwh
            if det is not None and len(det):
                # Rescale boxes from img_size to im0 size
                det[:, :4] = scale_coords(img.shape[2:], det[:, :4], im0.shape).round()

                # Print results
                for c in det[:, 5].unique():
                    n = (det[:, 5] == c).sum()  # detections per class
                    s += '%g %ss, ' % (n, names[int(c)])  # add to string

                # Write results
                for de, lic_plat in zip(det, plat_num):
                    # xyxy,conf,cls,lic_plat=de[:4],de[4],de[5],de[6:]
                    *xyxy, conf, cls=de

                    if save_txt:  # Write to file
                        xywh = (xyxy2xywh(torch.tensor(xyxy).view(1, 4)) / gn).view(-1).tolist()  # normalized xywh
                        with open(txt_path + '.txt', 'a') as f:
                            f.write(('%g ' * 5 + '\n') % (cls, xywh))  # label format

                    if save_img or view_img:  # Add bbox to image
                        # label = '%s %.2f' % (names[int(cls)], conf)

                        for a,i in enumerate(lic_plat):
                            # if a ==0:
                            #     continue
                            lb += CHARS[int(i)]
                        label = '%s %.2f' % (lb, conf)
                        im0 = plot_one_box(xyxy, im0, label=label, color=colors[int(cls)], line_thickness=3)

            # Print time (demo + NMS)
            print('%sDone. (%.3fs)' % (s, t2 - t1))

            # Stream results
            if view_img:
                cv2.imshow(p, im0)
                if cv2.waitKey(1) == ord('q'):  # q to quit
                    raise StopIteration

            # Save results (image with detections)
            if save_img:
                if dataset.mode == 'images':
                    cv2.imwrite(save_path, im0)
                else:
                    if vid_path != save_path:  # new video
                        vid_path = save_path
                        if isinstance(vid_writer, cv2.VideoWriter):
                            vid_writer.release()  # release previous video writer

                        fourcc = 'mp4v'  # rec_result video codec
                        fps = vid_cap.get(cv2.CAP_PROP_FPS)
                        w = int(vid_cap.get(cv2.CAP_PROP_FRAME_WIDTH))
                        h = int(vid_cap.get(cv2.CAP_PROP_FRAME_HEIGHT))
                        vid_writer = cv2.VideoWriter(save_path, cv2.VideoWriter_fourcc(*fourcc), fps, (w, h))
                    vid_writer.write(im0)


    if save_txt or save_img:
        print('Results saved to %s' % os.getcwd() + os.sep + out)
        if platform == 'darwin':  # MacOS
            os.system('open ' + save_path)

    print('Done. (%.3fs)' % (time.time() - t0))


    return lb
主要改动 为在 yolov5检测函数的基础上增加分类识别功能
    # Second-stage classifier  也就是rec 字符识别
    if classify:
        modelc = LPRNet(lpr_max_len=8, phase=False, class_num=len(CHARS), dropout_rate=0).to(device)
        modelc.load_state_dict(torch.load(rec_weights, map_location=torch.device('cpu')))
        print("load rec pretrained model successful!")
        modelc.to(device).eval()


     # Apply Classifier
        if classify:
            pred, plat_num = apply_classifier(pred, modelc, img, im0s)
因为需要进行界面调用,所以最终将检测识别的车牌进行了返回
return lb2) 设计实现如下界面
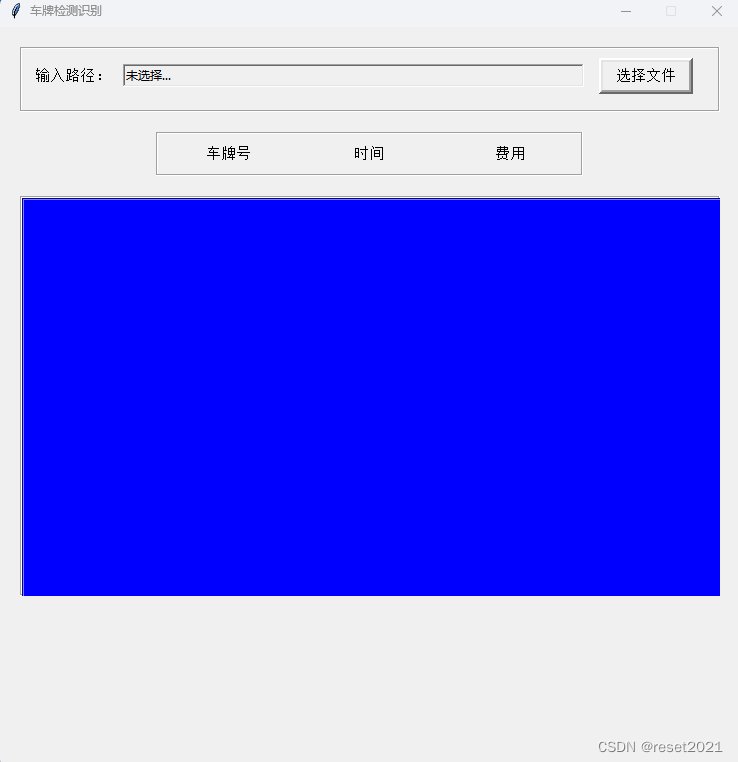
界面代码实现如下
""" 窗口初始化 """
window = tk.Tk()  # 实例化object,建立窗口window
window.title('人员数量统计')  # 窗口名
window.geometry('740x740')  # 设定窗口的大小(长x宽)
window.resizable(0, 0)  # 设置窗口大小不可变
myfront = ['Consolas', 11]  # 字体参数
infofront = ['Consolas', 10]

var1 = StringVar()
var2 = StringVar()


def print_scale(v):
    var2.set(v)


""" 框架组件 用于布局"""
# 父组件 边框像素(1凹陷感,2框线感)->简写bd 边线风格 垂直边距 高 宽
f1 = tk.Frame(window, borderwidth=2, relief="groove", height=100, width=700)
f2 = tk.Frame(window, borderwidth=2, relief="groove", height=160, width=700)
f3 = tk.Frame(window, borderwidth=2, relief="groove", height=400, width=700)
# grid布局 所在行 所在列 (跨越行数) 水平边距 垂直边距
f1.grid(row=0, column=0, padx=20, pady=20)  # 700+20+20=740 边框长+边距*2=窗口长 因此边框居中
f2.grid(row=1, column=0, padx=20, pady=0)
f3.grid(row=2, column=0, padx=20, pady=20)
# 固定组件大小,防止子组件大小影响
f1.grid_propagate(0)  # 子组件为grid布局
f2.grid_propagate(0)
f3.grid_propagate(0)


""" 标签 输入输出"""
title_output = tk.Label(f1, text='输出路径:', font=myfront, width=0, height=0)
title_input = tk.Label(f1, text='输入路径:', font=myfront, width=0, height=0)
# font为字体 width为长 height为高 这里的是字符的长和高(字符间距)
""" 输入路径 """
text_input = tk.Entry(f1, width=65, bd=2, show=None, state='normal', exportselection=False)  # 无密文 可写
# 此处双击文本 与list选择模型(line:70)事件冲突 双击后list失去选择报错 指定ex=f后解决(选中文本不可复制到剪贴板)
# 可双击选中 ctrl+C复制
text_input.insert(0, "未选择...")  # 写入文本
text_input.config(state='readonly')  # 写入后设为只读
""" 输出路径 """
text_output = tk.Entry(f1, width=65, bd=2, show=None, state='normal', exportselection=False)
text_output.insert(0, "未选择...")
text_output.config(state='readonly')
""" 按钮 选择文件 """
button_chooseFile = tk.Button(f1, text='选择文件', font=myfront, width=10, height=1, bd=4,
                              command=lambda: func_chooseFile(entryInput=text_input, entryOutput=text_output))
# command是按钮回调函数 lambda:传递参数
""" 按钮 开始 """
button_start = tk.Button(f1, text='开始', font=myfront, width=10, height=1, bd=4,
                         command=lambda: func_start())
""" 布局 """
title_input.grid(row=0, column=0, padx=10, pady=15)
title_output.grid(row=1, column=0, padx=10, pady=0)
text_input.grid(row=0, column=1, padx=0, pady=0)
text_output.grid(row=1, column=1, padx=0, pady=0)
button_chooseFile.grid(row=0, column=2, padx=15, pady=0)
button_start.grid(row=1, column=2, padx=15, pady=0)


""" 标签 参数选择"""
title_chvi = tk.Label(f2, text='视频/图像:', font=myfront, width=0, height=0)
title_chways = tk.Label(f2, text='选择阈值:', font=myfront, width=0, height=0)


s1=Scale(f2,from_=0,to=600,orient=HORIZONTAL,
    length=265,showvalue=1,variable=var1,tickinterval=200,
    resolution=1,command=print_scale)

e = Entry(f2,textvariable=var2,width=4,font=("仿宋", 17, "normal"))
""" 单选 算法选择 """

""" 单选 视频/图像 """
r_vi = StringVar()
r_vi.set('image')
radio_vi = tk.Radiobutton(f2, text='视频', variable=r_vi, value='video',
                          command=lambda: func_VideoImage(
                              ch='video'))
radio_vi2 = tk.Radiobutton(f2, text='图像', variable=r_vi, value='image',
                           command=lambda: func_VideoImage(
                               ch='image'))
""" 布局 """
title_chvi.grid(row=0, column=0, padx=40, pady=10)
radio_vi.grid(row=2, column=0, padx=0, pady=0)
radio_vi2.grid(row=1, column=0, padx=0, pady=0)
title_chways.grid(row=0, column=1, padx=0, pady=0)

s1.grid(row=1, column=1, padx=0, pady=0)
e.grid(row=2, column=1, padx=0, pady=0)


""" 标签 """

lmain = Label(master=f3, bg="blue" ,borderwidth=2, relief="groove", width=image_width, height=image_height)
lmain2 = Label(master=f3,  borderwidth=2, relief="groove", width=image_width, height=image_height)


lmain.pack(side = LEFT)
lmain2.pack(side = RIGHT)
lmain.grid(row=0, column=0, padx=0, pady=0)
lmain2.grid(row=0, column=1, padx=0, pady=0)
lmain.pack_propagate(0)
lmain2.pack_propagate(0)


""" 主窗口循环显示 """


window.mainloop()
3)结果检测
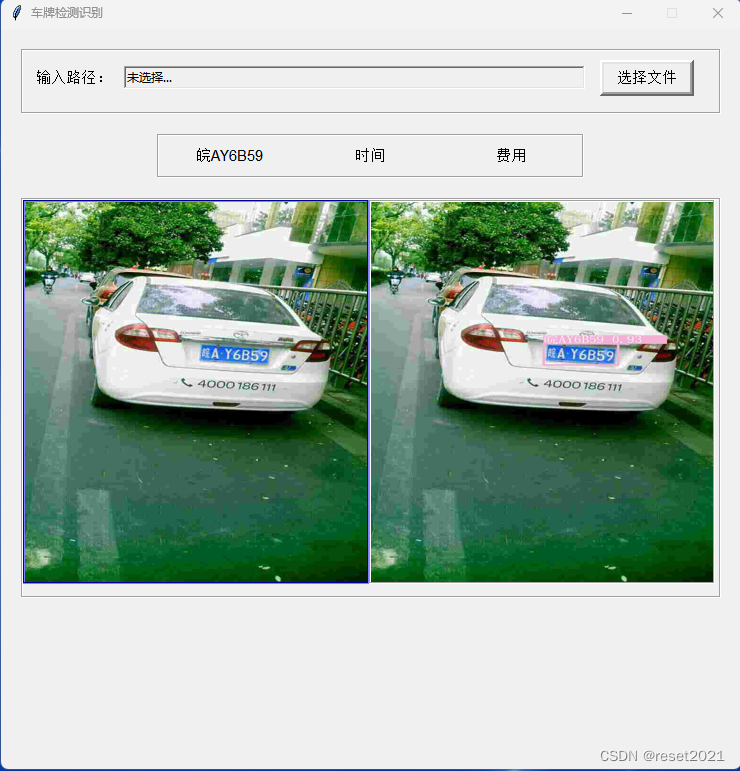
备注:这篇博文中涉及到的模型都是前面博文中训练来的。
完整的代码见
https://download.csdn.net/download/reset2021/87946658?spm=1001.2101.3001.9499


 扫一扫
扫一扫


 5639
5639

 被折叠的 条评论
为什么被折叠?
被折叠的 条评论
为什么被折叠?
 到【灌水乐园】发言


