Showing posts with label tutorial. Show all posts

Thursday, 4 June 2026

Goblin Green basing

Standards

(credit: xkcd) 

I entered Olden Demon (https://oldendemon.com/painting-competition/) this year. It's one of the rare online competitions I have the best of intentions to enter every year and somehow miss the deadline every time.

When it comes to retro/oldschool miniature painting, there's a surprising number of tutorials for replicating the "magic" of Goblin Green. From the few I found, none quite did what I wanted so ... let the tutorials proliferate! Really I'm recording it for my own benefit as a reference in the future, but if it helps you too, then fantastic.

Here's the paints used: Vallejo Intermediate Green, Citadel Shade Biel-Tan Green, Citadel Moot Green & Vallejo Flat Yellow.


The result will be this:

You don't need step-by-step pictures because that would be insane, but I'll explain the steps.

  • A layer of PVA applied to the base, covered in fine sand, andy left it to dry before removing excess sand to ensure good coverage.
  • Tap off the excess and apply either a "wash" of thinned down PVA, or ballast fixer, to secure and harden the sand so it's more receptive to paint. Don't brush it on, tap with a generous amount on the brush and let capilliary action do the work, or you risk it being pulled off the base.
  • Intermediate Green as (ahem) an intermediate green to act as a base and give uniformity of cover. Painting over black is an unpleasant experience when you want good coverage and this is a nice midpoint before going brighter.
  • Biel-Tan Green wash to darken and ensure the recesses are addressed and just darken the Intermediate Green so it offers greater contrast to the next colours going on top.
  • Citadel Moot Green is a great colour and if I was painting a whole army with basing, this is what I'd use without any mixing, but for a single model we can get a little closer by adding Flat Yellow to Moot Green. That's applied to the rim as a few even coats, and then as a gentle drybrush across the sand.
  • Add more Flat Yellow to the mix, and repeat the gentle drybrush onto the sand. Then repeat again until you feel good about it.


Monday, 12 January 2026

Orc shields

There's tens of thousands of painting tutorials. Almost all of them will be better than this, but I was asked by a couple of people for a step-by-step on how I've painted my shields, and was happy to oblige. It's also a useful way to track what I'm doing as a repeatable process on my army.

We're going to cover brushes, paints, process and future changes I might make. 

Let's start with the brushes because they're important. You don't need small brushes for the majority of detail, and it will slow you down to use small ones! While I have a 00 Series 7 for the final details, the majority of the work is done by these two horror show brushes to the right of it. They have not been loved, but are fantastic for this sort of project.

 Paints

  • Vallejo Leather Brown 
  • GW Wyldwood Contrast 
  • AK Dark Sea Blue
  • Kimera Magenta
  • AK Ochre 
  • AK Greenish White 

Process

Basecoat shields in Leather Brown, metal elements in Dark Sea Blue, and suns in Magenta. All you want is a consistent coat of paint as a starting point.

Wash everything in thinned down Wyldwood Contrast paint, except the suns. I applied it a little heavier on some shields than others just for variety. Don't forget that the symbols will be glued to them later so they don't have to be perfect. The goal is hitting any recess area that the paintbrush won't reach in later stages.

Take a big flat brush, and a 1:1 mix of Greenish White & Dark Sea Blue with almost no water added, and drag and stab it across the dark blue areas. The idea being I have my light source top left so the darker areas will be bottom right. Ensure you run the brush along every edge in a rough fashion. This isn't drybrushing, or stippling per se, it's just ensuring paint goes on the surface to create rough texture and start to build a sense of battered metal.

Using my round brush, I now add a very messy glaze dragging the brush upward to the top left corner ensuring I'm only catching raised surfaces and not going in the recess. This just helps to ensure the finish isn't chalky. 

Same process again but 2:1 mix of Greenish White & Dark Sea Blue this time. I swapped to a round brush and focused more on the upper left quarter of the pieces for most of the paint, but then ensured I brightened up areas like tusks, any edge facing upwards. Still a very ugly stabbing and dragging motion and not a lot of water.

As before, then a glaze of this over the top again. 

Now the fun part! I swap to the small brush and just using Greenish White, edge highlight the upper edges. Add a few random drags, stabs and then we're done.

At this point I move to the suns and using the Ochre apply the same approach with a lot of heavy stabbing and dragging from the top left. One nice feature of any yellow is that there's a bit more transparency than other colours, and over a pink or magenta it creates a nice warm tone. 

Now onto a 1:1 mix of Ochre and Greenish White and the same again, but a smaller area. Really focus on that upper left corner. By this point you should have more reds in the bottom right, then moving into an orange tone where the magenta and ochre overlap, up to a fuller yellow ochre, and now some whiter highlights.

Finally add a few touches of just Greenish White on the edge of tusks, horns and such. You don't need a lot of paint, just a stroke or two to catch an edge and make an interesting angle.


Done! Total time taken was 70 minutes for these, including pausing for notes and photos, and drying time. I plan to sit and do all the others in a single batch after this, and think the process will only take a few hours in total for everything. These aren't painted to win competitions, it's just to add character to an army, in a way that's fast to replicate across dozens of shields. So many shields. What on earth was I thinking.

What Would I Change?

There are two possible changes for the future.

  • Making the dark areas darker. My colours aren't very dark so there's scope to go back in places and push up the contrast by using more Wyldwood to darken areas.
  • Weathering. I plan to do a lot of rusted and weathered armour and weaponry, and could bring some of the oranges from those elements into the symbols on the shield in the darker areas.

Sunday, 11 December 2022

Gemstones

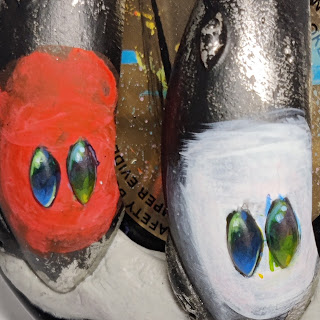
I needed a scheme for painting gems on my Eldar. The easiest way to try it is on larger shapes that have a similar surface shape, and I had a couple of wraithguard heads sitting around. I was amused that the result ended up looking like anime eyes at this scale. Heh.

For the green version it was a basecoat of black, Pthalo Green base, bottom highlight was Pthalo Green/Slimer Green, Slimer Green, Slimer Green/Warm Yellow, white edge then Warm Yellow glaze, top highlight was Pale Blue,

For the blue it was Red/Pthalo Blue to make a purple, the Pthalo Blue and white for the brighter colours, and a little of the Pale Blue in the final highlights.

This approach gave me a useful idea quickly of how I wanted the colours to work against red and white.


Footnote for the Eldar purists. No, I know these aren't gemstones they're instrument clusters because they don't have a gemstone setting ring around them.

Monday, 4 January 2021

Painting Checks

20 minute how-to for painting check patterns. I've picked an old goblin from the Avatar of War range to demonstrate it works reasonably well on a very small area. Plus I really need to start painting this guy ...

Prime the figure white.


I want to do a black and white effect on the sword and hat, so I'm going to start with a nearly black basecoat - mine's black with a little brown and purple added. It may seem wrong, but it's easier to tidy up my messy painting at the end using black instead of lots of white over black.

Stripes next. Using an off-white, I've painted these a little thicker for visibility than I would if pushing for a higher quality model. But hopefully you can see I've taken time to draw reasonably neat lines.

This is also the point where you can check your paint consistency. You want less water in the mix than you may think. It needs to be controllable, without running away from you - but not so thick you see marks in the paint. Practice your control.

I don't paint a full checkerboard pattern, because then you're left filling in tiny, unequal spaces. Bear with me again here!

Think of the stripes as creating rows. Let's create our first square. Top left corner of row one. To do this you should paint downward strokes from the top of the first row to the bottom of the first row. Don't try painting sideways, just turn your miniature round!

Now repeat the process across the whole row. Move to the second row and paint in the spaces you left behind. This gives you a clean edge on each square as you move down the rows.

Final touch of pure white along what will be the upper edge, just to add an edge highlight. It won't be very noticable, but it'll help.

It's a little scruffy and I need to tidy up. So now this is where the almost-black mix from the beginning comes back in. Same process again, but on black squares this time. As the final touch, add a line of pure black along the upper edge of each black square.


And that's it. You're done. Now I just need to complete the rest of the model ...

Monday, 21 September 2020

Scratch built base

I did two bases for my Chaos Spawn project, and both were scratch built, and thought it would be fun to share the process.

Start with an idea of what you want to do before anything is glued down! Here, my thinking was a destroyed science facility. Interestingly, it was only after completing these that I realised I'd used a similar theme with similar monsters last year (https://nerodine.blogspot.com/2019/07/roman-lappat-beginner-course.html) and pretty confident I was subconsciously influenced by this.

Blue cylinders are pieces of plastic straw, with some old cables from discarded PC parts glued inside. After that, it's a combination of leftover items from my bits box. So there's pop-out pieces from MDF terrain kits, some cork tiles I ripped up, Necromunda belt kits, basing paste, little cut offs of balsa wood. Anything to add to the feeling of a building that's been utterly destroyed.

 When the larger items were firmly in position, I generously applied superglue over the empty areas, and sprinkled large gravel in, and then very fine gravel to fill the inbetween spaces.

 The last step was ensuring it was all properly dried, then applying a dilution of PVA and water over everything to lock it in position. Leave for a few hours, then it's rock hard and you won't risk the gravel falling off.

There are large, flat surfaces here, despite the appearance. That's deliberate to ensure the monster feet have somewhere to securely place.I went back and forth checking it was still a good fit.

Black primer, then a harsh zenithal. I was pleased how coherent it looks at this point. There's something very pleasing to a well primed item.

Riffing on the colours used on my Chaos Spawn, I've tried not to focus on picking out elements of the base - rather just the feeling of a lot of rubble.

Highlights, such as they are, are just from the bluer end of the colours used on the Chaos Spawn. A little red and pink is added to the lettering to give an area of interest, but you won't see most of it when the monster's glued on top - so there isn't any point spending too long here.


Sunday, 14 April 2019

Painting Neon Bases - The First Element

Usually a work in progress is exactly that, but I realised my current WIP merited something more, and suddenly here's a tutorial for creating outrageous colours on bases. This is the Triple Hex pattern from Green Stuff World and I adore it.

Rolled out a base back in November 2018 as a test piece and then promptly put it to the side without really having a plan. Then my brain knew exactly what it wanted to do, and so here we are.


I like this effect, but as a painter of middling ability, I prefer deeper recesses to help me avoid painting over the wrong area. However ... off we go. Basecoated with the ever-reliable Hexed Lichen


Alternating rows painted in Warlock Purple with Squid Pink highlights. It still felt a little flat, so I went back into the recesses with Hexed Lichen and a little Stormy Blue into the recesses. I added white dots along one edge of the pink shapes to give it a little depth.


The idea was to give the road surface a feeling of life. Perhaps the pink strips represent active panels, and the purple ones are currently inactive. Or it reflects the direction of traffic flow. Who knows? Here's the rough plan with the vehicle adding to the big colours. You may have an idea of what I'm aiming for at this point with the inclusion of these two Heresy miniatures, but maybe not ...


The base still felt like it needed something more. Electric Blue really is quite electric. My eyes are starting to hurt a little while looking at this now, and strangely ... I'm okay with that. It reminded me of an oldschool computer game where the lives left are outlined in a super bright colours, or perhaps Moebius' concepts on Tron. Who knows.


This still wasn't sufficient, because I'm a masochist, so it's back into the recesses to add Dead White into my Electric Blue and paint in just two edges with this brighter colour. Again, trying to create the feeling of more depth in the shape. I also returned to the darker hexes and used Hexed Lichen and Warlock Purple and edged them, then added a little Dead White to that mix as final dots.


I'd done a little more work on the vehicle in the meantime, so here they are in situ. Reflecting the sames blues in the windows of the car and a little of that purple and blue "bouncing" up onto the underside of the yellow, with the blue exaggerated for effect.


So there you have it. A guide to painting face melting colours. I wouldn't recommend it for basing a whole army, unless you have an excellent therapist.

Thursday, 25 October 2018

Display Shelves

I've wanted a display cabinet for my miniatures for years. In fact, it can be measured in decades. They look brilliant, and showcase the effort you've put in to your collection.

At various points I didn't have the space, inclination to work it out, or the time to effect change.

Finally I had all three, and here's the result.


The cabinet itself is just an Ikea Billy bookcase, with Oxberg doors. I added glass shelves to maximimise the space that would benefit from the lights.

Lighting is Ikea Ledberg strips, and this is the only moderately complicated part. Ledberg comes in three connectable lighting strips and when the three strips are connected, they're a perfect fit for the internal width as the bookcase. But sadly you need add power in one end, and this makes it too long to fit.

The easiest solution would be to use only two lighting strips, but then that would leave dark spaces to the sides and reduce the usefulness of the display area. Looking at the strips, I realised it should (note: should) be possible to trim part of a strip, make a small solder to rejoin the positive and negative connections and then ... it'll work? Right?

It did! So I trimmed each third lighting strip about a third of the way down its length and added a dab of solder. Pleased with how that turned out.


I measured under the shelves, and set the light strips back about three inches from the front, then screwed in the clips to hold the lights. I used three clips, but in hindsight would probably have used four - with one near each end and two to support the joints between lighting strips. But I didn't, and here we are, but you can!


Holes were drilled through the back panel of the bookcase, behind where the shelf will be positioned. This has two benefits:
  • It gives the cables sufficient space to pull through correctly, and remain hidden.
  • When the shelf is seated, it pinches the cable a little and holds it in position tightly without damaging the cable.

Be very, very sure of the shelf positioning before you do this. I spent a good hour or two doing "what if?" testing with miniatures of varying heights and sizes before settling on the final heights. The lower shelf is slightly taller than the upper shelf, but if you reversed that, it would look wrong.

To fix the light switches in place, I applied the first part of a velcro strip to the side of the bookcase, applied the second part of velcro to the rear of each light switch.

Ensure you place all the large bulky display pieces on the shelf under glass, not on the glass. It means light gets through to everything underneath, and doesn't create awkward shadow areas. Position your best pieces directly under the lighting strip, and you're done!

I'm going to add dust proofing to this using 3mm insulation tape on the top and bottom of the doors. But that's a project for another day.

Saturday, 27 January 2018

Improving My Photography (Jan-18)

I've been fiddling with my lightbox to get better photos - something closer to the colours I see when looking at the model. Below is the journey I took with my Ork to get to a good place.

The default option with lightsource above lightbox, diffused.


Changed to increase exposure.


Changed the camera's elevation to be a little higher.


Increased the exposure again, without moving the light source.


Increased f-value to f11 but felt it was leaving the background in sharp focus as well now.


Pushed the light source back to be over the camera instead of over the lightbox. Getting close now.


Realised I'd overcomplicated life a little. Moved the light back to almost overhead the miniature again, and downstepped the exposure.


There will be further adjustments over time, but for the moment this feels pretty good - and gives an accurate representation of what the model looks like in real life. Here's how the camera setup looks in reality.


Sunday, 24 September 2017

Weathering

I was asked for tips on achieving the weathering and colours from the three shipping containers. So here's the breakdown of how they came together.

All paints used are from the Vallejo ranges, usually Game Color or Game Air ranges.

  • Prime with Black. Over the MDF you want to leave this an hour between thin coats to ensure it sinks in. This took while some time - but as there were lots of terrain pieces to prime, it wasn't a problem.
  • Basecoat with Dark Fleshtone. Full coverage apart from the very deepest recesses.
  • Basecoat with Parasite Brown. Partial coverage as the idea at this stage is to have several different shades of colour appearing.
At this point you're wondering what on earth you've done ...


... but it's okay! Stick with it. Now onto the invisible stages.

(also spoilers in the shot above, you can see there's more terrain incoming)

  • Apply matt varnish to everything. But don't make it thick and obscure detail, this is an important step to ensure you don't start pulling the paint off later. I did start with gloss varnish, but couldn't get it to run smooth in my airbrush and swapped to matt with zero problems. Personal taste, I think - the important thing is protecting the colours.
  • Apply chipping medium to everything. Sure, you could be quite precise and decide exactly where you want to chip the containers, but I'm not that good at remembering details - so a full coverage is best. After coating three surfaces, leave it overnight so it isn't sticky to the touch. Do the fourth surface the next morning then leave it all to fully dry.

This concludes the preparation work so now it's on to the painting proper with the main colours for the three crates.

  • Scarlett Red basecoat, Moon Yellow highlight.
  • Yellow Olive basecoat, Camoflage Green highlight
  • Scurf Green basecoat, Scurf Green/Dead White highlight.

Using the airbrush, I started with the darker colour and coated everything in three or four thin coats. You need to leave it a little longer between coats because the chipping medium underneath starts to activate with the water in the paint - so just take your time and get solid coverage. I then adding more of the highlight colour and started hitting the top parts and edges.


These containers had lettering pre-etched into the design so I picked them out with the final highlight colour. I wanted them to be readable but not something to focus on. There is a thin glaze of Imperial Blue toward the bottom of the Green and Blue containers just to make the contrast a little more distinct.

Now the colours have tried, it's on to the terrifying step. Ripping apart all your hard work. The chipping medium is activated with water, so take a large brush dripping in water and gently coat one surface. Let any excess water drip off onto a paper towel, then you need to take off the paint.

From experience, on smaller scale miniatures, like my Space Wolves, using a toothpick or paperclip works well - but larger pieces like this that approach would take a long time. I took a piece of pluck foam and started dragging it across the surface. After every drag I rotated the foam so a different surface was soaking up the paint. Then I just repeated it until everything was done.


It feels weird at this point - you've basically destroyed half your work! But again, it's okay. Final steps and it all comes together.

  • Edge Highlighting.  With the brightest highlight colour, you need to add a thin edge highlight. Not just the corners of the object, but also at the bottom of each chip. This enforces the three dimensional effect of the chip. You can, if time allows, go back and add a thin line of Dark Fleshtone + Black at the top of the each chip to really punch home the effect. The most time consuming stage of the process but it makes or breaks it.
  • Rust. Along the very bottom, at random intervals, I added a little of the Modelmates excellent rust effect. If you apply it a little thicker, this brings a small amount of texture onto the surface as well. You could take a reddish brown paint and add a little more orange to achieve a comparable effect.

Then that's it! We're now at the point where you have the finished container and get to bask in the sweet, sweet glow of knowing your Space Wolves can't be hit from 36" by filthy Tau artillery because there are now casual line of sight blockers on the table.

Sunday, 17 September 2017

Stripping old miniatures

We should talk about cleaning old figures, and Biostrip 20. I finally bought some of this and stripped a few old units for selling on eBay. Holy heck it's good stuff.

Here are my Fiends of Slaanesh before their bathtime ...


Dipped the models individually in the tub then let the excess drip off back into the tub, left an hour and removed all the surface paint. I then repeated the process but put the coated figures in a bowl overnight.

Next morning, armed with a toothbrush and bowl of hot water, I dropped them all in the water then scrubbed the paint away and they're nearly like new. There's no terrible smell like nail polish remover, which was my previous go-to, and did a better job too.

Here's how it looks when they're dry ...


It's £10 for a tub, but I've used maybe 10% of that cleaning down the first batch of old figures. Well worth the investment. The wife hasn't complained about an evil lingering odour, which is an additional bonus. In the dip at the moment are Blue Horrors, a Cauldron of Blood and then there'll be more models going the same way then up for sale.

If you want to have a look on eBay at my OOP pieces going for sale then click the link here.