Showing posts with label Tutorial. Show all posts

Saturday, December 17, 2011

Cute Bag/Purse Tutorial

Here is a picture of a bag to make from pillowcases of all things. The Tutorial is found at a site called Cut Out and Keep. I will be giving you a link to this tutorial at the end of this post.

Chris Daley's Blog of Greetings from the Shady Grove Blog told us about this in a comment below. She has a wonderful blog that I think you all ought to take a look at. She makes beautiful jewelry and hand dyed fabrics and has them for sale. She made several of these bags and used vintage pillowcases from thrift stores and other places. Go to her blog and see her versions of the bag.


Thank you very much Chris for letting us know about this and for the pillowcase tutorial you posted earlier. We are linked to that too.

You can click on the tutorial at: Cut Out and Keep which looks like an up and coming site.

Wednesday, November 16, 2011

Wool Applique Tutorial

It is not necessary to reinvent the wheel, because someone already did that very well. That's how I feel about this tutorial on wool applique. Ann at Cottons 'n Wool did a fantastic job with her explanations and pictures and gave some great tips that I have never seen before on wool applique. I have been working on something like this, and this tutorial has changed the way I am going to finish it. Please visit her blog and see this great tutorial. She also gives sources for wool and how to start a wool stash. I will post this in our tutorial section for future reference.

See the wool applique tutorial here. Enjoy!

Monday, October 17, 2011

Free Unique Dresden Plate Tutorial from Lurline

Isn't this the most different Dresden plate block you have ever seen? This was made by Lurline of Lurline's Place Blog in Australia. She is one of the blogs I follow.  Thank you Lurline for your hard work on this tutorial. I just love this block.


I was so taken by the colors and by how different this is from your ordinary, everyday Dresden plate block. She has a wonderful tutorial on how to do this block. It is really worth the click over there to see. Click here to see the tutorial. The tutorial is very well done with great pictures, instructions, and tips. If you stop over there, please remember to thank her for her work. She went through a lot of trouble to do that for us.


A link to this tutorial will be in our tutorial section for fast reference.

Monday, September 12, 2011

Moda Bakeshop - Free Patterns and Tutorials

I stumbled onto this fabulous site a while ago and will be including it in the tutorials and patterns section. I wasn't sure just where to put it, because it could fit in any of the categories.

Why is it called bakeshop? The Moda Bake Shop is a division of Moda Fabrics that provides online recipes which you can use with the wide range of Moda Pre-cuts like jelly rolls, layer cakes, etc.. All sizes and types of projects will be featured from various designers and shops. Tutorials for various moda projects sheets will be illustrated with step by step pictures. Some techniques and products will also be featured throughout, so check back often for what is "baking" here at Moda Fabrics.

Check it out. You will be thrilled with what you find.

Tuesday, August 23, 2011

Scalloped Borders - Try a New Technique

I always love to stretch my skills and learn something new. It is so good for the brain and makes you feel good when you can accomplish something that looked hard.


I found this pattern for a checkerboard table mat that would make a wonderful gift for checker players of any age. It gives you an opportunity to try the scalloped border technique. Perkin Dry Goods from Bloomington, MN offers this wonderful free pattern on their website. There are complete instructions, tips and a template for the scallops.


Celine Perkins runs this website and is a pattern designer. She has many gorgeous patterns to purchase on her site too. Go on over and check her site out. You will really like what you find.

Perkins Dry Goods

Wednesday, June 29, 2011

Origami Wreath Tutorial

Here is the complete tutorial on the origami wreath that Lynn Butler demonstrated at a Reedsburg Area Quilt Guild meeting. I would like to first thank Lynn Butler for all of her hard work and expertise on this project. You are truely a generous and wonderful lady!


Lynn Butler's first wreath she brought in. These could be used as a doily, table runner or hung on the wall.


Lynn made this one as a table runner in greens and tacked three of them together. As you can see, if you vary the colors in your triangles you will get a different effect.

The name on the pattern is called Origami Christmas Wreath and was an original design by Lynne Edwards.

Materials List:
1. Two different colors of fabric
2. A ruler that will cut at a 60 degree angle
3. General sewing kit of needle, thread and scissors.

Cut the two different colored fabrics into 5" strips. You will need to cut two strips for each color. Lynn said she gets 13 per strip on a 44" wide strip.

Next take the 5" strips and cut them into 60 degree triangles (18 equilateral triangles from each of the two colors). See the tutorial about how to do this here at the EZ Quilting Ruler site if you don't know how to cut a 60 degree triangle with the EZ quilting triangle template or some of their other rulers.


Thank you EZ Quilting for your tutorials on how to use your wonderful rulers.

You can also check here at About.com where Janet Wickell has posted a wonderful tutorial on how to cut eqilateral triangles and many other shapes with a rectangular ruler. Thank you About.com and Janet Wickell for your generosity in teaching us this skill.


The next step is optional but will save you handsewing later. I had planned on maybe trying to glue the opening shut at the end, but I remembered a technique that I saw on Sewing with Nancy. Before you put the pieces together first put fusible tape on one edge of the RIGHT side of one triangle.

This is Clover brand fusible web that is 5 mm. wide. It is used to put bias on stained glass type quilts or celtic bias. I cut it 2 inches long. It is ironed onto the RIGHT side on the middle of one edge, and then the paper peeled off. If you have something like Heat N Bond you could cut this into 3/8" pieces x 2 inches long to do the same thing. You could put a sheet through a paper shredder to get many pieces cut fast. Only one of the two triangles put together needs the fusible for this technique.


Here it is ironed onto the middle of one side. (Important - Put on the RIGHT side of the fabric)


Next peel the tape off. You can see on the burgundy triangle the fusible glue. There is no fusible on the tan triangle.


Next put one of each of the two different colored cut 60 degree triangles right sides together. I put pins at the beginning and end of where the fusible was so that I didn't sew there.

Sew around the sides of the triangle using a 1/4" seam allowance and leaving about 2" open (where you put the fusible on if you chose that technique) on one side so that you may turn it right side out.
Do this until you have 18 sewn triangles. Crop all 3 of the corners, but don't cut your seam.

Turn them all right side out and try and get all of the corners pushed out to make them as sharp as possible. Press. If you haven't put the fusible web on you should tack the seam allowances closed. This is where all I had to do after turning things right side out and making sure the corners were pushed out as far as they go was to press the opening closed. I love this technique. It save me a lot of time handsewing the openings closed.


Next fold all three sides and crease to mark your center.


You can see where the creases meet and mark the center in this triangle above.


Tack all three corners to the center of the triangle.


Next you will turn the hexagon shape over and tack the side to the middle. Do this on all three sides. The picture on top has the finger pointing to the place that should be folded back. The picture on the bottom has a needle pointing to the place that is tacked.


Here you will see two sides tacked. Continue until all three are tacked.


Here are two triangles completely tacked and then tacked together in two spots. I hope you can see those two points. My finger is pointing at one point, and a scissor is pointing at the other.
Here are three tacked together for a total of 6 tacks for a subunit.

This picture shows you how the two different sides look at this stage.

Here all of the subunits are assembled and waiting to be assembled as a whole.

Take two subunits and tack them in the 4 places that touch in the picture above.

Keep tacking your subunits together like above.

Completed wreath on one side


Completed wreath on other side.

I hope this answers all of your questions about this project. If not, please feel free to e-mail me, and I will be happy to help you in any way I can.

This tutorial will be permanently available in our tutorial section in the sidebar.

I just found a printable PDF version of this pattern by Lynn Edwards for Checkers/Creative Grids Rulers here.

Tuesday, March 29, 2011

Flower Tutorial

This is a very cute and easy flower to make to use in many situations.  Your imagination is the only thing holding you back from using these.  This can be put on clothing, quilts, barrettes, pony tail holders, etc.
This is one of two aprons I made for my granddaughters for Easter.  I love green quilting.  The skirt part of this was cut in half on the sides, and I made two aprons from one skirt.  I did have to throw in about a fat quarter to finish the bib part, but all in all a very economical gift.

So how do you make those flowers?

First I drew a pattern using a 1 inch square and rounded off the top with a found object that seemed to fit.  I am including a free template for this here for those of you who would like it, but maybe you want to make a larger size, and you should know how to do that.


Next trace your pattern five times on a piece of freezer paper.  You could do this on regular paper and pin, but the freezer paper is so much easier.  Then cut the shapes out and place the freezer paper shiny side down on either side of your fabric.

Press them down for about five seconds.

Cut the shape out the size of the freezer paper.

 Next cut a square that is about 1/4" larger than your original petal.  In this case it is 1 1/4"  This can be done without getting it exactly square, as you will be trimming later.


Place one petal and one square right sides together with petal centered.


Sew around the outside of the petal (the arch) with a small seam allowance.  I tried to do somewhere between 1/8 and 1/4 inch.  Just keep all of the petals consistent.  Leave the bottom open.  I did back stitch a little bit at the beginning and end.  It might have come apart in the next step if not done this way.


I am sorry that some of these pictures are blurry.  My photography is needing a little work yet.  At this point you trim around the outside arch to about 1/8".  You also trim the bottom opening even with the petal.


Here it is all trimmed.


This is one of my secret tools in blue.  It is a free straw from Culvers.  They are super strong and really help turn small appliques or stuffed items right side out.  Insert the straw into the opening of the petal.  The ball point bodkin above it is used to push it a little way through the straw so that it can be turned.


Here it is being pushed into the straw just enough to get ahold of it and finish turning.

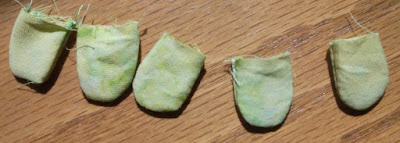
Now take it off and finish turning with the bodkin or something smooth that won't poke a hole in it.

Smooth it out.


You will need five petals for each flower.


Run a gathering stitch with needle and thread through each petal.


Gather all five petals onto thread.


Draw them up snug.  They will kind of curl into a circle.


 Connect the beginning to the end with a little knot.


Even out the petals so that they lay as symmetric as possible.

 f


For the centers I use either buttons or yo-yos.  Making yo-yos allows for matching fabrics in your project and are very inexpensive when compared to buttons.  I used the smallest yo-yo maker by Clover.  I will include a template for one the size of this project with the petal template here.


Then you either sew your button on or applique down your yo-yo, whatever side is more pleasing to you.


Flower with button Center embellishment on apron


Flower with yo-yo center
Flower embellishment on purse
Close up of flower on purse

Related Posts Plugin for WordPress, Blogger...