

API keys are unique identifiers generated by an API provider to authenticate applications and manage API access.
- Identify and authenticate applications making API requests.
- Control access to APIs and can be regenerated or revoked if compromised.
- Track API usage, enforce rate limits, and secure REST APIs, cloud services, and third-party integrations.
Example:
AIzaSyD8Gg1Xw9K6LAbCdEfGhIjKlMnOpQrStUvWorking of API Keys
API keys are sent with API requests to identify the client application. The API server validates the key before processing the request.
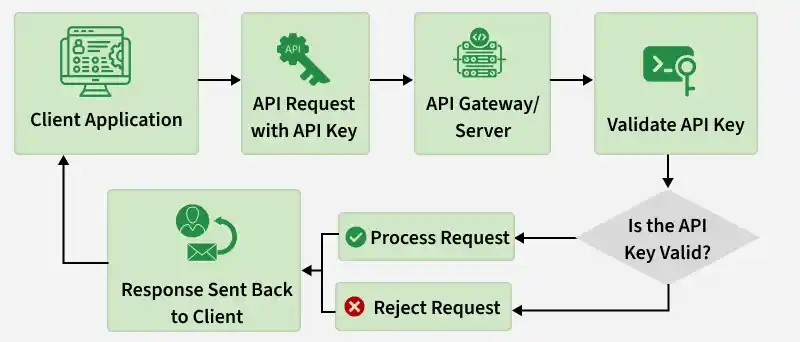
Generate an API Key
- The developer registers an application with the API provider.
- The provider generates a unique API key for the application.
Store the API Key Securely
- Store the API key in environment variables or a secrets manager.
- Avoid hardcoding the key in the application source code.
Send the API Request
- The client includes the API key with every request.
- The key is typically sent in an HTTP header, the Authorization header, or as a query parameter.
Validate the API Key
- The API server checks whether the key is valid, active, and authorized to access the requested resource.
Return the Response
- If the key is valid, the server processes the request and returns the requested data.
- If the key is invalid, missing, or revoked, the server returns an authentication error.
Example Request
GET /users HTTP/1.1Host: api.example.comX-API-Key: abc123xyz
Response for Valid API Key:
{"message": "Request processed successfully"}
Response for Invalid API Key:
{
"error": "Invalid API key"
}
Ways to Send an API Key
API providers specify how clients should send an API key with each request. The most common methods are using an HTTP header, the Authorization header, or a query parameter.
1. Using an HTTP Header
The API key is sent in a custom request header (e.g., X-API-Key). This is more secure than using query parameters because the key is not exposed in the URL.
GET /users HTTP/1.1
Host: api.example.com
X-API-Key: abc123xyz
Example using Fetch API
fetch("https://api.example.com/users", {
    headers: {
        "X-API-Key": "abc123xyz"
    }
});
2. Using the Authorization Header
The API key is sent in the Authorization header (often as Bearer <API_KEY>). This is a standard and more secure approach than query parameters, as the key is not exposed in the URL.
GET /users HTTP/1.1
Host: api.example.com
Authorization: Bearer abc123xyz
Example using Fetch API
fetch("https://api.example.com/users", {
    headers: {
        Authorization: "Bearer abc123xyz"
    }
});
Note: The Authorization header is commonly used with OAuth access tokens and JWTs. Some API providers also accept API keys using this header.
3. Using a Query Parameter
The API key is passed in the request URL (e.g., ?api_key=your_api_key). It is simple to use but less secure since URLs can be logged, cached, or stored in browser history, exposing the key.
GET /users?api_key=abc123xyz HTTP/1.1
Host: api.example.com
Example using Fetch API
fetch("https://api.example.com/users?api_key=abc123xyz");
Note: Sending API keys as query parameters is generally discouraged because URLs may be logged, cached, or stored in browser history, increasing the risk of exposing the API key.
Example: API Key Authentication in Node.js & Express
Demonstrates how to secure an API endpoint in a Node.js and Express application by validating the API key sent in the X-API-Key header against the key stored in an environment variable.
Step 1: Create a Node.js Project
Initialize a new project and install Express along with the dotenv package.
mkdir api-key-auth
cd api-key-auth
npm init -y
npm install express dotenv
Step 2: Create an Environment Variable
Create a .env file in the project root.
API_KEY=my-secret-api-keyStep 3: Create the Express Server
Create a file named server.js.
require("dotenv").config();
const express = require("express");

const app = express();
const PORT = 3000;

const API_KEY = process.env.API_KEY;

// Middleware to validate API Key
app.use((req, res, next) => {
    const apiKey = req.header("X-API-Key");

    if (!apiKey) {
        return res.status(401).json({
            error: "API key is required"
        });
    }

    if (apiKey !== API_KEY) {
        return res.status(401).json({
            error: "Invalid API key"
        });
    }

    next();
});

// Protected API Route
app.get("/users", (req, res) => {
    res.json({
        message: "API key verified successfully",
        users: [
            { id: 1, name: "Alen" },
            { id: 2, name: "Ben" }
        ]
    });
});

app.listen(PORT, () => {
    console.log(`Server running on http://localhost:${PORT}`);
});
Step 4: Run the Server
Start the server using the following command:
node server.jsStep 5: Test the API
Request with a Valid API Key
GET /users HTTP/1.1
Host: localhost:3000
X-API-Key: my-secret-api-key
Output:
{
  "message": "API key verified successfully",
  "users": [
    {
      "id": 1,
      "name": "Alen"
    },
    {
      "id": 2,
      "name": "Ben"
    }
  ]
}
Request with an Invalid API Key
GET /users HTTP/1.1
Host: localhost:3000
X-API-Key: wrong-key
Output:
{
  "error": "API key is required"
}
Applications and Benefits of API Keys
API keys enable secure API access while simplifying authentication, access control, usage monitoring, and application integration.
- Secure access across applications such as cloud services, third-party APIs, internal APIs, and web or mobile applications.
- Control and monitor API usage through access control, request tracking, analytics, billing, and rate limiting.
- Easy to implement and manage with lightweight authentication, simple key generation, rotation, and revocation.
- Support automation and integrations for server-to-server communication, scripts, developer APIs, and automated workflows.
Limitations of API Keys
API keys provide a simple authentication mechanism, but they have several limitations compared to more secure authentication methods such as OAuth.
- Limited Security: Identifies the application, not the user.
- Risk of Exposure: Can be leaked if hardcoded or exposed in client-side code.
- No User Authentication: Cannot identify individual users.
- Limited Permissions: Provides less granular access control than OAuth or JWT.
- Can Be Misused: A leaked key can be used until it is revoked.
- No Expiration: Usually remains valid until manually rotated or revoked.
- Not for Sensitive APIs: OAuth or JWT is preferred for secure applications handling sensitive data.
