

A Postman Pre-request Script allows you to execute JavaScript before the main API request is sent. The pm.sendRequest() function can be used to send an additional POST request and process its response.
- Sends an additional POST request from a Pre-request Script.
- Allows request data to be generated or prepared dynamically.
- Enables response data to be processed for subsequent API operations.
Prerequisites
Before working with POST requests in a Postman Pre-request Script, make sure you have the following:
- Basic knowledge of HTTP methods, especially GET and POST.
- Postman installed on your system.
- Basic understanding of JavaScript and JSON syntax.
- Access to a REST API such as JSONPlaceholder for testing.
Pre-request Script
A Pre-request Script is JavaScript code that Postman executes before sending the main request. It can be used to prepare data, set variables, generate values, or perform additional operations required before the request is sent.
- Executes before the main request.
- Supports dynamic data preparation and variable configuration.
- Can use Postman scripting APIs such as pm.sendRequest().
Understanding pm.sendRequest()
The pm.sendRequest() function allows a Pre-request Script to send an additional HTTP request. It accepts the request configuration and a callback function that handles the result.
- Supports HTTP methods such as GET, POST, PUT, and DELETE.
- Allows headers, URLs, and request bodies to be defined programmatically.
- Provides the request result through the callback function.
Step-by-Step: Sending a POST Request Using a Pre-request Script
Step 1: Create the Main Request
Create the main request that will be executed from Postman. In this example, a GET request retrieves a post from JSONPlaceholder.
- Open Postman and create a new HTTP request.
- Select the
GETmethod. - Enter
https://jsonplaceholder.typicode.com/posts/1in the URL field.
Step 2: Add the Pre-request Script
Open Scripts and select Pre-request. Define the additional POST request and use pm.sendRequest() to send it.
const postRequest = {
    method: 'POST',
    url: 'https://jsonplaceholder.typicode.com/posts',
    header: {
        'Content-Type': 'application/json'
    },
    body: {
        mode: 'raw',
        raw: JSON.stringify({
            title: 'Pre-Request Post Title',
            body: 'Pre-Request Post Body',
            userId: 1
        })
    }
};

pm.sendRequest(postRequest, (err, response) => {
    if (err) {
        console.error('Error:', err);
        return;
    }

    console.log('Pre-request POST response:', response.json());
});
Step 3: Send the Main Request
Click Send to execute the request. Postman runs the Pre-request Script during the request execution process.
- The script initiates the additional POST request.
- The main GET request is then sent as the configured request.
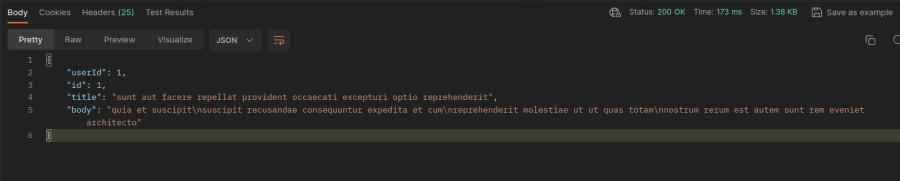
- The GET response appears in the Response section.
The main request is:
GET https://jsonplaceholder.typicode.com/posts/1
Step 4: View the POST Response
The POST response is logged using console.log(). Open the Postman Console to inspect the response returned by the additional request.
- Open the Postman Console.
- Find the Pre-request POST response message.
- Verify the returned response data.
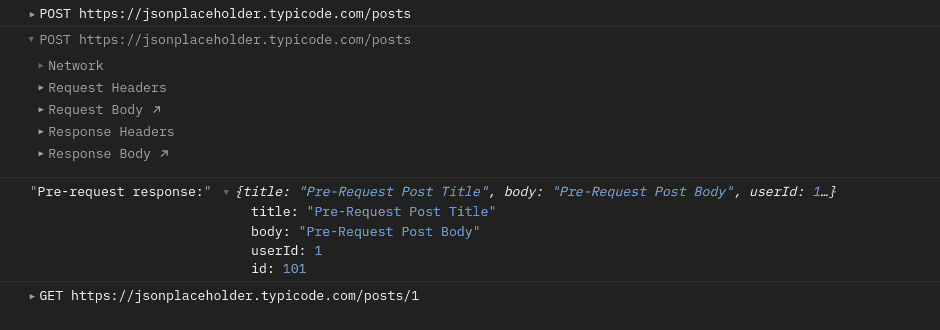
JSONPlaceholder provides a simulated response for testing and learning, so the POST resource is not permanently stored.
Adding Headers and Request Body
The POST request includes a header and a JSON body to provide the data required by the API. The Content-Type header tells the server how to interpret the request body.
- Content-Type: application/json indicates that the request body contains JSON data.
- mode: 'raw' specifies that the body is sent as raw data.
- JSON.stringify() converts the JavaScript object into a JSON string.
- title, body, and userId contain the submitted data.
Handling the POST Response
The response from the POST request is available through the callback passed to pm.sendRequest(). The response can be checked for errors and converted into a JavaScript object for further processing.
`err` indicates whether an error occurred while sending the POST request.- `response` contains the response returned by the API.
- `response.json()` converts the JSON response body into a JavaScript object.
- `console.log()` displays the processed response in the Postman Console.
Storing Response Data in Variables
A value from the POST response can be stored in a Postman variable when it is required for later use. This is useful for passing generated data between API requests.
const responseData = response.json();
pm.environment.set('post_id', responseData.id);
- response.json() extracts the response data.
- pm.environment.set() stores the id as an environment variable.
- The stored value can be referenced as {{post_id}}.
Important:
pm.sendRequest()is asynchronous. Therefore, the main request should not be assumed to wait for the POST request to finish before it is sent. If the main request depends on the POST response, the workflow must explicitly account for this behavior.
Using Response Data in the Main Request
Stored response data can be referenced in request URLs, parameters, headers, or request bodies. This allows API workflows to use values generated during execution.
Example:
GET https://jsonplaceholder.typicode.com/posts/{{post_id}}
- {{post_id}} references the stored variable value.
- Variables reduce the need to hardcode dynamic values.
- They can be used in URLs, parameters, headers, and request bodies.
Common Errors and Troubleshooting
Common issues when sending a POST request from a Pre-request Script include incorrect URLs, invalid request data, and JavaScript errors.
- Invalid URL: Verify that the POST endpoint is correct and accessible.
- Incorrect Headers: Set Content-Type to application/json when sending a JSON request body.
- Invalid JSON: Check the request body for missing quotes, commas, or brackets.
- Script Errors: Check the Pre-request Script for JavaScript syntax or runtime errors.
- Request Failure: Use the err parameter in pm.sendRequest() to identify whether the request failed.
- Unexpected Response: Inspect the response status, headers, and body in the Postman Console to determine the cause.
Limitations
Sending additional requests from a Pre-request Script can be useful, but it introduces some limitations.
- pm.sendRequest() creates an additional HTTP request, which can increase execution time.
- Its asynchronous behavior can make dependent request workflows more complex.
- Additional requests can make debugging and execution flow harder to manage.
- Unnecessary requests can increase API usage and may contribute to rate-limit issues.
