Client-Side Data Fetching in Next.js retrieves data in the browser after the page has loaded. It is commonly used for interactive, user-specific, or frequently changing data where the content does not need to be pre-rendered on the server.
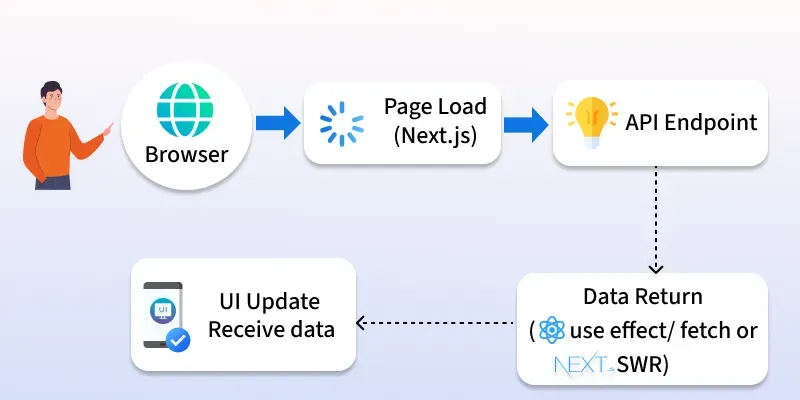
- Fetches data after the page loads in the browser.
- Uses Client Components with React hooks like useEffect or libraries such as SWR.
- Ideal for user-specific or frequently changing data.
- Supports asynchronous updates without refreshing the page.
Client-side Data fetching with useEffect and Fetch
The simplest way to fetch data on the client side is using React's useEffect hook inside a Client Component. In the App Router, the "use client" directive enables React hooks such as useState and useEffect.
Create a Client Component and add the following code:
"use client";
import { useState, useEffect } from "react";
export default function ClientFetchExample() {
  const [posts, setPosts] = useState([]);
  const [loading, setLoading] = useState(true);
  useEffect(() => {
    fetch("https://jsonplaceholder.typicode.com/posts")
      .then((res) => res.json())
      .then((data) => {
        setPosts(data);
        setLoading(false);
      });
  }, []);
  if (loading) return <p>Loading...</p>;
  return (
    <div>
      <h1>Client-Side Fetched Posts</h1>
      <ul>
        {posts.slice(0, 5).map((post) => (
          <li key={post.id}>{post.title}</li>
        ))}
      </ul>
    </div>
  );
}
- Data is fetched after the page loads.
- The loading state shows feedback until data arrives.
Client-side Data fetching with SWR
SWR is a popular data-fetching library created by the Next.js team. It provides built-in caching, automatic revalidation, request deduplication, and a simple API for client-side data fetching.
- Built-in caching for faster repeated requests
- Automatic revalidation to keep data fresh
- Real-time data updates without extra setup
- Simple and developer-friendly API
Install the SWR package using the following command:
npm install swr"use client";
import useSWR from "swr";
const fetcher = (url) => fetch(url).then((res) => res.json());
export default function SWRExample() {
const { data, error, isLoading } = useSWR(
"https://jsonplaceholder.typicode.com/posts",
fetcher
);
if (isLoading) return <p>Loading...</p>;
if (error) return <p>Failed to load data</p>;
return (
<div>
<h1>Posts (using SWR)</h1>
<ul>
{data.slice(0, 5).map((post) => (
<li key={post.id}>{post.title}</li>
))}
</ul>
</div>
);
}
- The fetcher function fetches data from the given API and returns it as JSON.
- The useSWR hook calls this fetcher, manages loading/error states, and provides the API response.
- The component shows a loading message first, then displays the first 5 post titles once the data is ready.
Features of Client-Side Data Fetching
- Runs entirely in the browser.
- Updates the UI asynchronously after data is fetched.
- Supports loading and error states.
- Suitable for real-time or frequently changing data.
- Works with REST APIs, GraphQL, and external services.
- Integrates with libraries like SWR and React Query.
Note: Use client-side data fetching for interactive, user-specific, or frequently changing content. For SEO-critical or static content, prefer Server Components or server-side data fetching.
Implementation of Client-Side Data Fetching
Follow the steps below to fetch data from an external API in a Client Component.
Step 1: Create a Next.js Project
npx create-next-app@latest client-fetch-appStep 2: Navigate to the Project Directory
cd client-fetch-appStep 3: Project Structure
client-fetch-app/
│
├── app/
│   ├── posts/
│   │   └── page.js
│   └── page.js
│
├── package.json
└── ...
Step 4: Fetch Data in a Client Component
Create the following file:
app/posts/page.js
"use client";

import { useEffect, useState } from "react";

export default function Posts() {
  const [posts, setPosts] = useState([]);
  const [loading, setLoading] = useState(true);

  useEffect(() => {
    fetch("https://jsonplaceholder.typicode.com/posts")
      .then((res) => res.json())
      .then((data) => {
        setPosts(data.slice(0, 10));
        setLoading(false);
      });
  }, []);

  if (loading) {
    return (
      <main style={{ padding: "40px", fontFamily: "Arial" }}>
        <h2>Loading posts...</h2>
      </main>
    );
  }

  return (
    <main
      style={{
        minHeight: "100vh",
        background: "#f6f8fc",
        padding: "40px 20px",
        fontFamily: "Arial, sans-serif",
      }}
    >
      <div
        style={{
          maxWidth: "900px",
          margin: "0 auto",
        }}
      >
        <h1
          style={{
            textAlign: "center",
            fontSize: "42px",
            marginBottom: "10px",
          }}
        >
          Client-Side Fetched Posts
        </h1>

        <p
          style={{
            textAlign: "center",
            color: "#666",
            marginBottom: "40px",
          }}
        >
          Posts loaded after the page is rendered in the browser.
        </p>

        {posts.map((post, index) => (
          <div
            key={post.id}
            style={{
              display: "flex",
              justifyContent: "space-between",
              alignItems: "center",
              background: "#fff",
              padding: "18px 24px",
              marginBottom: "16px",
              borderRadius: "12px",
              boxShadow: "0 4px 12px rgba(0,0,0,0.08)",
            }}
          >
            <div
              style={{
                display: "flex",
                alignItems: "center",
                gap: "20px",
              }}
            >
              <div
                style={{
                  width: "45px",
                  height: "45px",
                  borderRadius: "10px",
                  background: "#ede9fe",
                  color: "#6d28d9",
                  display: "flex",
                  justifyContent: "center",
                  alignItems: "center",
                  fontWeight: "bold",
                }}
              >
                {index + 1}
              </div>

              <span
                style={{
                  fontSize: "18px",
                  fontWeight: "600",
                }}
              >
                {post.title}
              </span>
            </div>

            <span
              style={{
                background: "#ede9fe",
                color: "#6d28d9",
                padding: "8px 14px",
                borderRadius: "20px",
                fontWeight: "bold",
              }}
            >
              Post #{index + 1}
            </span>
          </div>
        ))}
      </div>
    </main>
  );
}
Step 5: Run the Application
Start the development server:
npm run devOpen the following URL in your browser:
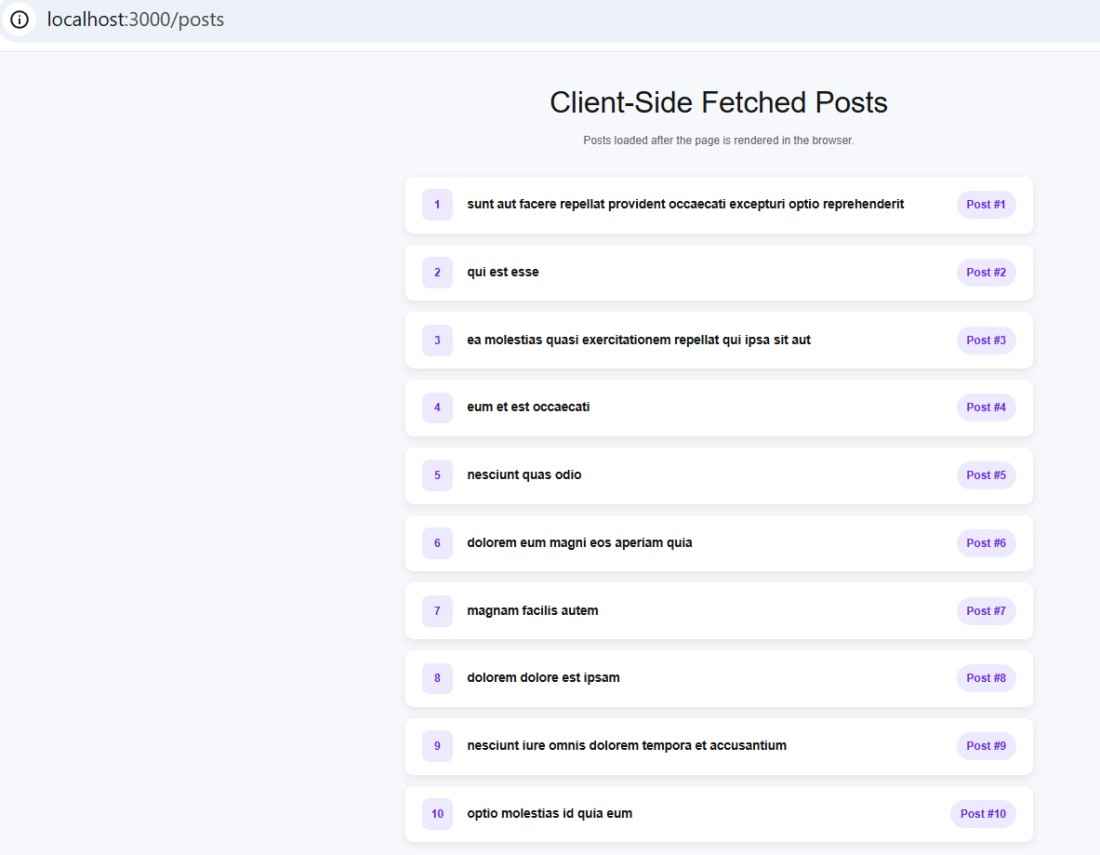
http://localhost:3000/postsOutput: