

Email verification is a common security feature that ensures users register with a valid email address. In this project, we use Spring Security and JavaMailSender to implement account verification through email and provide a resend verification feature for expired or missed verification links.
- User registration with email verification.
- Account activation using a secure verification link.
- Resend verification email functionality for expired or undelivered emails.
Registration Flow
- User registers with an email and password.
- The application stores the user with enabled = false.
- A unique verification token is generated and saved.
- A verification email containing the token is sent to the user's email address.
- The user clicks the verification link.
- If the token is valid, the account is activated (enabled = true).
Resend Verification Email Flow
- User does not receive the verification email or the link expires.
- The user clicks Resend Verification Email.
- The application generates a new verification token.
- The previous token is replaced with the new one.
- A new verification email is sent to the registered email address.
- The user clicks the new verification link to activate the account.
Implementation to Resend Verification Email in Spring Security
Follow the steps below to implement the resend verification email functionality using Spring Boot and Spring Security.
Step 1: Create a Spring Boot Project
Create a new Spring Boot project using Spring Initializr.
Add the following dependencies:
- Spring Web
- Spring Security
- Java Mail Sender
- Spring Data JPA
- MySQL Driver
- Validation
- Thymeleaf
- Lombok
- Spring DevTools
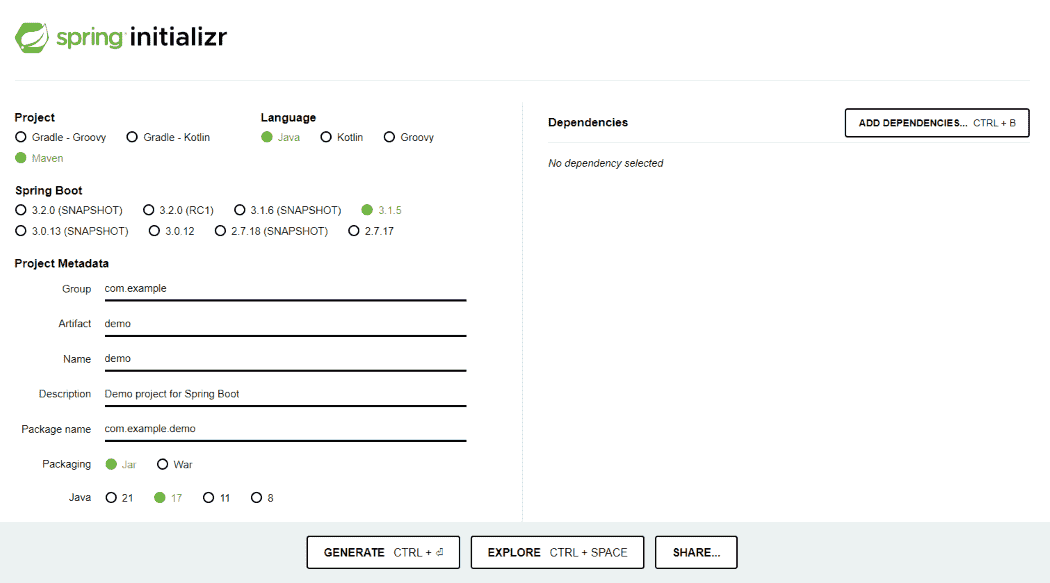
Generate the project and run it in IntelliJ IDEA by referring to the above article.
Step 2: Verify the pom.xml File
After project creation, verify that the required dependencies are present in your pom.xml file.
Below we can see the project folder structure after successfully creation of the project.

Step 3: Configure Application Properties
These properties allow the application to connect to the database and send verification emails successfully.
# Database connection settings
spring.datasource.url=jdbc:mysql://localhost:3306/email_verification
spring.datasource.username=root
spring.datasource.password=
spring.datasource.driver-class-name=com.mysql.cj.jdbc.Driver
# Hibernate settings
spring.jpa.properties.hibernate.dialect=org.hibernate.dialect.MySQLDialect
spring.jpa.hibernate.ddl-auto=update
# Mail settings (replace with your mail server details)
spring.mail.host=smtp.gmail.com
spring.mail.port=587
spring.mail.username=mahi.looser123@gmail.com
spring.mail.password=rsgazwlsiokhazsl
spring.mail.properties.mail.smtp.auth=true
spring.mail.properties.mail.smtp.starttls.enable=true
spring.thymeleaf.prefix=classpath:/templates/
spring.thymeleaf.suffix=.html
spring.thymeleaf.mode=HTML
spring.main.allow-circular-references=true
Step 4: Create the User Entity
Create a User entity inside the model package This entity stores the user information required for authentication and email verification.
package org.example.springsecurityaccountactivateemail.model;

import jakarta.persistence.*;
import lombok.AllArgsConstructor;
import lombok.Data;
import lombok.NoArgsConstructor;

import java.util.UUID;

@Entity
@Data
@AllArgsConstructor
@NoArgsConstructor
public class User {
    @Id
    @GeneratedValue(strategy = GenerationType.IDENTITY)
    private Long id;
    private String email;
    private String password;
    private boolean enabled;
    private String verificationToken;
}
Step 5: Create the User Repository
Create a repository interface for the User entity. The repository is responsible for interacting with the database.
package org.example.springsecurityaccountactivateemail.repository;


import org.example.springsecurityaccountactivateemail.model.User;
import org.springframework.data.jpa.repository.JpaRepository;

import java.util.Optional;
import java.util.UUID;

public interface UserRepository extends JpaRepository<User, UUID> {
    Optional<User> findByEmail(String email);
    Optional<User> findByVerificationToken(String token);
}
Step 6: Create the Registration DTO
Create a DTO class named UserRegistrationDto. This class is used to transfer registration data between the registration form and the service layer.
package org.example.springsecurityaccountactivateemail.dtos;


import lombok.AllArgsConstructor;
import lombok.Data;
import lombok.NoArgsConstructor;

@Data
@AllArgsConstructor
@NoArgsConstructor
public class UserRegistrationDto {
    private String email;
    private String password;
}
Step 7: Create the User Service
The UserService class contains the business logic related to user registration, account verification, and email verification.
package org.example.springsecurityaccountactivateemail.service;


import jakarta.mail.MessagingException;
import org.example.springsecurityaccountactivateemail.dtos.UserRegistrationDto;
import org.example.springsecurityaccountactivateemail.model.User;
import org.example.springsecurityaccountactivateemail.repository.UserRepository;
import org.springframework.beans.factory.annotation.Autowired;
import org.springframework.security.crypto.bcrypt.BCryptPasswordEncoder;
import org.springframework.stereotype.Service;

import java.util.UUID;


@Service
public class UserService {

    @Autowired
    private UserRepository userRepository;

    @Autowired
    private EmailService emailService;

    public User registerNewUserAccount(UserRegistrationDto userDto) throws MessagingException {
        User user = new User();
        user.setEmail(userDto.getEmail());
        user.setPassword(new BCryptPasswordEncoder().encode(userDto.getPassword()));
        user.setEnabled(false);
        userRepository.save(user);

        // Generate verification token and send email
        String token = UUID.randomUUID().toString();
        user.setVerificationToken(token);
        userRepository.save(user);

        String confirmationUrl = "http://localhost:8080/verify-email?token=" + token;
        emailService.sendVerificationEmail(user.getEmail(), confirmationUrl);

        return user;
    }

    public String validateVerificationToken(String token) {
        User user = userRepository.findByVerificationToken(token).orElse(null);
        if (user == null) {
            return "invalid";
        }

        user.setEnabled(true);
        userRepository.save(user);
        return "valid";
    }

    public User findUserByEmail(String email) {
        return userRepository.findByEmail(email).orElse(null);
    }

    public void save(User user) {
        userRepository.save(user);
    }

}
Step 8: Create the Email Service
This service sends HTML emails using JavaMailSender. It provides methods for:
- Sending the email verification link.
- Sending new login notification emails.
package org.example.springsecurityaccountactivateemail.service;
import jakarta.mail.MessagingException;
import jakarta.mail.internet.MimeMessage;
import org.springframework.beans.factory.annotation.Autowired;
import org.springframework.mail.SimpleMailMessage;
import org.springframework.mail.javamail.JavaMailSender;
import org.springframework.mail.javamail.MimeMessageHelper;
import org.springframework.stereotype.Service;
@Service
public class EmailService {
@Autowired
private JavaMailSender mailSender;
public void sendVerificationEmail(String to, String verificationUrl) throws MessagingException {
MimeMessage message = mailSender.createMimeMessage();
MimeMessageHelper helper = new MimeMessageHelper(message, true);
String subject = "Email Verification";
String htmlContent = "<!DOCTYPE html>"
+ "<html lang=\"en\">"
+ "<head>"
+ "<meta charset=\"UTF-8\">"
+ "<meta name=\"viewport\" content=\"width=device-width, initial-scale=1.0\">"
+ "<title>Email Verification</title>"
+ "<style>"
+ "body { font-family: Arial, sans-serif; margin: 0; padding: 0; background-color: #f4f4f4; }"
+ ".container { width: 100%; padding: 20px; background-color: #f4f4f4; }"
+ ".email-content { max-width: 600px; margin: 0 auto; background-color: #ffffff; padding: 20px; border-radius: 5px; box-shadow: 0 0 10px rgba(0, 0, 0, 0.1); }"
+ ".header { text-align: center; background-color: #007bff; color: #ffffff; padding: 10px 0; border-radius: 5px 5px 0 0; }"
+ ".header h1 { margin: 0; font-size: 24px; }"
+ ".body { padding: 20px; text-align: center; }"
+ ".body p { font-size: 16px; color: #333333; line-height: 1.5; }"
+ ".body a { display: inline-block; margin-top: 20px; padding: 10px 20px; background-color: #007bff; color: #ffffff; text-decoration: none; border-radius: 5px; }"
+ ".footer { text-align: center; margin-top: 20px; color: #777777; font-size: 12px; }"
+ "</style>"
+ "</head>"
+ "<body>"
+ "<div class=\"container\">"
+ "<div class=\"email-content\">"
+ "<div class=\"header\">"
+ "<h1>Email Verification</h1>"
+ "</div>"
+ "<div class=\"body\">"
+ "<p>Hello,</p>"
+ "<p>Thank you for registering with us. Please click the button below to verify your email address:</p>"
+ "<a href=\"" + verificationUrl + "\" target=\"_blank\">Verify Email</a>"
+ "<p>If you did not create an account, no further action is required.</p>"
+ "</div>"
+ "<div class=\"footer\">"
+ "<p>© 2024 MyApp. All rights reserved.</p>"
+ "</div>"
+ "</div>"
+ "</div>"
+ "</body>"
+ "</html>";
helper.setTo(to);
helper.setSubject(subject);
helper.setText(htmlContent, true); // Set to true to indicate the content is HTML
mailSender.send(message);
}
public void sendNewLoginNotification(String to, String ipAddress, String location) throws MessagingException {
MimeMessage message = mailSender.createMimeMessage();
MimeMessageHelper helper = new MimeMessageHelper(message, true);
String subject = "New Login Detected";
String htmlContent = "<!DOCTYPE html>"
+ "<html lang=\"en\">"
+ "<head>"
+ "<meta charset=\"UTF-8\">"
+ "<meta name=\"viewport\" content=\"width=device-width, initial-scale=1.0\">"
+ "<title>New Login Detected</title>"
+ "<style>"
+ "body { font-family: Arial, sans-serif; margin: 0; padding: 0; background-color: #f4f4f4; }"
+ ".container { width: 100%; padding: 20px; background-color: #f4f4f4; }"
+ ".email-content { max-width: 600px; margin: 0 auto; background-color: #ffffff; padding: 20px; border-radius: 5px; box-shadow: 0 0 10px rgba(0, 0, 0, 0.1); }"
+ ".header { text-align: center; background-color: #dc3545; color: #ffffff; padding: 10px 0; border-radius: 5px 5px 0 0; }"
+ ".header h1 { margin: 0; font-size: 24px; }"
+ ".body { padding: 20px; text-align: center; }"
+ ".body p { font-size: 16px; color: #333333; line-height: 1.5; }"
+ ".footer { text-align: center; margin-top: 20px; color: #777777; font-size: 12px; }"
+ "</style>"
+ "</head>"
+ "<body>"
+ "<div class=\"container\">"
+ "<div class=\"email-content\">"
+ "<div class=\"header\">"
+ "<h1>New Login Detected</h1>"
+ "</div>"
+ "<div class=\"body\">"
+ "<p>Hello,</p>"
+ "<p>A new login to your account was detected from IP address: " + ipAddress + ".</p>"
+ "<p>Location: " + location + "</p>"
+ "<p>If this was you, you can safely ignore this email. If you did not log in, please secure your account immediately.</p>"
+ "</div>"
+ "<div class=\"footer\">"
+ "<p>© 2024 MyApp. All rights reserved.</p>"
+ "</div>"
+ "</div>"
+ "</div>"
+ "</body>"
+ "</html>";
helper.setTo(to);
helper.setSubject(subject);
helper.setText(htmlContent, true); // Set to true to indicate the content is HTML
mailSender.send(message);
}
}
Step 9: Create the Verification Token Service
This service manages the verification token associated with each user account. It performs two primary tasks:
- Stores the generated verification token.
- Validates the token during email verification.
package org.example.springsecurityaccountactivateemail.service;

import org.example.springsecurityaccountactivateemail.model.User;
import org.example.springsecurityaccountactivateemail.repository.UserRepository;
import org.springframework.beans.factory.annotation.Autowired;
import org.springframework.stereotype.Service;

@Service
public class VerificationTokenService {

    @Autowired
    private UserRepository userRepository;

    public void createVerificationToken(User user, String token) {
        user.setVerificationToken(token);
        userRepository.save(user);
    }

    public String validateVerificationToken(String token) {
        User user = userRepository.findByVerificationToken(token).orElse(null);
        if (user == null) {
            return "invalid";
        }

        user.setEnabled(true);
        userRepository.save(user);
        return "valid";
    }
}
Step 10: Create the Login Service
The LoginService performs manual authentication using Spring Security's AuthenticationManager. It authenticates the user credentials and stores the authenticated user inside the Security Context.
package org.example.springsecurityaccountactivateemail.service;


import org.springframework.beans.factory.annotation.Autowired;
import org.springframework.security.authentication.AuthenticationManager;
import org.springframework.security.authentication.UsernamePasswordAuthenticationToken;
import org.springframework.security.core.Authentication;
import org.springframework.security.core.AuthenticationException;
import org.springframework.security.core.context.SecurityContextHolder;
import org.springframework.stereotype.Service;


@Service
public class LoginService {

    @Autowired
    private AuthenticationManager authenticationManager;

    public void login(String username, String password) throws AuthenticationException {
        UsernamePasswordAuthenticationToken authenticationToken =
                new UsernamePasswordAuthenticationToken(username, password);

        Authentication authentication = authenticationManager.authenticate(authenticationToken);

        SecurityContextHolder.getContext().setAuthentication(authentication);
    }
}
Step 11: Create the Custom Authentication Failure Handler
This handler is executed whenever authentication fails. It redirects users back to the login page and displays an appropriate error message.
package org.example.springsecurityaccountactivateemail.handler;


import jakarta.servlet.ServletException;
import jakarta.servlet.http.HttpServletRequest;
import jakarta.servlet.http.HttpServletResponse;
import org.springframework.security.core.AuthenticationException;
import org.springframework.security.web.authentication.AuthenticationFailureHandler;
import org.springframework.security.web.authentication.SimpleUrlAuthenticationFailureHandler;
import org.springframework.stereotype.Component;
import java.io.IOException;


@Component
public class CustomAuthenticationFailureHandler implements AuthenticationFailureHandler {
    @Override
    public void onAuthenticationFailure(HttpServletRequest request, HttpServletResponse response, AuthenticationException exception) throws IOException, ServletException {
        // Handle authentication failure logic here
        response.sendRedirect("/login?error=true");
    }
}
Step 12: Create the Custom Authentication Success Handler
This handler is executed after successful authentication. It redirects authenticated users to the dashboard page.
package org.example.springsecurityaccountactivateemail.handler;


import jakarta.servlet.ServletException;
import jakarta.servlet.http.HttpServletRequest;
import jakarta.servlet.http.HttpServletResponse;
import org.springframework.security.core.Authentication;
import org.springframework.security.web.authentication.AuthenticationSuccessHandler;
import org.springframework.stereotype.Component;


import java.io.IOException;


@Component
public class CustomAuthenticationSuccessHandler implements AuthenticationSuccessHandler {
    @Override
    public void onAuthenticationSuccess(HttpServletRequest request, HttpServletResponse response, Authentication authentication) throws IOException, ServletException {
        // Handle authentication success logic here
        response.sendRedirect("/dashboard");
    }
}
Step 13: Configure Spring Security
The SecurityConfig class configures authentication and authorization rules for the application. It performs the following tasks:
- Allows public access to registration, login and verification endpoints and Registers the custom authentication provider.
- Configures custom success and failure handlers and Registers the custom login filter andConfigures password encoding using BCrypt.
package org.example.springsecurityaccountactivateemail.config;

import org.example.springsecurityaccountactivateemail.fliter.LoginFilter;
import org.example.springsecurityaccountactivateemail.handler.CustomAuthenticationFailureHandler;
import org.example.springsecurityaccountactivateemail.handler.CustomAuthenticationProvider;
import org.example.springsecurityaccountactivateemail.handler.CustomAuthenticationSuccessHandler;
import org.example.springsecurityaccountactivateemail.model.User;
import org.example.springsecurityaccountactivateemail.service.CustomUserDetailsService;
import org.springframework.beans.factory.annotation.Autowired;
import org.springframework.context.annotation.Bean;
import org.springframework.context.annotation.Configuration;
import org.springframework.security.authentication.AuthenticationManager;
import org.springframework.security.config.annotation.authentication.configuration.AuthenticationConfiguration;
import org.springframework.security.config.annotation.web.builders.HttpSecurity;
import org.springframework.security.config.annotation.web.configuration.EnableWebSecurity;
import org.springframework.security.core.userdetails.UserDetailsService;
import org.springframework.security.crypto.bcrypt.BCryptPasswordEncoder;
import org.springframework.security.web.SecurityFilterChain;
import org.springframework.security.web.authentication.UsernamePasswordAuthenticationFilter;

@Configuration
@EnableWebSecurity
public class SecurityConfig {


    @Autowired
    private LoginFilter loginFilter;


    @Autowired
    private CustomAuthenticationProvider customAuthenticationProvider;


    @Autowired
    private CustomAuthenticationFailureHandler customAuthenticationFailureHandler;

    @Autowired
    private CustomAuthenticationSuccessHandler customAuthenticationSuccessHandler;


    @Bean
    public SecurityFilterChain securityFilterChain(HttpSecurity http) throws Exception {
        http
                .addFilterBefore(loginFilter, UsernamePasswordAuthenticationFilter.class)
                .authorizeHttpRequests((requests) -> requests
                        .requestMatchers("/register", "/verify-email","/resend-verification", "/login","/","/dashboard").permitAll()
                        .anyRequest().authenticated()
                )
                .formLogin((form) -> form
                        .loginPage("/login")
                        .successHandler(customAuthenticationSuccessHandler)
                        .failureHandler(customAuthenticationFailureHandler)
                        .permitAll()
                )
                .logout((logout) -> logout.permitAll())
                .authenticationProvider(customAuthenticationProvider);

        return http.build();
    }

    @Bean
    public UserDetailsService userDetailsService() {
        return new CustomUserDetailsService();
    }

    @Bean
    public AuthenticationManager authenticationManager(AuthenticationConfiguration authenticationConfiguration) throws Exception {
        return authenticationConfiguration.getAuthenticationManager();
    }

    @Bean
    public BCryptPasswordEncoder passwordEncoder() {
        return new BCryptPasswordEncoder();
    }
}
Step 14: Create the Random String Generator Utility
Create a utility class for generating secure random strings. This utility can be used whenever random verification tokens or secure identifiers are required within the application.
package org.example.springsecurityaccountactivateemail.util;

import java.security.SecureRandom;

public class RandomStringGenerator {

    private static final String CHARACTERS = "ABCDEFGHIJKLMNOPQRSTUVWXYZabcdefghijklmnopqrstuvwxyz0123456789";
    private static final SecureRandom random = new SecureRandom();

    public static String generateString(int length) {
        StringBuilder sb = new StringBuilder(length);
        for (int i = 0; i < length; i++) {
            sb.append(CHARACTERS.charAt(random.nextInt(CHARACTERS.length())));
        }
        return sb.toString();
    }
}
Step 15: Create the Registration Complete Event
Spring Events provide a clean way for different components to communicate without creating tight coupling. This event is published immediately after a user successfully completes the registration process.
package org.example.springsecurityaccountactivateemail.event;


import org.example.springsecurityaccountactivateemail.model.User;
import org.springframework.context.ApplicationEvent;


public class OnRegistrationCompleteEvent extends ApplicationEvent {
    private final User user;

    public OnRegistrationCompleteEvent(User user) {
        super(user);
        this.user = user;
    }

    public User getUser() {
        return user;
    }
}
Step 16: Create the Registration Listener
After successful registration, an application event is published. The RegistrationListener listens for this event, generates a verification token, and sends the verification email automatically.
package org.example.springsecurityaccountactivateemail.event;

import jakarta.mail.MessagingException;
import org.example.springsecurityaccountactivateemail.model.User;
import org.example.springsecurityaccountactivateemail.service.EmailService;
import org.example.springsecurityaccountactivateemail.service.VerificationTokenService;
import org.springframework.beans.factory.annotation.Autowired;
import org.springframework.context.ApplicationListener;
import org.springframework.stereotype.Component;

import java.util.UUID;


@Component
public class RegistrationListener implements ApplicationListener<OnRegistrationCompleteEvent> {

    @Autowired
    private VerificationTokenService tokenService;

    @Autowired
    private EmailService emailService;

    @Override
    public void onApplicationEvent(OnRegistrationCompleteEvent event) {
        this.confirmRegistration(event);
    }

    private void confirmRegistration(OnRegistrationCompleteEvent event) {
        User user = event.getUser();
        String token = UUID.randomUUID().toString();
        tokenService.createVerificationToken(user, token);

        String recipientAddress = user.getEmail();
        String confirmationUrl = "http://localhost:8080/verify-email?token=" + token;

        try {
            emailService.sendVerificationEmail(recipientAddress, confirmationUrl);
        } catch (MessagingException e) {
            // Handle the exception (log it, notify the user, etc.)
            e.printStackTrace();
        }
    }
}
Step 17: Create the Registration Controller
This controller handles all user registration related requests.
package org.example.springsecurityaccountactivateemail.controller;

import jakarta.mail.MessagingException;
import org.example.springsecurityaccountactivateemail.dtos.UserRegistrationDto;
import org.example.springsecurityaccountactivateemail.event.OnRegistrationCompleteEvent;
import org.example.springsecurityaccountactivateemail.model.User;
import org.example.springsecurityaccountactivateemail.service.UserService;
import org.springframework.beans.factory.annotation.Autowired;
import org.springframework.context.ApplicationEventPublisher;
import org.springframework.stereotype.Controller;
import org.springframework.ui.Model;
import org.springframework.web.bind.annotation.GetMapping;
import org.springframework.web.bind.annotation.ModelAttribute;
import org.springframework.web.bind.annotation.PostMapping;
import org.springframework.web.bind.annotation.RequestParam;


@Controller
public class RegistrationController {

    @Autowired
    private UserService userService;

    @Autowired
    private ApplicationEventPublisher eventPublisher;

    @GetMapping("/register")
    public String showRegistrationForm(Model model) {
        model.addAttribute("user", new UserRegistrationDto());
        return "registration";
    }

    @PostMapping("/register")
    public String registerUserAccount(@ModelAttribute("user") UserRegistrationDto userDto, Model model) throws MessagingException {
        User registered = userService.registerNewUserAccount(userDto);
        eventPublisher.publishEvent(new OnRegistrationCompleteEvent(registered));
        model.addAttribute("notVerified", true);
        model.addAttribute("email", registered.getEmail());
        return "verify-email";
    }

    @GetMapping("/verify-email")
    public String verifyEmail(@RequestParam("token") String token, Model model) {
        String result = userService.validateVerificationToken(token);
        if (result.equals("valid")) {
            model.addAttribute("message", "Your account has been verified successfully.");
            return "verified";
        } else {
            model.addAttribute("message", "Invalid verification token.");
            return "verify-email";
        }
    }

    @PostMapping("/resend-verification")
    public String resendVerification(@RequestParam("email") String email, Model model) {
        User user = userService.findUserByEmail(email);
        eventPublisher.publishEvent(new OnRegistrationCompleteEvent(user));
        model.addAttribute("notVerified", true);
        model.addAttribute("email", email);
        return "verify-email";
    }
}
Step 18: Create the Login Controller
This controller displays the login page and authenticates users using Spring Security. It also handles authentication errors and returns the appropriate login view.
package org.example.springsecurityaccountactivateemail.controller;

import org.example.springsecurityaccountactivateemail.service.LoginService;
import org.springframework.beans.factory.annotation.Autowired;
import org.springframework.security.core.Authentication;
import org.springframework.security.core.AuthenticationException;
import org.springframework.stereotype.Controller;
import org.springframework.ui.Model;
import org.springframework.web.bind.annotation.GetMapping;
import org.springframework.web.bind.annotation.PostMapping;
import org.springframework.web.bind.annotation.RequestParam;


@Controller
public class LoginController {

    @Autowired
    private LoginService loginService;

    @GetMapping("/login")
    public String loginPage(@RequestParam(value = "error", required = false) String error, Model model) {
        if (error != null) {
            model.addAttribute("error", "Invalid username or password.");
        }
        return "login";
    }

    @PostMapping("/login")
    public String login(@RequestParam("username") String username,
                        @RequestParam("password") String password,
                        Model model) {
        try {
            loginService.login(username, password);
            return "redirect:/dashboard";
        } catch (AuthenticationException e) {
            model.addAttribute("error", "Invalid username or password.");
            return "login";
        }
    }
}
Step 19: Create the Dashboard Controller
After successful authentication and email verification, users are redirected to the dashboard page. This controller simply returns the dashboard view after successful login.
package org.example.springsecurityaccountactivateemail.controller;


import org.example.springsecurityaccountactivateemail.model.User;
import org.example.springsecurityaccountactivateemail.service.UserService;
import org.springframework.beans.factory.annotation.Autowired;
import org.springframework.security.core.Authentication;
import org.springframework.stereotype.Controller;
import org.springframework.ui.Model;
import org.springframework.web.bind.annotation.GetMapping;
import org.springframework.web.bind.annotation.PostMapping;
import org.springframework.web.bind.annotation.RequestParam;

@Controller
public class DashboardController {

    @Autowired
    private UserService userService;

    @GetMapping("/dashboard")
    public String showDashboard() {
        return "dashboard";
    }
}
Step 20: Create the Home Page
This page serves as the landing page of the application and provides navigation links to the Login and Registration pages.
<!DOCTYPE html>
<html xmlns:th="http://www.thymeleaf.org">
<head>
    <title>My App</title>
    <link rel="stylesheet" href="https://stackpath.bootstrapcdn.com/bootstrap/4.5.2/css/bootstrap.min.css">
</head>
<body>
<div class="container">
    <h2 class="mt-5 text-center">Welcome to My App</h2>
    <p class="text-center">Choose an option below to get started:</p>
    <div class="text-center">
        <a href="/login" class="btn btn-primary m-1">Login</a>
        <a href="/register" class="btn btn-secondary m-1">Register</a>
    </div>
</div>
<script src="https://cdn.jsdelivr.net/npm/bootstrap@5.3.0/dist/js/bootstrap.bundle.min.js"></script>
</body>
</html>
Step 21: Create the Registration Page
This page allows users to create a new account by providing their email address and password. After successful registration, the application sends a verification email to the registered email address.
<!DOCTYPE html>
<html xmlns:th="http://www.thymeleaf.org">
<head>
    <title>Registration</title>
    <link rel="stylesheet" href="https://stackpath.bootstrapcdn.com/bootstrap/4.5.2/css/bootstrap.min.css">
</head>
<body>
<div class="container">
    <div class="row justify-content-center">
        <div class="col-md-6">
            <div class="card mt-5">
                <div class="card-header text-center">
                    <h2>Register</h2>
                </div>
                <div class="card-body">
                    <form th:action="@{/register}" method="post" class="needs-validation" novalidate>
                        <div class="mb-3">
                            <label for="email" class="form-label">Email</label>
                            <input type="email" class="form-control" id="email" name="email" placeholder="Enter your email" required/>
                            <div class="invalid-feedback">
                                Please provide a valid email.
                            </div>
                        </div>
                        <div class="mb-3">
                            <label for="password" class="form-label">Password</label>
                            <input type="password" class="form-control" id="password" name="password" placeholder="Enter your password" required/>
                            <div class="invalid-feedback">
                                Please provide a password.
                            </div>
                        </div>
                        <div class="d-grid gap-2">
                            <button type="submit" class="btn btn-primary btn-block">Register</button>
                        </div>
                    </form>
                </div>
            </div>
        </div>
    </div>
</div>
<script src="https://cdn.jsdelivr.net/npm/bootstrap@5.3.0/dist/js/bootstrap.bundle.min.js"></script>
<script>
    (function () {
        'use strict'
        var forms = document.querySelectorAll('.needs-validation')
        Array.prototype.slice.call(forms)
            .forEach(function (form) {
                form.addEventListener('submit', function (event) {
                    if (!form.checkValidity()) {
                        event.preventDefault()
                        event.stopPropagation()
                    }
                    form.classList.add('was-validated')
                }, false)
            })
    })()
</script>
</body>
</html>
Step 22: Create the Verify Email Page
This page informs users that the verification email has been sent. It also displays a countdown timer before enabling the Resend Verification Email button.
<!DOCTYPE html>
<html xmlns:th="http://www.thymeleaf.org">
<head>
    <title>Verify Email</title>
    <link rel="stylesheet" href="https://stackpath.bootstrapcdn.com/bootstrap/4.5.2/css/bootstrap.min.css">
    <script>
        function startTimer(duration, display) {
            var timer = duration, minutes, seconds;
            setInterval(function () {
                minutes = parseInt(timer / 60, 10);
                seconds = parseInt(timer % 60, 10);

                minutes = minutes < 10 ? "0" + minutes : minutes;
                seconds = seconds < 10 ? "0" + seconds : seconds;

                display.textContent = minutes + ":" + seconds;

                if (--timer < 0) {
                    document.getElementById("resend-email-btn").disabled = false;
                }
            }, 1000);
        }

        window.onload = function () {
            var oneMinute = 60,
                display = document.querySelector('#time');
            startTimer(oneMinute, display);
        };
    </script>
</head>
<body>
<nav class="navbar navbar-expand-lg navbar-dark bg-dark">
    <div class="container-fluid">
        <a class="navbar-brand" href="#">MyApp</a>
        <button class="navbar-toggler" type="button" data-bs-toggle="collapse" data-bs-target="#navbarNav" aria-controls="navbarNav" aria-expanded="false" aria-label="Toggle navigation">
            <span class="navbar-toggler-icon"></span>
        </button>
        <div class="collapse navbar-collapse" id="navbarNav">
            <ul class="navbar-nav ms-auto">
                <li class="nav-item">
                    <a class="nav-link" href="/dashboard">Dashboard</a>
                </li>
                <li class="nav-item">
                    <a class="nav-link btn btn-danger text-light ms-2" href="/logout">Logout</a>
                </li>
            </ul>
        </div>
    </div>
</nav>
<div class="container">
    <div class="row justify-content-center">
        <div class="col-md-8">
            <div class="card mt-5">
                <div class="card-header text-center">
                    <h2>Verify Email</h2>
                </div>
                <div class="card-body">
                    <div th:if="${message}" class="alert" th:classappend="${message == 'Your account has been verified successfully.' ? 'alert-success' : 'alert-danger'}">
                        <span th:text="${message}"></span>
                    </div>
                    <div th:if="${notVerified}">
                        <p>Verification email sent. Please check your email.</p>
                        <p>Resend verification email in <span id="time">01:00</span> minutes.</p>
                        <form th:action="@{/resend-verification}" method="post">
                            <input type="hidden" th:value="${email}" name="email"/>
                            <button type="submit" id="resend-email-btn" class="btn btn-primary" disabled>Resend Verification Email</button>
                        </form>
                    </div>
                </div>
            </div>
        </div>
    </div>
</div>
<script src="https://cdn.jsdelivr.net/npm/bootstrap@5.3.0/dist/js/bootstrap.bundle.min.js"></script>
</body>
</html>
Step 23: Create the Login Page
This page allows users to sign in using their registered email address and password. If authentication fails, an appropriate error message is displayed.
<!DOCTYPE html>
<html xmlns:th="http://www.thymeleaf.org">
<head>
    <title>Login</title>
    <link rel="stylesheet" href="https://stackpath.bootstrapcdn.com/bootstrap/4.5.2/css/bootstrap.min.css">
</head>
<body>
<div class="container">
    <div class="row justify-content-center">
        <div class="col-md-6">
            <div class="card mt-5">
                <div class="card-header text-center">
                    <h2>Login</h2>
                </div>
                <div class="card-body">
                    <div th:if="${error}" class="alert alert-danger text-center">
                        <span th:text="${error}"></span>
                    </div>
                    <form th:action="@{/login}" method="post" class="needs-validation" novalidate>
                        <div class="mb-3">
                            <label for="username" class="form-label">Email</label>
                            <input type="text" class="form-control" id="username" name="username" placeholder="Enter your email" required/>
                            <div class="invalid-feedback">
                                Please provide a valid email.
                            </div>
                        </div>
                        <div class="mb-3">
                            <label for="password" class="form-label">Password</label>
                            <input type="password" class="form-control" id="password" name="password" placeholder="Enter your password" required/>
                            <div class="invalid-feedback">
                                Please provide a password.
                            </div>
                        </div>
                        <div class="d-grid gap-2">
                            <button type="submit" class="btn btn-primary btn-block">Login</button>
                        </div>
                    </form>
                </div>
            </div>
        </div>
    </div>
</div>
<script src="https://cdn.jsdelivr.net/npm/bootstrap@5.3.0/dist/js/bootstrap.bundle.min.js"></script>
<script>
    (function () {
        'use strict'
        var forms = document.querySelectorAll('.needs-validation')
        Array.prototype.slice.call(forms)
            .forEach(function (form) {
                form.addEventListener('submit', function (event) {
                    if (!form.checkValidity()) {
                        event.preventDefault()
                        event.stopPropagation()
                    }
                    form.classList.add('was-validated')
                }, false)
            })
    })()
</script>
</body>
</html>
Step 24: Create the Verified Email Page
This page is displayed after successful email verification and informs the user that the account has been activated successfully.
<!DOCTYPE html>
<html xmlns:th="http://www.thymeleaf.org">
<head>
    <title>Email Verified</title>
    <link rel="stylesheet" href="https://stackpath.bootstrapcdn.com/bootstrap/4.5.2/css/bootstrap.min.css">
</head>
<body>
<nav class="navbar navbar-expand-lg navbar-dark bg-dark">
    <div class="container-fluid">
        <a class="navbar-brand" href="#">MyApp</a>
        <button class="navbar-toggler" type="button" data-bs-toggle="collapse" data-bs-target="#navbarNav" aria-controls="navbarNav" aria-expanded="false" aria-label="Toggle navigation">
            <span class="navbar-toggler-icon"></span>
        </button>
        <div class="collapse navbar-collapse" id="navbarNav">
            <ul class="navbar-nav ms-auto">
                <li class="nav-item">
                    <a class="nav-link" href="/dashboard">Dashboard</a>
                </li>
                <li class="nav-item">
                    <a class="nav-link btn btn-danger text-light ms-2" href="/logout">Logout</a>
                </li>
            </ul>
        </div>
    </div>
</nav>
<div class="container">
    <div class="row justify-content-center">
        <div class="col-md-8">
            <div class="card mt-5">
                <div class="card-header text-center">
                    <h2>Email Verified</h2>
                </div>
                <div class="card-body text-center">
                    <div class="alert alert-success">
                        <span th:text="${message}"></span>
                    </div>
                    <a href="/dashboard" class="btn btn-primary">Go to Dashboard</a>
                </div>
            </div>
        </div>
    </div>
</div>
<script src="https://cdn.jsdelivr.net/npm/bootstrap@5.3.0/dist/js/bootstrap.bundle.min.js"></script>
</body>
</html>
Step 25: Create the Dashboard Page
This page is displayed after successful login and email verification. It provides access to protected resources such as updating the password or logging out.
<!DOCTYPE html>
<html xmlns:th="http://www.thymeleaf.org">
<head>
    <title>Dashboard</title>
    <link rel="stylesheet" href="https://stackpath.bootstrapcdn.com/bootstrap/4.5.2/css/bootstrap.min.css">
</head>
<body>
<nav class="navbar navbar-expand-lg navbar-dark bg-dark">
    <div class="container-fluid">
        <a class="navbar-brand" href="#">MyApp</a>
        <button class="navbar-toggler" type="button" data-bs-toggle="collapse" data-bs-target="#navbarNav" aria-controls="navbarNav" aria-expanded="false" aria-label="Toggle navigation">
            <span class="navbar-toggler-icon"></span>
        </button>
        <div class="collapse navbar-collapse" id="navbarNav">
            <ul class="navbar-nav ms-auto">
                <li class="nav-item">
                    <a class="nav-link" href="/update-password">Update Password</a>
                </li>
                <li class="nav-item">
                    <a class="nav-link btn btn-danger text-light ms-2" href="/logout">Logout</a>
                </li>
            </ul>
        </div>
    </div>
</nav>
<div class="container">
    <div class="row justify-content-center">
        <div class="col-md-8">
            <div class="card mt-5">
                <div class="card-header text-center">
                    <h2>Dashboard</h2>
                </div>
                <div class="card-body text-center">
                    <p>Welcome to the dashboard!</p>
                    <a href="/update-password" class="btn btn-warning">Update Password</a>
                    <a href="/logout" class="btn btn-danger ms-2">Logout</a>
                </div>
            </div>
        </div>
    </div>
</div>
<script src="https://cdn.jsdelivr.net/npm/bootstrap@5.3.0/dist/js/bootstrap.bundle.min.js"></script>
</body>
</html>
Step 26: Run the Application
- Right-click the project.
- Run SpringSecurityAccountActivateEmailApplication.
After the application starts successfully, it will be available on port 8080.
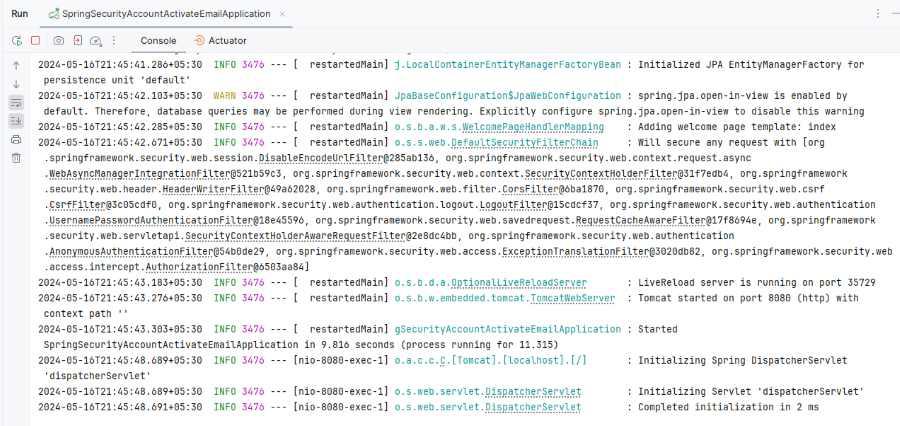
Open the following URL in your browser.
http://localhost:8080/
Output:

Click on the register page button.
http://localhost:8080/register
Output:

There is a 11 minute of time, then enable resend verification of the user account of the application.

Click on resend verification button:
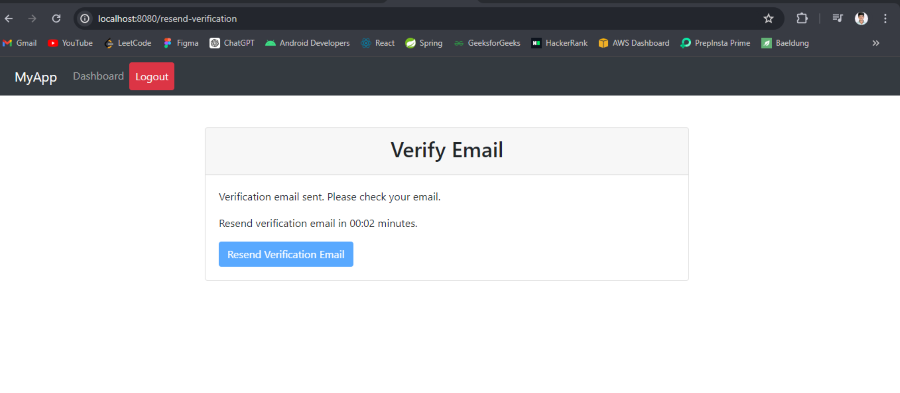
Resend email messages:

Verification message:
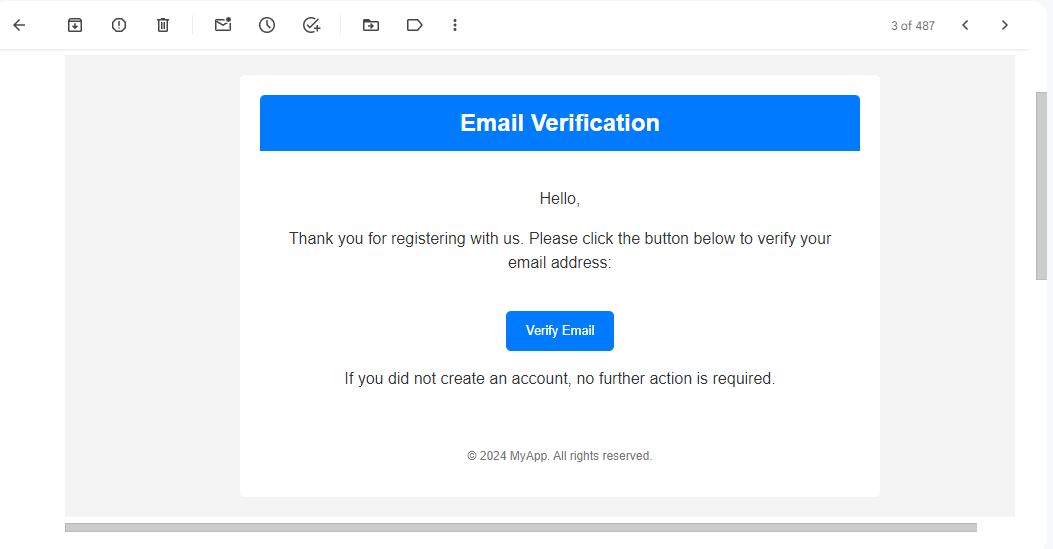
Once you click on the verify button, it will verify the account.
Now, click on the dashboard, and then we will redirect to the dashboard.

