

A RESTful Registration API in Spring Security allows users to register through HTTP requests while securely storing their credentials. It follows REST principles and integrates security features such as password encoding and request validation.
- Validates user input before saving.
- Encodes passwords before storing them in the database.
- Returns appropriate HTTP status codes and responses.
Implementation to Make Registration API RESTful in Spring Security
Below are the step-by-step implementation to make Registration API RESTful in spring security.
Step 1: Create a Spring project using Spring Initializr, add the following dependencies when generating the project:
Dependencies:
- Spring Web
- Spring Security
- Spring data JPA
- MySQL Driver
- Spring Dev Tools
- Lombok
Once the Spring project is created, the file structure typically resembles the following:

Step 2: Open the application.properties file and add the following code to configure the server port and MySQL database:
spring.application.name=spring-security-registration# DataSource configuration
spring.datasource.url=jdbc:mysql://localhost:3306/example
spring.datasource.username=root
spring.datasource.password=
spring.datasource.driver-class-name=com.mysql.cj.jdbc.Driver# Hibernate configuration
spring.jpa.hibernate.ddl-auto=update
spring.jpa.show-sql=true
Step 3: Create a new package named "model". Inside this package, create a new Java class named "User".
Go to src > org.example.springsecurityregistration > model > User and put the below code.
package org.example.springsecurityregistration.model;

import jakarta.persistence.Entity;
import jakarta.persistence.GeneratedValue;
import jakarta.persistence.GenerationType;
import jakarta.persistence.Id;
import lombok.AllArgsConstructor;
import lombok.Data;
import lombok.NoArgsConstructor;

@Entity
@Data
@AllArgsConstructor
@NoArgsConstructor
public class User {
    @Id
    @GeneratedValue(strategy = GenerationType.IDENTITY)
    private Long id;
    private String username;
    private String email;
    private String password;

}
Step 4: Create a new package named "repository". Inside this package, create a new Java interface named "UserRepository".
Go to src > org.example.springsecurityregistration > repository > UserRepository and put the below code.
package org.example.springsecurityregistration.repository;

import org.example.springsecurityregistration.model.User;
import org.springframework.data.jpa.repository.JpaRepository;
import org.springframework.stereotype.Repository;

@Repository
public interface UserRepository extends JpaRepository<User,Long> {
    User findByUsername(String username);
}
Step 5: Create a new package named "dto". Inside this package, create a new Java class named "RegistrationRequest".
Go to src > org.example.springsecurityregistration > dto > RegistrationRequest and put the below code.
package org.example.springsecurityregistration.DTO;

import lombok.AllArgsConstructor;
import lombok.Data;
import lombok.NoArgsConstructor;

@Data
@AllArgsConstructor
@NoArgsConstructor
public class RegistrationRequest {
    private String username;
    private String email;
    private String password;
    // Constructors, getters, and setters
}
Step 6: Create a new package named "config". Inside this package, create a new Java class named "SecurityConfig".
Go to src > org.example.springsecurityregistration > config > SecurityConfig and put the below code.
package org.example.springsecurityregistration.config;

import org.springframework.beans.factory.annotation.Autowired;
import org.springframework.context.annotation.Bean;
import org.springframework.context.annotation.Configuration;
import org.springframework.security.config.annotation.authentication.builders.AuthenticationManagerBuilder;
import org.springframework.security.config.annotation.web.builders.HttpSecurity;
import org.springframework.security.config.annotation.web.configuration.EnableWebSecurity;
import org.springframework.security.core.userdetails.UserDetailsService;
import org.springframework.security.crypto.bcrypt.BCryptPasswordEncoder;
import org.springframework.security.crypto.password.PasswordEncoder;
import org.springframework.security.web.SecurityFilterChain;

@Configuration
@EnableWebSecurity
public class SecurityConfig  {

    @Autowired
    private UserDetailsService userDetailsService;


    protected void configure(AuthenticationManagerBuilder auth) throws Exception {
        auth.userDetailsService(userDetailsService).passwordEncoder(passwordEncoder());
    }


    @Bean
    protected SecurityFilterChain securityFilterChain(HttpSecurity http) throws Exception {
        http
                .authorizeRequests()
                .requestMatchers("/api/register").permitAll() // Allow registration endpoint without authentication
                .anyRequest().authenticated()
                .and()
                .formLogin()
                .and()
                .httpBasic()
                .and()
                .csrf().disable();
        return http.build();
    }

    @Bean
    public PasswordEncoder passwordEncoder() {
        return new BCryptPasswordEncoder();
    }
}
Step 7: Create a new package named "service". Inside this package, create a new Java class named "UserService".
Go to src > org.example.springsecurityregistration > service > UserService and put the below code.
    package org.example.springsecurityregistration.service;

    import org.example.springsecurityregistration.DTO.RegistrationRequest;
    import org.example.springsecurityregistration.model.User;
    import org.example.springsecurityregistration.repository.UserRepository;
    import org.springframework.beans.factory.annotation.Autowired;
    import org.springframework.stereotype.Service;

    @Service
    public class UserService {

        @Autowired
        private UserRepository userRepository;

        public void registerUser(RegistrationRequest request) {
            User user = new User();
            user.setUsername(request.getUsername());
            user.setEmail(request.getEmail());
            user.setPassword(request.getPassword());
            userRepository.save(user);
        }
    }
Step 8: Create a new package controller
- Handles HTTP requests from the client and acts as an entry point of the application .
- Uses @RestController to create RESTful web services
package org.example.springsecurityregistration.controller;

import org.example.springsecurityregistration.DTO.RegistrationRequest;
import org.example.springsecurityregistration.service.UserService;
import org.springframework.beans.factory.annotation.Autowired;
import org.springframework.http.ResponseEntity;
import org.springframework.web.bind.annotation.*;

@RestController
@RequestMapping("/api")
public class UserController {

    @Autowired
    private UserService userService;

    @PostMapping("/register")
    public ResponseEntity<String> registerUser(@RequestBody RegistrationRequest request) {
        userService.registerUser(request);
        return ResponseEntity.ok("User Registered Successfully");
    }
}
Step 8: Create a new package named "service". Inside this package, create a new Java class named "UserDetailsServiceImpl".
Go to src > org.example.springsecurityregistration > service > UserDetailsServiceImpl and put the below code.
package org.example.springsecurityregistration.service;

import org.example.springsecurityregistration.model.User;
import org.example.springsecurityregistration.repository.UserRepository;
import org.springframework.beans.factory.annotation.Autowired;
import org.springframework.security.core.userdetails.UserDetails;
import org.springframework.security.core.userdetails.UserDetailsService;
import org.springframework.security.core.userdetails.UsernameNotFoundException;
import org.springframework.stereotype.Service;

import java.util.Collections;

@Service
public class UserDetailsServiceImpl implements UserDetailsService {

    @Autowired
    private UserRepository userRepository;

    @Override
    public UserDetails loadUserByUsername(String username) throws UsernameNotFoundException {
        User user = userRepository.findByUsername(username);
        if (user == null) {
            throw new UsernameNotFoundException("User not found with username: " + username);
        }
        return new org.springframework.security.core.userdetails.User(
                user.getUsername(),
                user.getPassword(),
                Collections.emptyList()
        );
    }
}
Step 9: Open the main class and insert the following code.
package org.example.springsecurityregistration;

import org.springframework.boot.SpringApplication;
import org.springframework.boot.autoconfigure.SpringBootApplication;

@SpringBootApplication
public class SpringSecurityRegistrationApplication {

    public static void main(String[] args) {
        SpringApplication.run(SpringSecurityRegistrationApplication.class, args);
    }
}
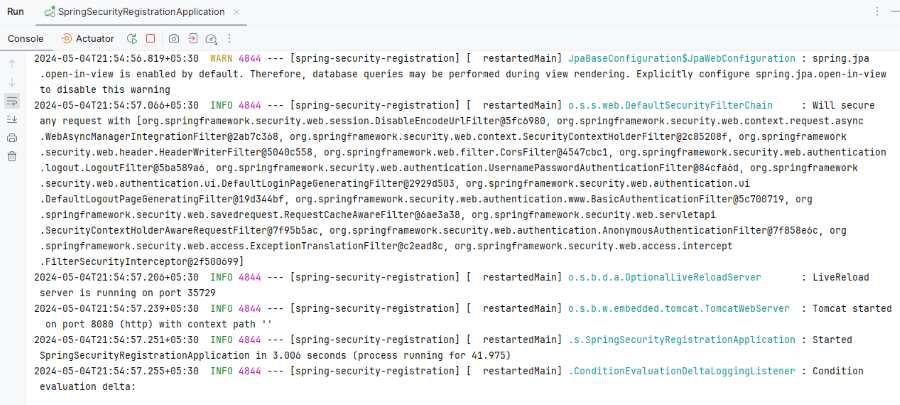
Step 10: Once the Spring project is completed and runs as a Spring application successfully, it will start at port 8080.
Registration Restful API:
POST http://localhost:8080/api/registerOutput:
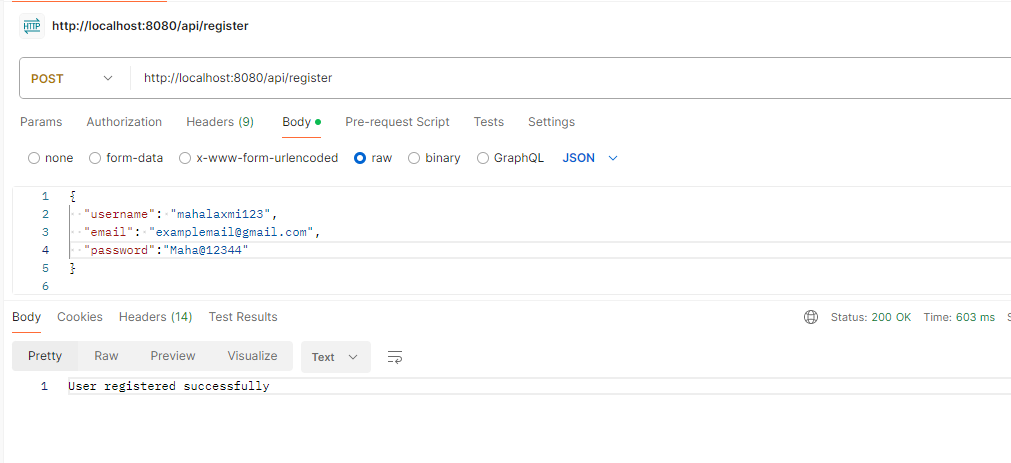
This example demonstrates how to integrate Spring Security into a Spring Boot application to secure the registration endpoint. Users need to access other endpoints while the registration endpoint remains accessible without authentication.
