Spring Security is a powerful framework that provides authentication, authorization, and protection against common security vulnerabilities in Spring-based applications. One of the simplest authentication mechanisms supported by Spring Security is HTTP Basic Authentication, where the client sends a username and password with every HTTP request.
- Spring Security automatically validates user credentials.
- Suitable for REST APIs and simple web applications.
- Can be configured using httpBasic() in Spring Security.
Basic Authentication Flow
- Client Sends Request: User requests a protected resource.
- Authentication Required: Spring Security detects that authentication is needed.
- Browser Displays Login Dialog: Browser prompts the user for credentials.
- Credentials Sent in Header: Username and password are sent using the
Authorizationheader. - Spring Security Validates User: Credentials are verified against the configured user store.
- Access Granted: If authentication succeeds, the request reaches the controller.
- Response Returned: Controller processes the request and sends a response.
Steps to Implement Basic Authentication
Follow the steps below to implement HTTP Basic Authentication in a Spring MVC application using Spring Security.
Step 1: Create a Spring Boot Project
- Open Spring Tool Suite (STS).
- Create a Spring Boot Project.
- Add the required dependencies.
- Spring Boot automatically configures the embedded Tomcat server.
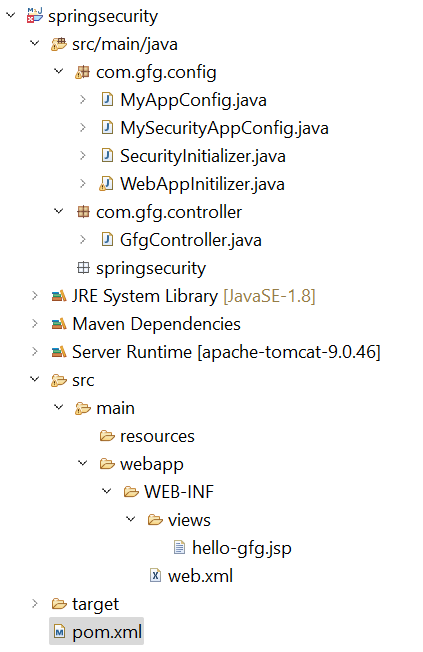
Folder Structure
Step 2: Add Dependencies to pom.xml File
Add the following dependencies to your project:
- Spring Web
- Spring Security
- Spring Boot DevTools
<dependencies>
    <!-- Spring Web dependency for MVC setup -->
    <dependency>
        <groupId>org.springframework</groupId>
        <artifactId>spring-boot-starter-web</artifactId>
    </dependency>

    <!-- Spring Security for authentication and authorization -->
    <dependency>
        <groupId>org.springframework.boot</groupId>
        <artifactId>spring-boot-starter-security</artifactId>
    </dependency>

    <!-- Spring Boot DevTools for enhanced development experience -->
    <dependency>
        <groupId>org.springframework.boot</groupId>
        <artifactId>spring-boot-devtools</artifactId>
        <scope>runtime</scope>
    </dependency>
</dependencies>
Below is the complete pom.xml file. Please cross-verify if you have missed some dependencies.
<?xml version="1.0" encoding="UTF-8"?>
<project xmlns="https://maven.apache.org/POM/4.0.0" xmlns:xsi="https://www.w3.org/2001/XMLSchema-instance"
  xsi:schemaLocation="https://maven.apache.org/POM/4.0.0 https://maven.apache.org/xsd/maven-4.0.0.xsd">
  <modelVersion>4.0.0</modelVersion>

  <groupId>com.gfg.springsecurity</groupId>
  <artifactId>springsecurity</artifactId>
  <version>0.0.1-SNAPSHOT</version>
  <packaging>jar</packaging> <!-- Change to jar if not using an external servlet container -->

  <name>springsecurity Maven Webapp</name>
  <url>http://www.gfg.com</url>

  <properties>
    <project.build.sourceEncoding>UTF-8</project.build.sourceEncoding>
    <maven.compiler.source>17</maven.compiler.source>
    <maven.compiler.target>17</maven.compiler.target>
  </properties>

  <dependencies>
    <!-- Spring Boot Web dependency -->
    <dependency>
        <groupId>org.springframework.boot</groupId>
        <artifactId>spring-boot-starter-web</artifactId>
        <version>3.1.0</version> <!-- Use the latest version -->
    </dependency>

    <!-- Spring Security for authentication and authorization -->
    <dependency>
        <groupId>org.springframework.boot</groupId>
        <artifactId>spring-boot-starter-security</artifactId>
        <version>3.1.0</version> <!-- Use the latest version -->
    </dependency>

    <!-- Spring Boot DevTools for enhanced development experience -->
    <dependency>
        <groupId>org.springframework.boot</groupId>
        <artifactId>spring-boot-devtools</artifactId>
        <scope>runtime</scope> <!-- DevTools for runtime use only -->
    </dependency>
  </dependencies>

  <build>
    <finalName>springsecurity</finalName>
    <pluginManagement>
      <plugins>
        <plugin>
          <artifactId>maven-clean-plugin</artifactId>
          <version>3.1.0</version>
        </plugin>
        <plugin>
          <artifactId>maven-resources-plugin</artifactId>
          <version>3.0.2</version>
        </plugin>
        <plugin>
          <artifactId>maven-compiler-plugin</artifactId>
          <version>3.10.1</version>
        </plugin>
        <plugin>
          <artifactId>maven-surefire-plugin</artifactId>
          <version>3.0.0-M5</version>
        </plugin>
        <plugin>
          <artifactId>maven-war-plugin</artifactId>
          <version>3.3.0</version>
        </plugin>
      </plugins>
    </pluginManagement>
  </build>
</project>
Step 3: Configure Dispatcher Servlet
Create a class named WebAppInitializer inside src/main/java.
- Dispatcher Servlet handles incoming requests.
- Acts as the front controller of Spring MVC.
File: WebAppInitilizer.java:
package com.gfg.config;

import org.springframework.web.servlet.support.AbstractAnnotationConfigDispatcherServletInitializer;

public class WebAppInitializer extends AbstractAnnotationConfigDispatcherServletInitializer {

    @Override
    protected Class<?>[] getRootConfigClasses() {
        return null;  // No root configuration needed for this example
    }

    @Override
    protected Class<?>[] getServletConfigClasses() {
        return new Class[] { MyAppConfig.class };
    }

    @Override
    protected String[] getServletMappings() {
        return new String[] { "/" };  // All requests are handled by this servlet
    }
}
Step 4: Configure Spring MVC
Create a class named MyAppConfig.
- @EnableWebMvc enables Spring MVC features.
- @ComponentScan automatically detects Spring components.
File: MyAppConfig.java
package com.gfg.config;

import org.springframework.context.annotation.Bean;
import org.springframework.context.annotation.ComponentScan;
import org.springframework.context.annotation.Configuration;
import org.springframework.web.servlet.config.annotation.EnableWebMvc;
import org.springframework.web.servlet.view.InternalResourceViewResolver;

@Configuration
@EnableWebMvc
@ComponentScan("com.gfg")
public class MyAppConfig {

    @Bean
    public InternalResourceViewResolver viewResolver() {
        InternalResourceViewResolver viewResolver = new InternalResourceViewResolver();
        viewResolver.setPrefix("/WEB-INF/views/");
        viewResolver.setSuffix(".jsp");
        return viewResolver;
    }
}
Reference article: Spring – Configure Dispatcher Servlet in Three Different Ways
Step 5: Create Spring MVC Controller
Create a controller class named GfgController.
- @Controller marks the class as a Spring MVC Controller.
- @GetMapping handles HTTP GET requests.
File: GfgController.java
package com.gfg.controller;

import org.springframework.stereotype.Controller;
import org.springframework.web.bind.annotation.GetMapping;

@Controller
public class GfgController {

    @GetMapping("/gfg")
    public String helloGfg() {
        return "hello-gfg";  // View name
    }
}
Reference article: Create and Run Your First Spring MVC Controller in Eclipse/Spring Tool Suite
Step 6: Create Spring MVC View
Create a JSP file named hello-gfg.jsp inside:
/WEB-INF/views/
- JSP is used to display dynamic web pages.
- Files inside WEB-INF cannot be accessed directly.
File: hello-gfg.jsp
<!DOCTYPE html>
<html>
<body bgcolor="green">
    <h1>Hello GeeksforGeeks!</h1>
</body>
</html>
Reference article: How to Create Your First View in Spring MVC?
Step 7: Configure Spring Security Basic Authentication
Create a class named MySecurityAppConfig.
- @EnableWebSecurity enables Spring Security.
- Creates and configures the Security Filter Chain.
File: MySecurityAppConfig.java
package com.gfg.config;

import org.springframework.context.annotation.Bean;
import org.springframework.context.annotation.Configuration;
import org.springframework.security.config.annotation.web.builders.HttpSecurity;
import org.springframework.security.config.annotation.web.configuration.EnableWebSecurity;
import org.springframework.security.core.userdetails.User;
import org.springframework.security.core.userdetails.UserDetails;
import org.springframework.security.core.userdetails.UserDetailsService;
import org.springframework.security.crypto.bcrypt.BCryptPasswordEncoder;
import org.springframework.security.crypto.password.PasswordEncoder;
import org.springframework.security.provisioning.InMemoryUserDetailsManager;
import org.springframework.security.web.SecurityFilterChain;

@Configuration
@EnableWebSecurity
public class MySecurityAppConfig {

    @Bean
    public PasswordEncoder passwordEncoder() {
        return new BCryptPasswordEncoder();
    }

    @Bean
    public UserDetailsService userDetailsService() {
        UserDetails user = User.builder()
            .username("gfg")
            .password(passwordEncoder().encode("gfg123"))
            .roles("ADMIN")
            .build();
        return new InMemoryUserDetailsManager(user);
    }

    @Bean
    public SecurityFilterChain securityFilterChain(HttpSecurity http) throws Exception {
        http
            .authorizeHttpRequests(auth -> auth
                .anyRequest().authenticated()
            )
            .httpBasic(); // Enable Basic Auth
        return http.build();
    }
}
Step 8: Create Spring Security Initializer
Create the SecurityInitializer class.
- Registers Spring Security Filter Chain.
- Applies security filters to incoming requests.
File: SecurityInitializer.java
package com.gfg.config;

import org.springframework.security.web.context.AbstractSecurityWebApplicationInitializer;

// Optional in Spring Boot 3.x+ (auto-configured)
public class SecurityInitializer extends AbstractSecurityWebApplicationInitializer {
    // No code needed
}
Now we are done with setting up our Spring Security Filter Chain.
Now, let's run the application and test it out.
Step 9: Run Your Spring MVC Application
To run our Spring MVC Application right-click on your project > Run As > Run on Server. After that use the following URL to run your controller.
http://localhost:8080/springsecurity/gfg
And it will ask for authentication to use the endpoint and a pop-up screen will be shown like this.

Now sign in with the following credentials
- Username: gfg
- Password: gfg123
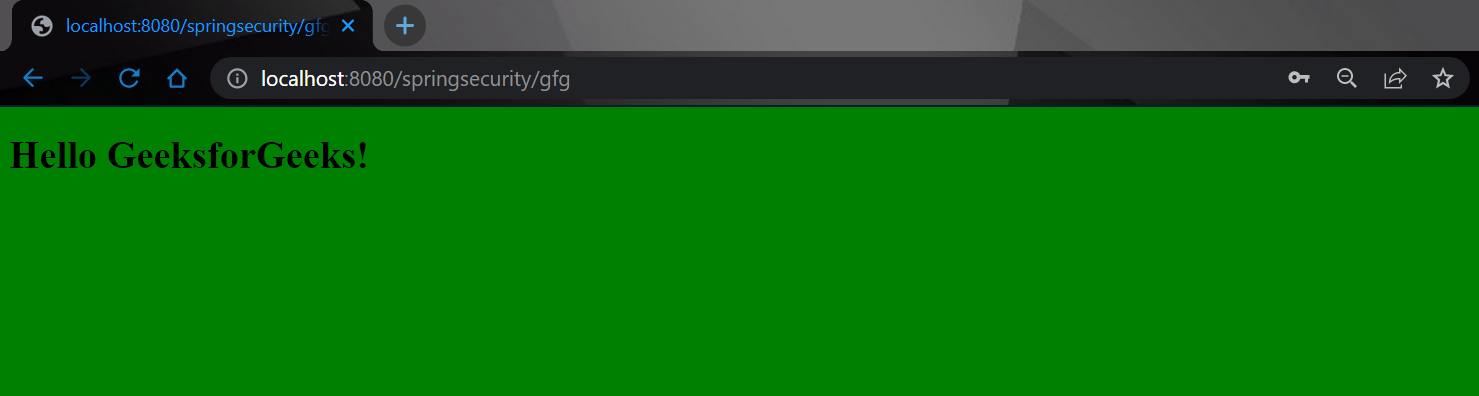
And now you can access your endpoint.