

In a microservices architecture, failures in one service can quickly impact other dependent services, leading to reduced system reliability. Spring Cloud Netflix Hystrix provides fault tolerance and latency control mechanisms to improve the resilience and stability of distributed applications. It helps applications handle service failures gracefully by preventing cascading failures.
- Implements the Circuit Breaker pattern to prevent cascading failures between microservices.
- Provides fallback mechanisms to maintain service availability during failures.
- Monitors service health and improves fault tolerance in distributed systems.
Example Project
We’ll build a User Registration and Login API with MongoDB as the database and enable Hystrix fallback to handle failures.
- Users can sign up (email + password).
- Users can log in with credentials.
- If the API is unavailable, Hystrix will trigger a fallback response.
Workflow diagram
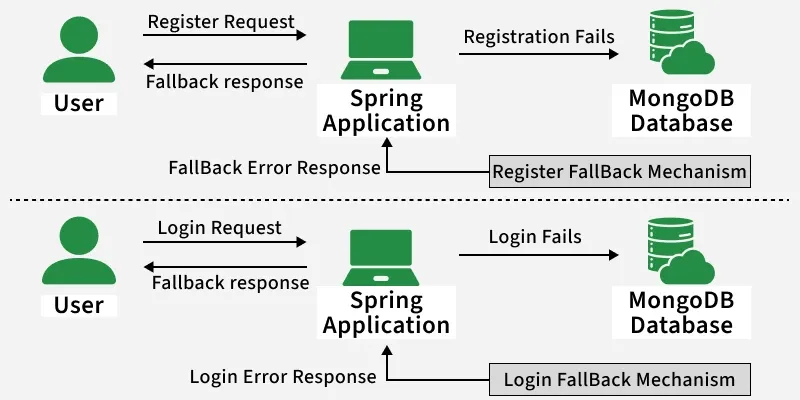
Step-by-Step Implementation of Hystrix in Spring Cloud Netflix
Step 1: Create the Spring project
Create a Spring Boot project named employee-service using Spring Initializr.
Add the following dependencies.
- Spring Web
- Spring Data MongoDB
- Spring Web Security
- Lombok
- Spring Cloud Netflix Hystrix
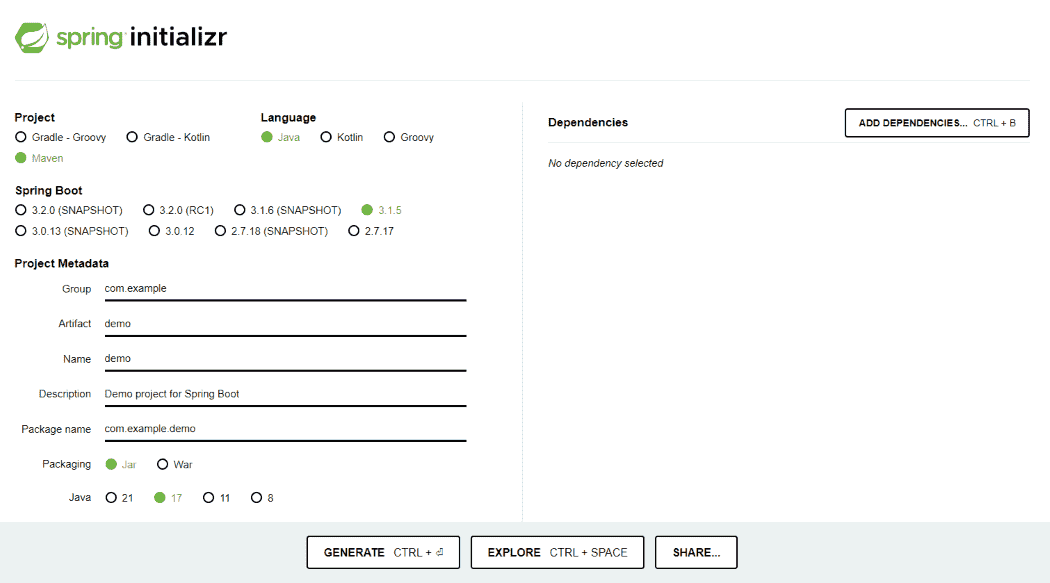
Generate the project and run it in IntelliJ IDEA/Eclipse IDE by referring to the above article.
Below is the directory structure of our project:

Note: Hystrix has been deprecated by Netflix and removed from the latest versions of Spring Cloud. If you still want to use it for learning, you need to manually add the last working version in your `pom.xml`
Step 2: Configure application.properties
Open the application.properties file then configure the mongodb database and netflix hystrix mechanism into your spring project. Put the code in the application.properties file.
server.port=8082
spring.data.mongodb.uri=mongodb://localhost:27017/users
hystrix.command.default.execution.isolation.thread.timeoutInMilliseconds=5000
Step 3: Create the Model Classes
Once successful create the project after that create the one package named as the model in that package create one class named as User.
package in.mahesh.tasks.model;

import org.springframework.data.annotation.Id;
import org.springframework.data.mongodb.core.mapping.Document;

import lombok.AllArgsConstructor;
import lombok.NoArgsConstructor;

@Document
@AllArgsConstructor
@NoArgsConstructor
public class User {

    @Id
    private String id;
    private String email;
    private String password;

    public String getId() {

        return id;
    }
    public void setId(String id) {

        this.id = id;
    }
    public String getEmail() {

        return email;
    }
    public void setEmail(String email) {

        this.email = email;
    }
    public String getPassword() {
        return password;
    }
    public void setPassword(String password) {
        this.password = password;
    }
}
Step 4: Create the LoginRequest.java
Create one more class in same package and it named as the LoginRequest and this class handle login request into the project.
package in.mahesh.tasks.model;

import lombok.AllArgsConstructor;
import lombok.Data;
import lombok.NoArgsConstructor;

@Data
@AllArgsConstructor
@NoArgsConstructor
public class LoginRequest {

    String email;
    String password;
    public String getEmail() {
        return email;
    }
    public void setEmail(String email) {
        this.email = email;
    }
    public String getPassword() {
        return password;
    }
    public void setPassword(String password) {
        this.password = password;
    }
}
Step 5: Repository Layer
Now, we can create one more package and it named as repository in that repository create an interface named as UserRepository and put the code below.
package in.mahesh.tasks.repository;

import org.springframework.data.mongodb.repository.MongoRepository;
import org.springframework.data.mongodb.repository.Query;
import org.springframework.stereotype.Repository;

import in.mahesh.tasks.model.User;

@Repository
public interface UserRepository extends MongoRepository<User, String> {

    @Query("{email :?0}")
    User findByEmail(String username);

}
Step 6: Controller with Hystrix Fallback
Create one more package and it named as the controller after that create the class in that package and it named as the UserController and this class can handles the requests from the user.
package in.mahesh.tasks.controller;

import com.netflix.hystrix.contrib.javanica.annotation.HystrixCommand;
import org.springframework.beans.factory.annotation.Autowired;
import org.springframework.cloud.client.circuitbreaker.EnableCircuitBreaker;
import org.springframework.cloud.netflix.hystrix.EnableHystrix;
import org.springframework.http.HttpStatus;
import org.springframework.http.ResponseEntity;
import org.springframework.security.crypto.password.PasswordEncoder;
import org.springframework.web.bind.annotation.PostMapping;
import org.springframework.web.bind.annotation.RequestBody;
import org.springframework.web.bind.annotation.RestController;

import in.mahesh.tasks.model.LoginRequest;
import in.mahesh.tasks.model.User;
import in.mahesh.tasks.repository.UserRepository;
import org.springframework.web.client.RestTemplate;

@RestController
@EnableHystrix
public class UserController {

      @Autowired
      UserRepository userRepository;

      @Autowired
      PasswordEncoder passwordEncoder;

      @PostMapping("/signup")
     @HystrixCommand(fallbackMethod = "fallbackRegisterUser")
      public ResponseEntity<String> createUserHandler(@RequestBody User user) {
      String email = user.getEmail();
      String password = user.getPassword();
      User createdUser = new User();
      createdUser.setEmail(email);
      createdUser.setPassword(passwordEncoder.encode(password));

      User savedUser = userRepository.save(createdUser);
      userRepository.save(savedUser); return new
      ResponseEntity<>("User Registration Sucess", HttpStatus.OK);

      }

      @PostMapping("/signin")
     @HystrixCommand(fallbackMethod = "fallbackLoginUser")
      public ResponseEntity<String> sign(@RequestBody LoginRequest loginRequest) {
      String username = loginRequest.getEmail();
      String password = loginRequest.getPassword();

      // Retrieve the user from the database based on the email
      User user = userRepository.findByEmail(username);

      if (user == null) {
          return ResponseEntity.status(HttpStatus.UNAUTHORIZED)
                  .body("Invalid email or password");
      }

      // Verify the password
      if (!passwordEncoder.matches(password, user.getPassword())) {
          return ResponseEntity.status(HttpStatus.UNAUTHORIZED)
                  .body("Invalid email or password");
      }

      // You can generate a token here and return it as part of the response
      // For simplicity, let's just return a success message for now
      return ResponseEntity.ok("Login successful");


 }
      // Fallback method for user registration
 public ResponseEntity<String> fallbackRegisterUser(User user) {
          // Lothe error or perform any necessary handling
      System.err.println("User registration failed. Fallback method called.");
      return ResponseEntity.status(HttpStatus.INTERNAL_SERVER_ERROR)
      .body("User Registration Failed. Please try again later."); }

     // Fallback method for user login

       public ResponseEntity<String> fallbackLoginUser(LoginRequest
      loginRequest) { // Log the error or perform any necessary handling
      System.err.println("User login failed. Fallback method called."); return
      ResponseEntity.status(HttpStatus.INTERNAL_SERVER_ERROR)
      .body("User Login Failed. Please try again later."); }


}
Note: Add the EnableHystrix annotation into the UserController class to enabling the hystrix fallback mechanism in this project.
Step 7: Security Configuration
In main package, create the one more class and it named as the AppConfig and this class can be configure the web security of the project.
package in.mahesh.tasks;

import java.util.Arrays;
import java.util.Collections;

import org.springframework.context.annotation.Bean;
import org.springframework.context.annotation.Configuration;
import org.springframework.security.config.Customizer;
import org.springframework.security.config.annotation.web.builders.HttpSecurity;
import org.springframework.security.config.annotation.web.configuration.EnableWebSecurity;
import org.springframework.security.config.http.SessionCreationPolicy;
import org.springframework.security.crypto.bcrypt.BCryptPasswordEncoder;
import org.springframework.security.crypto.password.PasswordEncoder;
import org.springframework.security.web.SecurityFilterChain;


@Configuration
@EnableWebSecurity
public class AppConfig {
    @SuppressWarnings("deprecation")
    @Bean
    SecurityFilterChain filterChain(HttpSecurity http) throws Exception {
        http.sessionManagement(management -> management.sessionCreationPolicy(SessionCreationPolicy.STATELESS))
                .authorizeRequests(
                        authorize -> authorize.requestMatchers("/api/**")
                        .authenticated().anyRequest().permitAll())
                .csrf(csrf -> csrf.disable())
                .httpBasic(Customizer.withDefaults())
                .formLogin(Customizer.withDefaults());
                  return http.build();
    }


    @Bean
    PasswordEncoder passwordEncoder() {
        return new BCryptPasswordEncoder();
    }

}
Step 8: Create Main Class
In main package, by default the main class created by the creation of the bring project in this class we can enable the Hystrix to be working with the Netflix Hystrix into the spring project.
package in.mahesh.tasks;

import org.springframework.boot.SpringApplication;
import org.springframework.boot.autoconfigure.SpringBootApplication;
import org.springframework.cloud.client.circuitbreaker.EnableCircuitBreaker;
import org.springframework.cloud.netflix.hystrix.EnableHystrix;

@SpringBootApplication
@EnableHystrix
public class UserServiceApplication {

    public static void main(String[] args) {
        SpringApplication.run(UserServiceApplication.class, args);
    }

}
Step 8. Run Your Application
Once successfully completed the project then run the project as a spring application once the successfully then we will the output like the below image. In our case application start on port 8082.

Step 9: Test Your Api
Register Endpoint request
http://localpoint:8082/signup
Reference the below image for better understanding:

Check the login endpoint:
http://localpoint:8082/signin
Reference the below image for better understanding:

Fallback Mechanism:
Below we can see the fallback login details and output in the request body.

