

In a microservices architecture, services are created, scaled, and deployed independently, making it difficult to manage their network locations manually. Eureka Service Registry, provided by Netflix, enables automatic service registration and discovery, while Spring Boot simplifies the development of these distributed applications.
- Automatic Service Registration for registering services with the Eureka Server.
- Dynamic Service Discovery to locate services without hardcoded URLs.
- Scalability and Fault Tolerance through multiple service instances and load balancing.
Some Important Concept
- Microservices: An architectural style where applications are divided into small independent services. Each service performs a specific business task.
- Eureka : A Netflix service registry used for service registration and discovery in microservices architecture.
- Service Registry: A central directory that stores details of all available microservices and their network locations.
- Service Discovery: A mechanism that helps services locate and communicate with other services dynamically.
- Eureka Server: The main registry server that manages and monitors registered microservices.
- Eureka Client: A microservice that registers itself with Eureka Server and discovers other services.
- Instance Registration: The process where a microservice registers itself with Eureka during startup.
- Instance Deregistration: The process of removing a service from Eureka when the service stops running.
- Service Name: A unique name assigned to a microservice for identification and communication.
- Load Balancing: Distributes requests among multiple service instances to improve performance and availability.
Step-by-step implementation
Below are the steps for both Eureka Server and Eureka Client to start with Spring Boot and Eureka Service Registry.
Step 1: Create Spring Boot Project
Create a Spring Boot project using Spring Initializr.
Add Dependencies:
- Spring Web
- Eureka Server
- Spring DevTools
- Lombok
After creating the Spring project, the file structure resembles the image below.
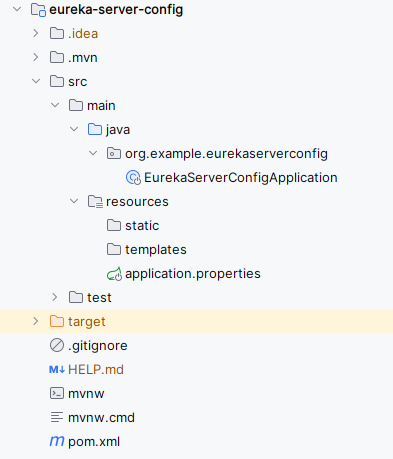
Step 2: Configure application.properties
Open the application.properties file and put the below code for the server port and eureka server configuration to the project.
spring.application.name=eureka-server-config
server.port=9099
eureka.instance.prefer-ip-address=true
eureka.client.fetch-registry=true
eureka.client.register-with-eureka=true
eureka.client.service-url.defaultZone=http://localhost:9099/eureka
Step 3: Enable Eureka Server
In the main class, add the annotation @EnableEurekaServer to enable Eureka server functionality.
package org.example.eurekaserverconfig;

import org.springframework.boot.SpringApplication;
import org.springframework.boot.autoconfigure.SpringBootApplication;
import org.springframework.cloud.netflix.eureka.server.EnableEurekaServer;

@SpringBootApplication
@EnableEurekaServer
public class EurekaServerConfigApplication {

    public static void main(String[] args) {
        SpringApplication.run(EurekaServerConfigApplication.class, args);
    }

}
Step 4: Run the Eureka Server
Run the application as a Spring Boot application and it runs successful then it starts at port 9099.

Steps For User-service(Eureka-Client)
Step 1: Create Spring Boot Project
Add Dependencies:
- Spring Web
- Eureka Discovery Client
- Spring DevTools
- Lombok
After creating the Spring project, the file structure resembles the image below.

Step 2: Configure application.properties
Open the application.properties file and put the below code for the server port and eureka client configuration to the project.
spring.application.name=user-service
server.port=8086
eureka.instance.prefer-ip-address=true
eureka.client.fetch-registry=true
eureka.client.register-with-eureka=true
eureka.client.service-url.defaultZone=http://localhost:9099/eureka
Step 3: Create Controller Class
Create the new Java class and it named as UserController. Go to src > org.example.userservice > UserController and put the below code.
package org.example.userservice;

import org.springframework.web.bind.annotation.*;

import java.util.List;

@RestController

public class UserController {

    @GetMapping("/client")
        public String check() {
        return "Welcome to client";
        }
}
Step 4: Enable Discovery Client
Open the main class and add the @EnableDiscoveryClient into it.
package org.example.userservice;

import org.springframework.boot.SpringApplication;
import org.springframework.boot.autoconfigure.SpringBootApplication;
import org.springframework.cloud.client.discovery.EnableDiscoveryClient;

@SpringBootApplication
@EnableDiscoveryClient
public class UserServiceApplication {

    public static void main(String[] args) {
        SpringApplication.run(UserServiceApplication.class, args);
    }

}
Step 5: Run the Client Application
Run the client application as a Spring Boot application and it runs successful then it starts at port 8086.

Eureka Dashboard
This dashboard provides the visibility into the microservices registered with Eureka Server and their status and the other relevant information.

