

In a microservices architecture, services often need to communicate with each other to exchange data and execute business workflows. Apache ActiveMQ is a popular open-source message broker that enables asynchronous communication between microservices through message queues and topics. By decoupling services from one another, ActiveMQ helps build scalable, reliable, and fault-tolerant distributed systems.
- Asynchronous communication, allowing services to process requests independently without waiting for immediate responses.
- Reliable message delivery, ensuring messages are stored and delivered even when consumer services are temporarily unavailable.
- Loose coupling and scalability, enabling microservices to evolve, deploy, and scale independently.
Uses of ActiveMQ in Microservices:
Traditional REST communication creates direct dependencies between services. ActiveMQ removes this dependency by introducing a message broker between services.
- Improved scalability
- Better fault tolerance
- Asynchronous processing
Working of Microservices Communication with Apache ActiveMQ
Message Production
- The producer service can creates the message and sends it to the specific queue or topic on the ActiveMQ broker.
- The producer does not need to know the details of the consumer services and it can only needs to the know queue or topic name.
Message Queuing
- ActiveMQ can stores the message in the designated queue or topic.
- If consumer service is not available then the ActiveMQ can holds the message until the consumer is ready to receive it and ensuring no message is lost.
Message Consumption
- The Consumer service can listens to the queue or topic.
- when the message arrives and the consumer retrieves and processes it.
- It can allows the consumer to the handle messages at its the own place and improving the system resilience.
Steps to implements ActiveMQ Server to communicate Microservices
Below is the implementation of microservices communication with Apache ActiveMQ.
Setup the Apache ActiveMQ
We can download the ActiveMQ from official website and follow the installation process instructions.
To Start ActiveMQ write the below command in cmd and start ActiveMQ.
cd apache-activemq-5.3.2/bin
./activemq start
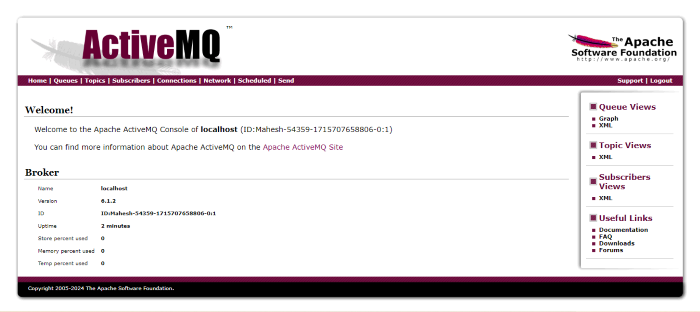
Image reference:

Below is the ActiveMQ Dashboard.
Now we will create two Microservices
- Producer Service
- Consumer Service
Create the producer-service
Step 1: Create Spring Boot Project
Create a new Spring Boot project using Spring Initializr, and add the following dependencies:
- Spring Web
- Apache ActiveMQ
- Spring DevTools
- Lombok
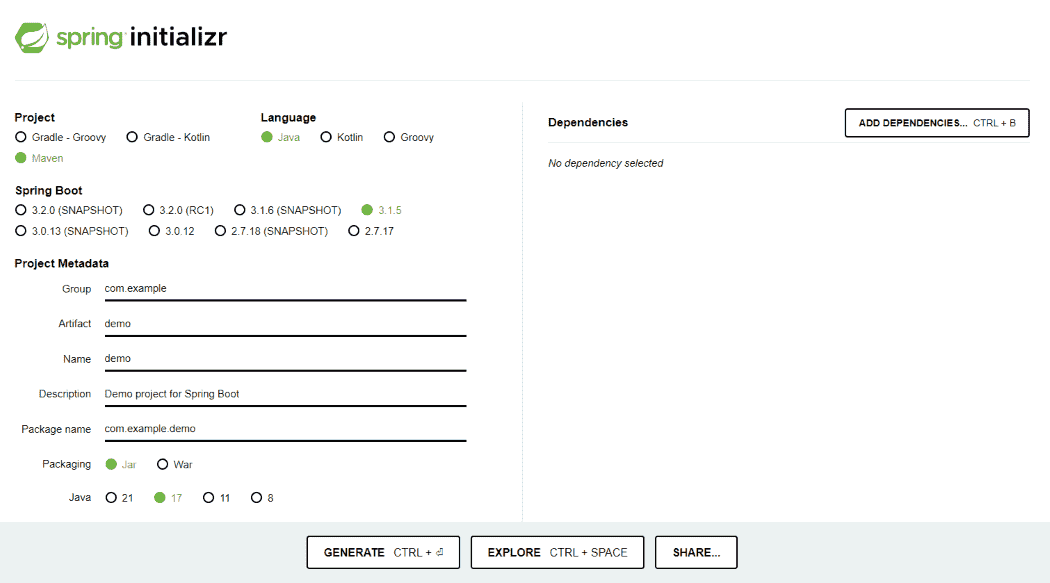
Once the project is created, the folder structure will be like below.
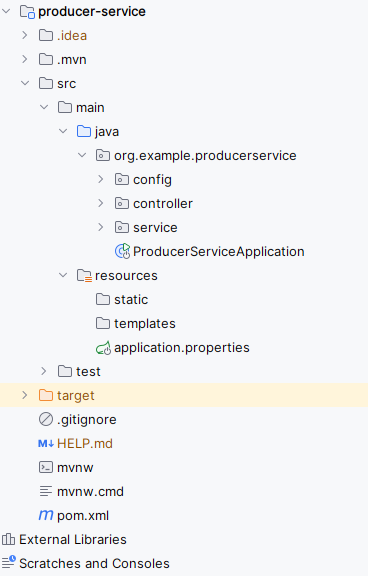
Step 2: Review the Generated pom.xml File.
The generated pom.xml file should contain the Following Dependency.
<?xml version="1.0" encoding="UTF-8"?>
<project xmlns="https://maven.apache.org/POM/4.0.0" xmlns:xsi="https://www.w3.org/2001/XMLSchema-instance"
         xsi:schemaLocation="https://maven.apache.org/POM/4.0.0 https://maven.apache.org/xsd/maven-4.0.0.xsd">
    <modelVersion>4.0.0</modelVersion>
    <parent>
        <groupId>org.springframework.boot</groupId>
        <artifactId>spring-boot-starter-parent</artifactId>
        <version>3.2.5</version>
        <relativePath/> <!-- lookup parent from repository -->
    </parent>
    <groupId>org.example</groupId>
    <artifactId>producer-service</artifactId>
    <version>0.0.1-SNAPSHOT</version>
    <name>producer-service</name>
    <description>producer-service</description>
    <properties>
        <java.version>17</java.version>
    </properties>
    <dependencies>
        <dependency>
            <groupId>org.springframework.boot</groupId>
            <artifactId>spring-boot-starter-activemq</artifactId>
        </dependency>
        <dependency>
            <groupId>org.springframework.boot</groupId>
            <artifactId>spring-boot-starter-web</artifactId>
        </dependency>

        <dependency>
            <groupId>org.springframework.boot</groupId>
            <artifactId>spring-boot-devtools</artifactId>
            <scope>runtime</scope>
            <optional>true</optional>
        </dependency>
        <dependency>
            <groupId>org.projectlombok</groupId>
            <artifactId>lombok</artifactId>
            <optional>true</optional>
        </dependency>
        <dependency>
            <groupId>org.springframework.boot</groupId>
            <artifactId>spring-boot-starter-test</artifactId>
            <scope>test</scope>
        </dependency>
    </dependencies>

    <build>
        <plugins>
            <plugin>
                <groupId>org.springframework.boot</groupId>
                <artifactId>spring-boot-maven-plugin</artifactId>
                <configuration>
                    <excludes>
                        <exclude>
                            <groupId>org.projectlombok</groupId>
                            <artifactId>lombok</artifactId>
                        </exclude>
                    </excludes>
                </configuration>
            </plugin>
        </plugins>
    </build>

</project>
Step 3: Configure ActiveMQ Properties
Open the application.properties file and add the ActiveMQ connection properties to the project.
spring.application.name=producer-service
spring.activemq.broker-url=tcp://localhost:61616
spring.activemq.user=admin
spring.activemq.password=admin
Step 4: Create ActiveMQ Configuration
We will create the configuration class to configure ActiveMQ for Configuring JMS connection factory and JmsTemplate.
package org.example.producerservice.config;

import org.apache.activemq.ActiveMQConnectionFactory;
import org.springframework.context.annotation.Bean;
import org.springframework.context.annotation.Configuration;
import org.springframework.jms.annotation.EnableJms;
import org.springframework.jms.core.JmsTemplate;

@Configuration
@EnableJms
public class ActiveMQConfig {

    private static final String BROKER_URL = "tcp://localhost:61616";

    @Bean
    public ActiveMQConnectionFactory connectionFactory() {
        ActiveMQConnectionFactory factory = new ActiveMQConnectionFactory();
        factory.setBrokerURL(BROKER_URL);
        return factory;
    }

    @Bean
    public JmsTemplate jmsTemplate() {
        return new JmsTemplate(connectionFactory());
    }
}
Step 5: Create Producer Service
Create a service that publishes messages.
package org.example.producerservice.service;

import org.springframework.beans.factory.annotation.Autowired;
import org.springframework.jms.core.JmsTemplate;
import org.springframework.stereotype.Service;

@Service
public class MessageService {

    private static final String QUEUE_NAME = "sample-queue";

    @Autowired
    private JmsTemplate jmsTemplate;

    public void sendMessage(String message) {
        jmsTemplate.convertAndSend(QUEUE_NAME, message);
    }
}
Step 6: Create REST Controller
Create an endpoint to publish messages.
package org.example.producerservice.controller;

import org.example.producerservice.service.MessageService;
import org.springframework.beans.factory.annotation.Autowired;
import org.springframework.web.bind.annotation.PostMapping;
import org.springframework.web.bind.annotation.RequestParam;
import org.springframework.web.bind.annotation.RestController;

@RestController
public class MessageController {

    @Autowired
    private MessageService messageService;

    @PostMapping("/send")
    public String sendMessage(@RequestParam String message) {
        messageService.sendMessage(message);
        return "Message sent: " + message;
    }
}
Step 7: Create Main Class
Open the Main Class and write the following code.
package org.example.producerservice;

import org.springframework.boot.SpringApplication;
import org.springframework.boot.autoconfigure.SpringBootApplication;

@SpringBootApplication
public class ProducerServiceApplication {

    public static void main(String[] args) {
        SpringApplication.run(ProducerServiceApplication.class, args);
    }

}
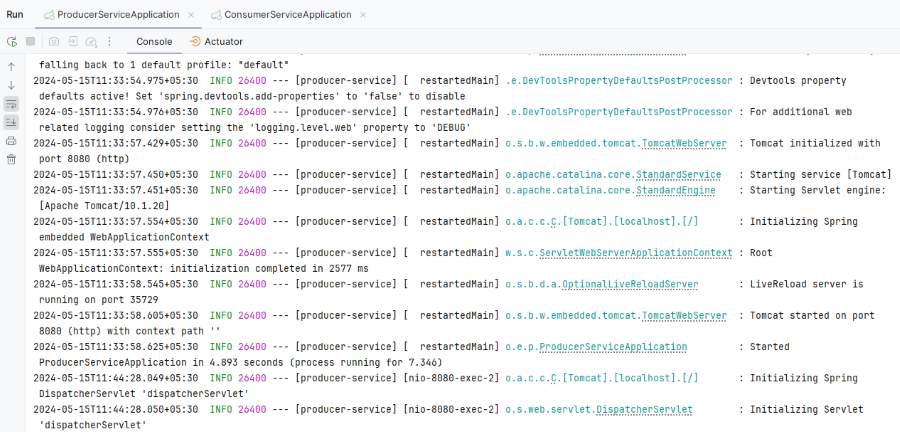
Step 8: Run the application
Once we run the application, then the project will run at port 8081.
Create the consumer service
Step 1: Create a new Spring Boot project using Spring Initializr, and include the following dependencies:
- Spring Web
- Apache ActiveMQ
- Spring DevTools
- Lombok
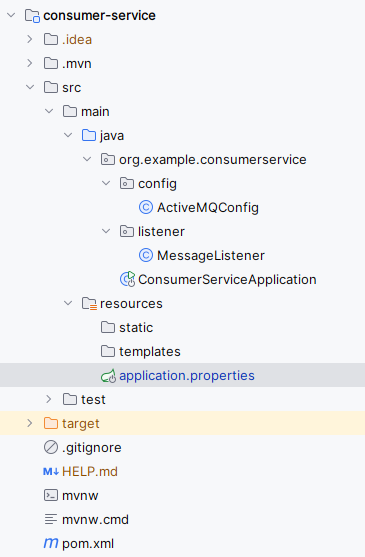
Once the project is created, the file structure will be like below.
Step 2: Review the Generated pom.xml File.
The generated pom.xml file should contain the Following Dependency.
<?xml version="1.0" encoding="UTF-8"?>
<project xmlns="https://maven.apache.org/POM/4.0.0" xmlns:xsi="https://www.w3.org/2001/XMLSchema-instance"
         xsi:schemaLocation="https://maven.apache.org/POM/4.0.0 https://maven.apache.org/xsd/maven-4.0.0.xsd">
    <modelVersion>4.0.0</modelVersion>
    <parent>
        <groupId>org.springframework.boot</groupId>
        <artifactId>spring-boot-starter-parent</artifactId>
        <version>3.2.5</version>
        <relativePath/> <!-- lookup parent from repository -->
    </parent>
    <groupId>org.example</groupId>
    <artifactId>consumer-service</artifactId>
    <version>0.0.1-SNAPSHOT</version>
    <name>consumer-service</name>
    <description>consumer-service</description>
    <properties>
        <java.version>17</java.version>
    </properties>
    <dependencies>
        <dependency>
            <groupId>org.springframework.boot</groupId>
            <artifactId>spring-boot-starter-activemq</artifactId>
        </dependency>
        <dependency>
            <groupId>org.springframework.boot</groupId>
            <artifactId>spring-boot-starter-web</artifactId>
        </dependency>

        <dependency>
            <groupId>org.springframework.boot</groupId>
            <artifactId>spring-boot-devtools</artifactId>
            <scope>runtime</scope>
            <optional>true</optional>
        </dependency>
        <dependency>
            <groupId>org.projectlombok</groupId>
            <artifactId>lombok</artifactId>
            <optional>true</optional>
        </dependency>
        <dependency>
            <groupId>org.springframework.boot</groupId>
            <artifactId>spring-boot-starter-test</artifactId>
            <scope>test</scope>
        </dependency>
    </dependencies>

    <build>
        <plugins>
            <plugin>
                <groupId>org.springframework.boot</groupId>
                <artifactId>spring-boot-maven-plugin</artifactId>
                <configuration>
                    <excludes>
                        <exclude>
                            <groupId>org.projectlombok</groupId>
                            <artifactId>lombok</artifactId>
                        </exclude>
                    </excludes>
                </configuration>
            </plugin>
        </plugins>
    </build>

</project>
Step 3: Configure ActiveMQ Properties
Open the application.properties file and add the ActiveMQ connection properties to the project.
spring.application.name=consumer-service
server.port=8081
spring.activemq.broker-url=tcp://localhost:61616
spring.activemq.user=admin
spring.activemq.password=admin
Step 4: Create Consumer Configuration
We will create the configuration class to configure the JMS listener.
package org.example.consumerservice.config;

import org.apache.activemq.ActiveMQConnectionFactory;
import org.springframework.context.annotation.Bean;
import org.springframework.context.annotation.Configuration;
import org.springframework.jms.annotation.EnableJms;
import org.springframework.jms.config.DefaultJmsListenerContainerFactory;

@Configuration
@EnableJms
public class ActiveMQConfig {

    private static final String BROKER_URL = "tcp://localhost:61616";

    @Bean
    public ActiveMQConnectionFactory connectionFactory() {
        ActiveMQConnectionFactory factory = new ActiveMQConnectionFactory();
        factory.setBrokerURL(BROKER_URL);
        return factory;
    }

    @Bean
    public DefaultJmsListenerContainerFactory jmsListenerContainerFactory() {
        DefaultJmsListenerContainerFactory factory = new DefaultJmsListenerContainerFactory();
        factory.setConnectionFactory(connectionFactory());
        return factory;
    }
}
Step 5: Create Message Listener
We will create the configuration class to listen the ActiveMQ message broker of the application.
package org.example.consumerservice.listener;

import org.springframework.jms.annotation.JmsListener;
import org.springframework.stereotype.Component;

@Component
public class MessageListener {

    @JmsListener(destination = "sample-queue")
    public void listen(String message) {
        System.out.println("Received message: " + message);
    }
}
Step 6: Create Main Class
Create ConsumerServiceApplication and put the below code.
package org.example.consumerservice;

import org.springframework.boot.SpringApplication;
import org.springframework.boot.autoconfigure.SpringBootApplication;

@SpringBootApplication
public class ConsumerServiceApplication {

    public static void main(String[] args) {
        SpringApplication.run(ConsumerServiceApplication.class, args);
    }

}
Step 7: Run the application
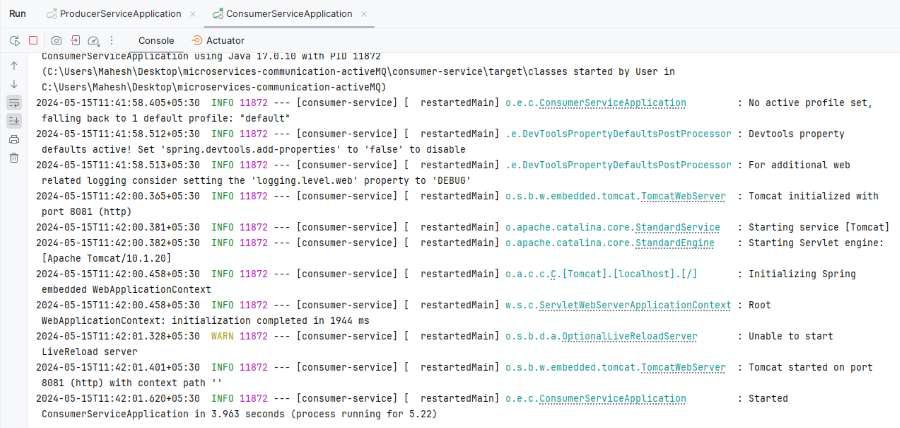
Once we run the application, then the project will run at port 8081.
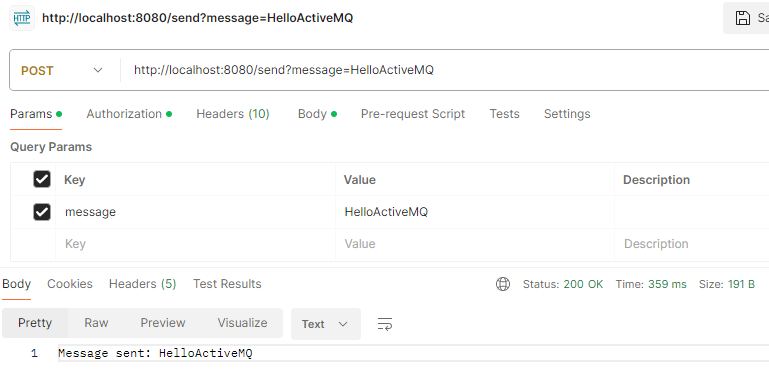
Producer-service endpoint:
POST http:localhost:8080/send?message=HelloActiveMQ
Output:
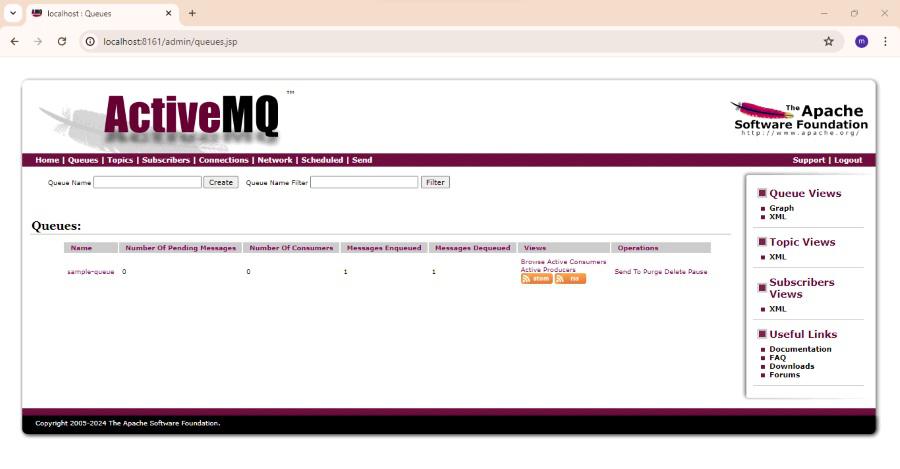
Below is the ActiveMQ queues dashboard.
Consumer-service Application run on
http://localhost:8081
Below is the image of Consumer-service Application log with message.

