

Auto-Scaling Microservices with Spring Boot and Eureka enables systems to dynamically adjust service instances based on real-time load. It ensures high availability, fault tolerance, and efficient resource usage in distributed architectures. This combination is widely used in modern cloud-native applications.
- Enables automatic service registration and discovery using Eureka for seamless communication between microservices.
- Dynamically scales up or down microservice instances based on traffic, CPU usage, or request load.
- Improves system resilience and performance by distributing requests efficiently across available instances.
Key Terminologies:
- Eureka: A service registry that enables microservices to self-register and discover each other. It plays a vital role in service discovery and load balancing.
- Spring Boot: Provides an easy way to develop microservices with embedded servers and dependency injection, streamlining the development process.
- Auto-Scaling: Automatically adjusts the number of instances of a microservice based on metrics like CPU usage or incoming requests. This ensures the system can handle fluctuations in load efficiently.
Steps to implement Auto-Scaling Microservices with Eureka and Spring Boot
Follow these below steps to implement Auto-Scaling Microservices with Eureka and Spring Boot.
STEP 1: Create set-up for Eureka Server
Eureka Server acts as a central directory where all microservices register and discover each other.
1.1: Create Spring Boot Project
Create a Spring Boot project using Spring Initializr.
Add Dependencies:
- Spring Web
- Eureka Server
- Spring Dev Tools
- Lombok
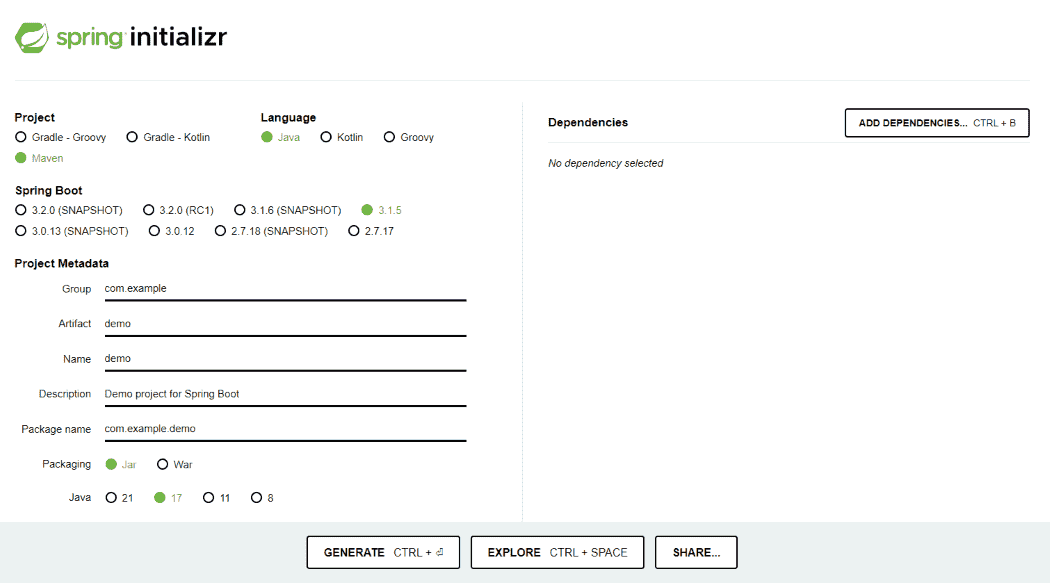
1.2: Review the Generated pom.xml File
The generated pom.xml file should look similar to the following:
<project xmlns="http://maven.apache.org/POM/4.0.0"
         xmlns:xsi="http://www.w3.org/2001/XMLSchema-instance"
         xsi:schemaLocation="http://maven.apache.org/POM/4.0.0 http://maven.apache.org/xsd/maven-4.0.0.xsd">

    <modelVersion>4.0.0</modelVersion>

    <groupId>com.example</groupId>
    <artifactId>eureka-server</artifactId>
    <version>0.0.1-SNAPSHOT</version>
    <name>eureka-server</name>

    <!-- Spring Boot Parent -->
    <parent>
        <groupId>org.springframework.boot</groupId>
        <artifactId>spring-boot-starter-parent</artifactId>
        <version>3.2.5</version>
        <relativePath/>
    </parent>

    <!-- Java Version -->
    <properties>
        <java.version>17</java.version>
        <spring-cloud.version>2023.0.3</spring-cloud.version>
    </properties>

    <!-- Dependency Management for Spring Cloud -->
    <dependencyManagement>
        <dependencies>
            <dependency>
                <groupId>org.springframework.cloud</groupId>
                <artifactId>spring-cloud-dependencies</artifactId>
                <version>${spring-cloud.version}</version>
                <type>pom</type>
                <scope>import</scope>
            </dependency>
        </dependencies>
    </dependencyManagement>

    <dependencies>

        <!-- Eureka Server -->
        <dependency>
            <groupId>org.springframework.cloud</groupId>
            <artifactId>spring-cloud-starter-netflix-eureka-server</artifactId>
        </dependency>

        <!-- Spring Boot Web (required for server) -->
        <dependency>
            <groupId>org.springframework.boot</groupId>
            <artifactId>spring-boot-starter-web</artifactId>
        </dependency>

        <!-- Actuator (optional for monitoring) -->
        <dependency>
            <groupId>org.springframework.boot</groupId>
            <artifactId>spring-boot-starter-actuator</artifactId>
        </dependency>

    </dependencies>

    <build>
        <plugins>
            <plugin>
                <groupId>org.springframework.boot</groupId>
                <artifactId>spring-boot-maven-plugin</artifactId>
            </plugin>
        </plugins>
    </build>

</project>
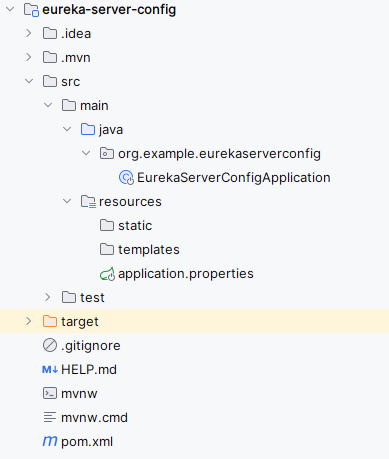
After creating the Spring project, the file structure will resemble the image below.
1.3: Configure application.properties
Open the application.properties file and add the following code to configure the server port and Eureka server settings for the project.
spring.application.name=eureka-server-config
server.port=9099
eureka.instance.prefer-ip-address=true
eureka.client.fetch-registry=true
eureka.client.register-with-eureka=true
eureka.client.service-url.defaultZone= http://localhost:9099/eureka
1.4: Enable Eureka Server
This activates Eureka Server functionality in the Spring Boot application.
package org.example.eurekaserverconfig;

import org.springframework.boot.SpringApplication;
import org.springframework.boot.autoconfigure.SpringBootApplication;
import org.springframework.cloud.netflix.eureka.server.EnableEurekaServer;

@SpringBootApplication
@EnableEurekaServer
public class EurekaServerConfigApplication {

    public static void main(String[] args) {
        SpringApplication.run(EurekaServerConfigApplication.class, args);
    }

}
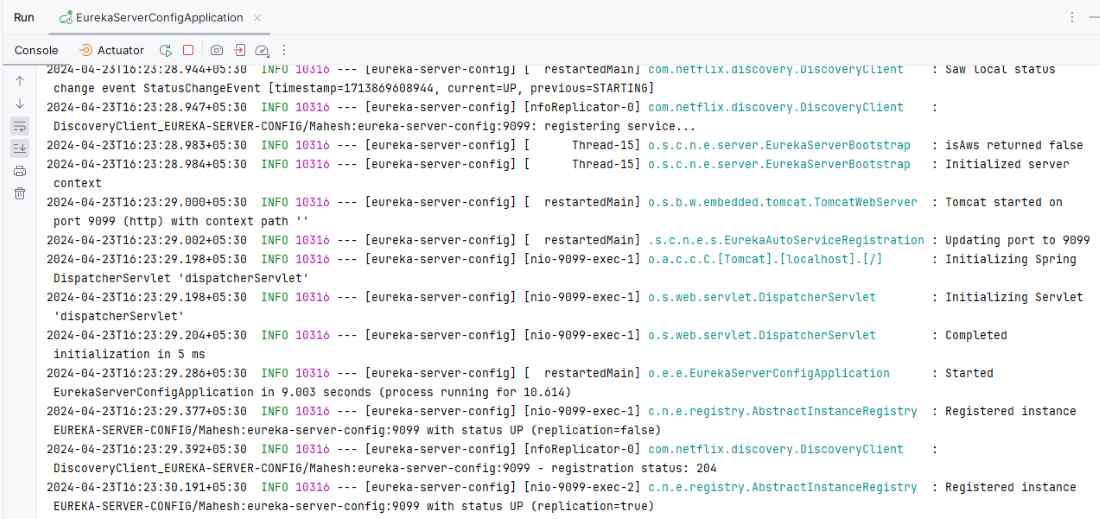
1.5: Run Eureka Server
- Right-click EurekaServerConfigApplication
- Then select -> Run 'EurekaServerConfigApplication'
Once the Spring project is completed and run as a Spring application successfully, it will start at port 9099.
STEP 2: Create User Microservice (Eureka Client)
2.1: Create Spring Boot Project
Create a Spring Boot project using Spring Initializr.
Add Dependencies:
- Spring Web
- Eureka Server Client
- Spring Dev Tools
- Lombok
2.2: Review the Generated pom.xml File
The generated pom.xml file should look similar to the following:
<dependencies>

    <!-- Spring Web -->
    <dependency>
        <groupId>org.springframework.boot</groupId>
        <artifactId>spring-boot-starter-web</artifactId>
    </dependency>

    <!-- Eureka Client -->
    <dependency>
        <groupId>org.springframework.cloud</groupId>
        <artifactId>spring-cloud-starter-netflix-eureka-client</artifactId>
    </dependency>

    <!-- Spring Boot DevTools -->
    <dependency>
        <groupId>org.springframework.boot</groupId>
        <artifactId>spring-boot-devtools</artifactId>
        <scope>runtime</scope>
        <optional>true</optional>
    </dependency>

    <!-- Lombok -->
    <dependency>
        <groupId>org.projectlombok</groupId>
        <artifactId>lombok</artifactId>
        <optional>true</optional>
    </dependency>

    <!-- Test Dependency -->
    <dependency>
        <groupId>org.springframework.boot</groupId>
        <artifactId>spring-boot-starter-test</artifactId>
        <scope>test</scope>
    </dependency>

</dependencies>
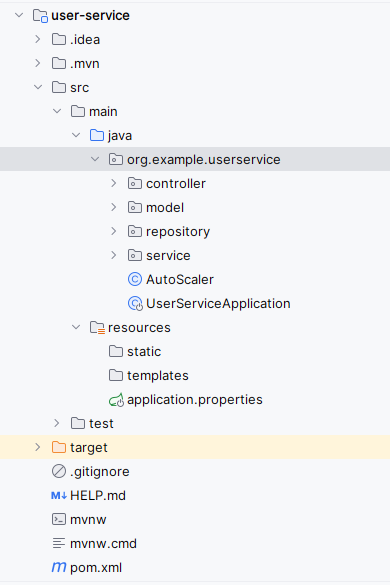
After creating the Spring project, the file structure should resemble the image below.
2.3: Configure application.properties
Open the application.properties file and insert the following code to configure the server port and Eureka client settings for the project.
spring.application.name=user-service
server.port=8086
management.endpoints.web.exposure.include=*
management.endpoint.metrics.enabled=true
management.prometheus.metrics.export.enabled=true
autoscaler.cpu.threshold=0.75
eureka.instance.prefer-ip-address=true
eureka.client.fetch-registry=true
eureka.client.register-with-eureka=true
eureka.client.service-url.defaultZone= http://localhost:9099/eureka
spring.data.mongodb.uri=mongodb://localhost:27017/demo
2.4: Create Model Class
Create a User class to represent data structure. This class defines how user data is stored in the system.
package org.example.userservice.model;

import lombok.*;


import org.springframework.data.annotation.Id;
import org.springframework.data.mongodb.core.mapping.Document;

@Document
@Data
@AllArgsConstructor
@NoArgsConstructor
public class User {
    @Id
    private String id;
    private String username;
    private String email;
}
2.5: Create Repository Layer
Create repository interface using MongoRepository. This handles database operations automatically.
package org.example.userservice.repository;

import org.example.userservice.model.User;
import org.springframework.data.mongodb.repository.MongoRepository;
import org.springframework.stereotype.Repository;

@Repository
public interface UserRepository extends MongoRepository<User, String> {
    // You can add custom query methods here if needed
}
2.6: Create Service Layer
Define business logic for user operations. This separates logic from controller for clean architecture.
package org.example.userservice.service;

import org.example.userservice.model.User;

import java.util.List;

public interface UserService {
    List<User> getAllUsers();

    User createUser(User user);

    void deleteUser(String userId);
}
2.7: Create Service Implementation
This class Implement service methods using repository. this class is responsible for performing actual database operations.
package org.example.userservice.service;

import org.example.userservice.repository.UserRepository;
import org.example.userservice.model.User;

import org.springframework.beans.factory.annotation.Autowired;
import org.springframework.stereotype.Service;

import java.util.List;


@Service
public class UserServiceImpl implements UserService {

    private final UserRepository userRepository;

    @Autowired
    public UserServiceImpl(UserRepository userRepository) {
        this.userRepository = userRepository;
    }

    @Override
    public List<User> getAllUsers() {
        return userRepository.findAll();
    }


    @Override
    public User createUser(User user) {
        return userRepository.save(user);
    }


    @Override
    public void deleteUser(String userId) {
        userRepository.deleteById(userId);
    }
}
2.8: Enable Auto-Scaling
AutoScaler monitors system load and decides scaling actions. If load increases -> scale up, if decreases -> scale down.
@Component
public class EnhancedAutoScaler {
    @Value("${autoscaler.cpu.threshold.high}")
    private double cpuThresholdHigh;

    @Value("${autoscaler.cpu.threshold.low}")
    private double cpuThresholdLow;

    @Value("${autoscaler.instance.min}")
    private int minInstances;

    @Value("${autoscaler.instance.max}")
    private int maxInstances;

    @Autowired
    private OrchestrationPlatformClient orchestrationClient;

    @Autowired
    private MetricsCollector metricsCollector;

    @Scheduled(fixedRate = 60000)
    public void autoScale() {
        double cpuUsage = metricsCollector.getAverageCpuUsage();
        int currentInstances = orchestrationClient.getCurrentInstanceCount();

        if (cpuUsage > cpuThresholdHigh && currentInstances < maxInstances) {
            int newInstances = Math.min(currentInstances + 1, maxInstances);
            orchestrationClient.scaleToInstanceCount(newInstances);
            System.out.println("Scaling up to " + newInstances + " instances due to high CPU usage.");
        } else if (cpuUsage < cpuThresholdLow && currentInstances > minInstances) {
            int newInstances = Math.max(currentInstances - 1, minInstances);
            orchestrationClient.scaleToInstanceCount(newInstances);
            System.out.println("Scaling down to " + newInstances + " instances due to low CPU usage.");
        }
    }
}
2.9: Create REST Controller
This exposes APIs for external communication.
package org.example.userservice.controller;

import org.example.userservice.model.User;
import org.example.userservice.service.UserService;
import org.springframework.beans.factory.annotation.Autowired;
import org.springframework.http.HttpStatus;
import org.springframework.http.ResponseEntity;
import org.springframework.web.bind.annotation.*;

import java.util.List;

@RestController
@RequestMapping("/api/users")
public class UserController {

    private final UserService userService;

    @Autowired
    public UserController(UserService userService) {
        this.userService = userService;
    }

    @GetMapping
    public ResponseEntity<List<User>> getAllUsers() {
        List<User> users = userService.getAllUsers();
        return ResponseEntity.ok(users);
    }


    @PostMapping
    public ResponseEntity<User> createUser(@RequestBody User user) {
        User createdUser = userService.createUser(user);
        return ResponseEntity.status(HttpStatus.CREATED).body(createdUser);
    }


    @DeleteMapping("/{userId}")
    public ResponseEntity<Void> deleteUser(@PathVariable String userId) {
        userService.deleteUser(userId);
        return ResponseEntity.noContent().build();
    }
}
2.10: Run User Service
You can run the application using Maven Commands:
mvn spring-boot:run
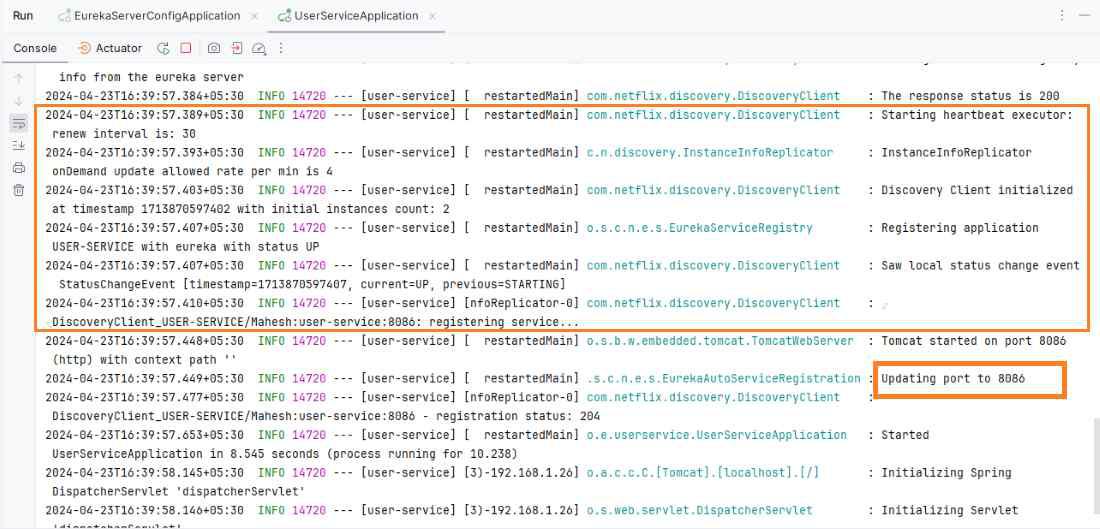
Once completed the project after that run the application once runs the application successfully looks like the below image.
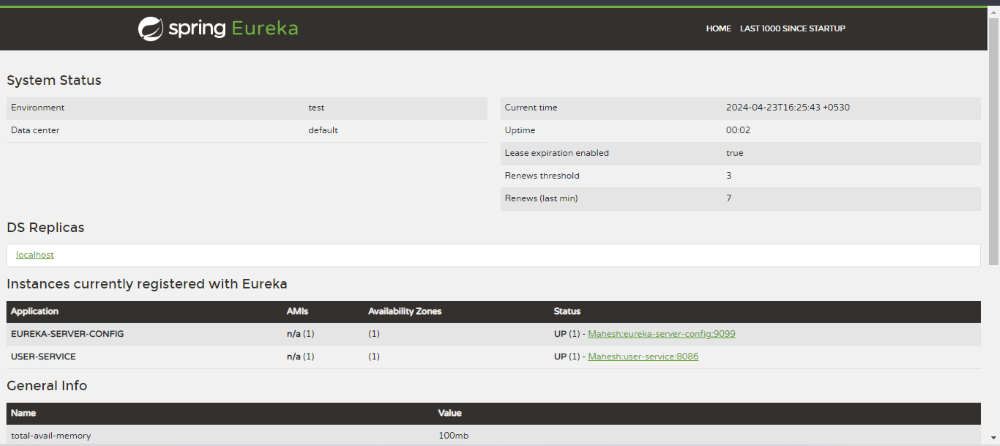
Open the Eureka Dashboard:
http://localhost:9099
This confirms that the microservice is successfully registered and visible to us on Eureka Dashboard.
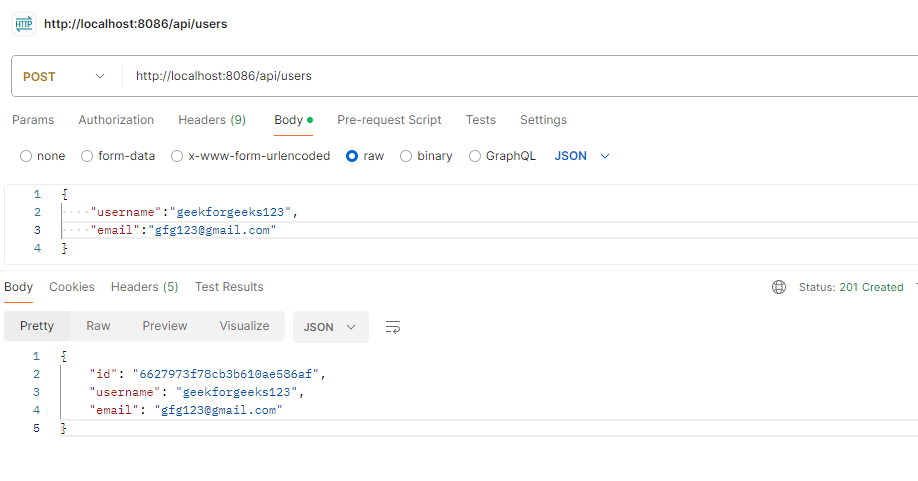
2.13: Test the APIs
This verifies that the service is working correctly.
Create the user:
POST http://localhost//8086/api/users
Output:
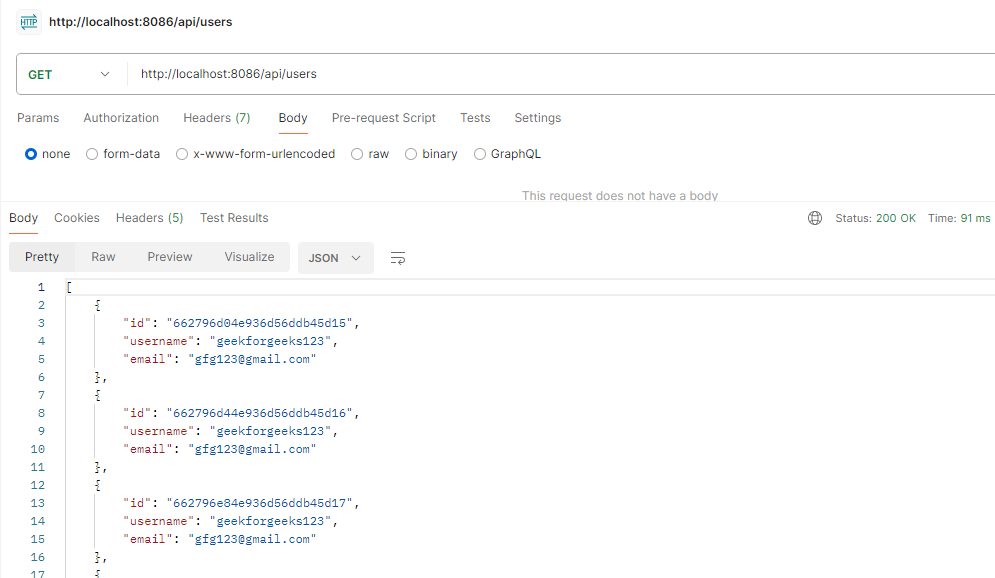
Get the users:
GET http://localhost//8086/api/users
Output:
Explanation: The Eureka Server acts as a centralized service registry where microservices register themselves and discover other services dynamically. The auto-scaling mechanism continuously monitors system metrics such as CPU usage, memory consumption, or request traffic and automatically adjusts the number of service instances based on the current load. This approach ensures efficient resource utilization, high availability, fault tolerance, and improved application performance.
