A Windows guest on KVM without VirtIO drivers runs on emulated hardware: an IDE or SATA disk controller and an Intel e1000 network card, both software impersonations that cap I/O far below what the host can deliver. VirtIO drivers replace that emulation with paravirtualized devices the hypervisor serves directly, and disk plus network throughput improves several-fold on I/O-bound workloads. Windows does not ship these drivers, so every Windows VM on Proxmox VE, KVM/libvirt, or plain QEMU needs them installed once.
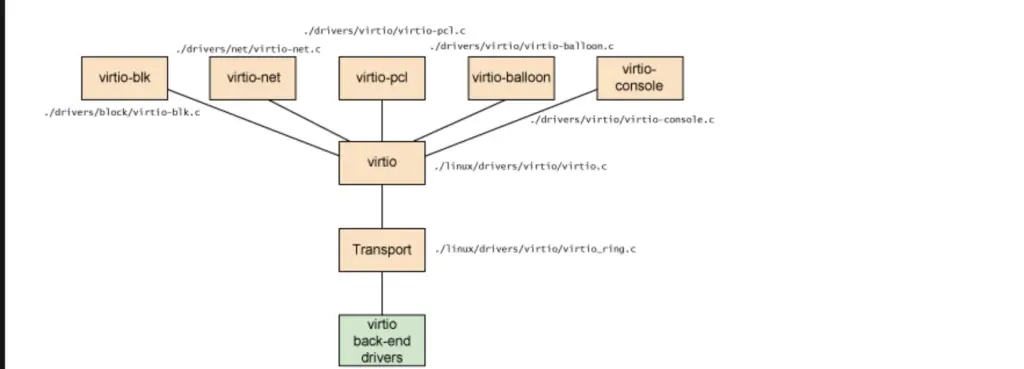
This guide covers all three situations you will hit in practice: installing the drivers and QEMU Guest Agent on a running Windows VM, loading the storage driver during Windows Setup so the installer can see a VirtIO disk, and switching an existing VM from SATA/IDE to VirtIO without breaking boot. Every Windows-side step below was re-run this month on Windows Server 2025 Datacenter with the current stable driver ISO (the 0.1.285 build); the same steps apply to Windows Server 2022 and Windows 11/10.
Reviewed August 2026. The driver walkthrough was captured July 2026.
Download the VirtIO Drivers ISO
The drivers are distributed as a single ISO maintained by the Fedora project. Grab the stable build on your hypervisor host:
wget https://fedorapeople.org/groups/virt/virtio-win/direct-downloads/stable-virtio/virtio-win.isoThere is also a latest-virtio channel with the newest build. The two channels frequently point at the same release (they do right now), and stable is the safe default for production guests:
wget https://fedorapeople.org/groups/virt/virtio-win/direct-downloads/latest-virtio/virtio-win.isoOn RHEL, Rocky, or AlmaLinux hosts, the package manager delivers an equivalent Red Hat-built driver ISO to /usr/share/virtio-win/virtio-win.iso:
sudo dnf install virtio-winMove the downloaded ISO to wherever your hypervisor stores installation media, so it can be attached as a CD:
sudo mv virtio-win.iso /var/lib/vz/template/iso/       # Proxmox VE
sudo mv virtio-win.iso /var/lib/libvirt/images/        # KVM/libvirt
Proxmox can also fetch it for you. Open your storage node, select ISO Images, click Download from URL, and paste the stable-virtio link:
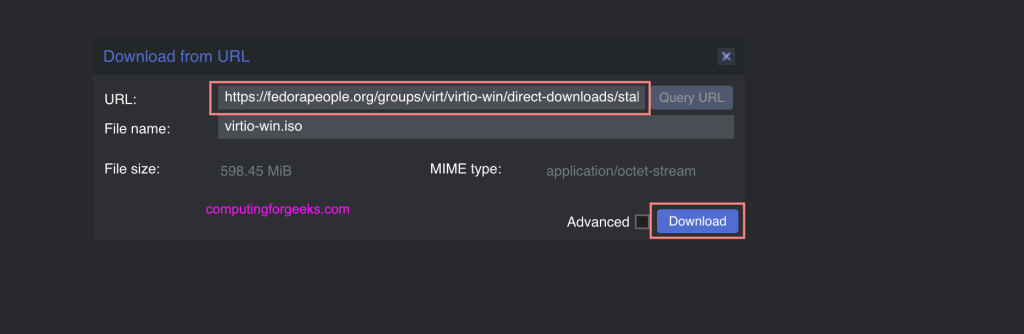
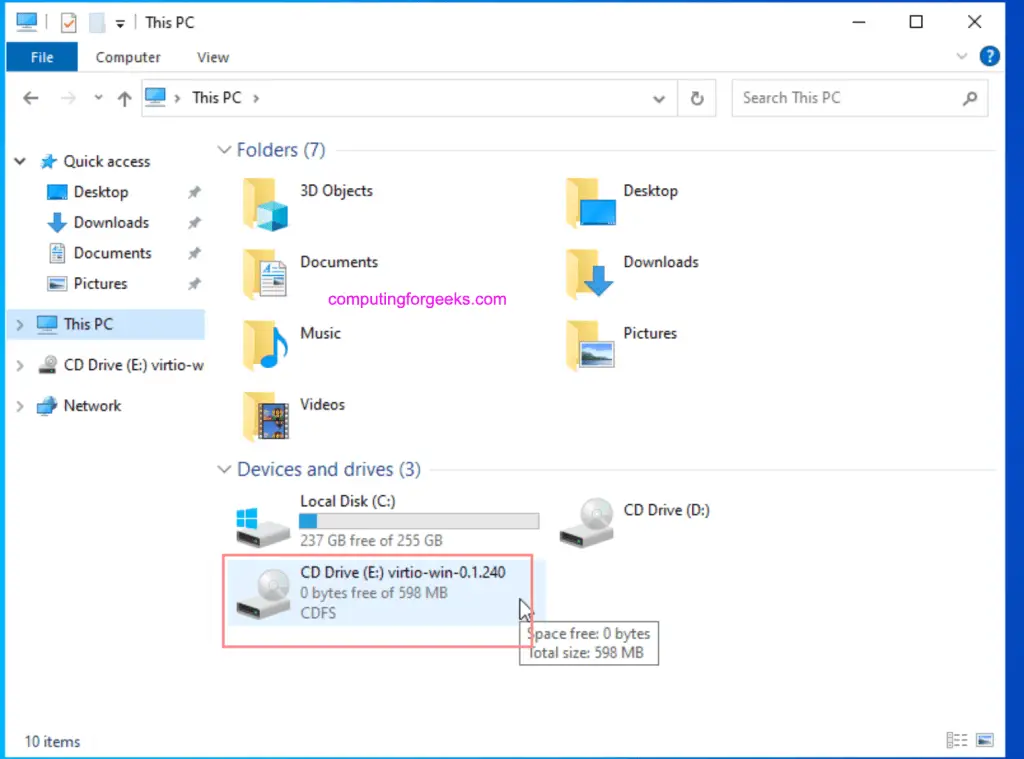
Either way, the ISO lands in the storage list ready to mount. It is roughly 750 MB because it carries every driver for every supported Windows release in one image.
What Ships on the ISO
The virtio-win package bundles a driver per device class, each in its own directory with per-OS subfolders (2k22, 2k25, w10, w11 and so on, each holding amd64 and ARM64 builds):
| Driver | Purpose |
|---|---|
vioscsi | SCSI controller driver for virtio-scsi disks (the Proxmox default) |
viostor | Block driver for virtio-blk disks |
NetKVM | Network adapter driver. Replaces emulated e1000/rtl8139 |
Balloon | Memory ballooning for dynamic RAM management |
vioserial | Serial channel the QEMU Guest Agent communicates over |
viofs | Shared filesystem (virtiofs) between host and guest |
viogpudo / qxldod | Display drivers for VirtIO-GPU and QXL video |
viorng | Entropy (random number) passthrough |
pvpanic | Panic notification, signals the host on a guest BSOD |
guest-agent | QEMU Guest Agent MSI for graceful shutdown, fs-freeze snapshots, IP reporting |
The balloon driver is the one that quietly matters for capacity planning: it lets the host reclaim memory from idle Windows guests, which buys the most on hosts that were tight to begin with. The memory sizing guide for virtualization hosts covers how much headroom Windows guests realistically need.
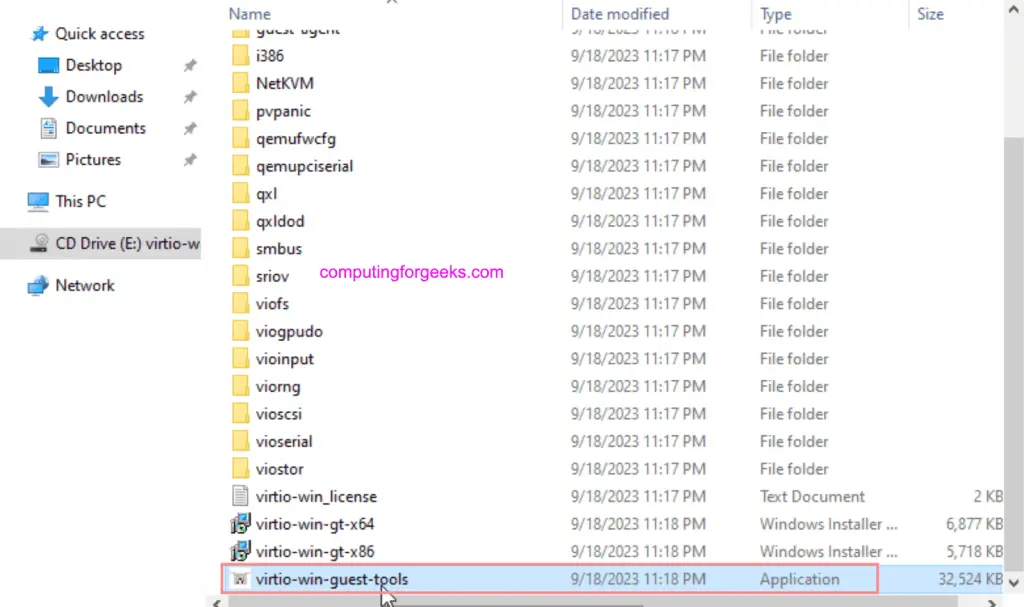
The ISO root also carries three installers: virtio-win-guest-tools.exe, which installs all drivers plus the Guest Agent and SPICE agent in one pass, and virtio-win-gt-x64.msi / virtio-win-gt-x86.msi, which install the drivers only. For most VMs the single .exe is the right choice.
Attach the ISO to the Windows VM
Add a CD/DVD drive to the VM and point it at the ISO. In Proxmox, that is Hardware > Add > CD/DVD Drive:
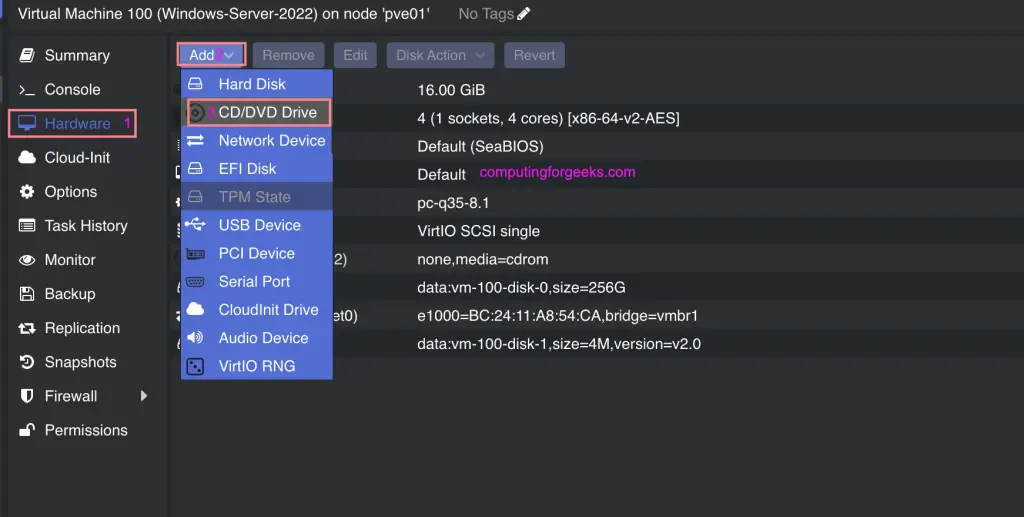
Pick virtio-win.iso from the ISO storage and confirm:
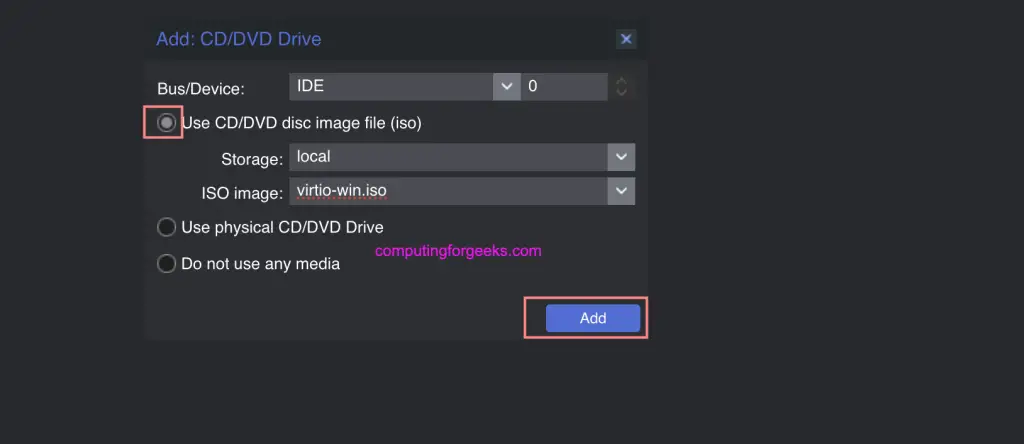
On KVM/libvirt with virt-manager, the equivalent is Add Hardware > Storage > Device type: CDROM device, then browse to the ISO. The disc shows up inside Windows immediately, no reboot needed.
Install the Drivers and Guest Agent on a Running VM
Log into Windows and open the mounted CD in File Explorer. All the driver folders and the three installers sit in the root of the disc:
Double-click virtio-win-guest-tools.exe. This is the one-stop installer: it runs the driver MSI for your architecture, then adds the QEMU Guest Agent and the SPICE agent for clipboard sharing and display scaling in console sessions:
Accept the license and click through; the whole run takes under a minute. If you prefer drivers without the agents, run virtio-win-gt-x64.msi instead and you get the classic feature-selection wizard:
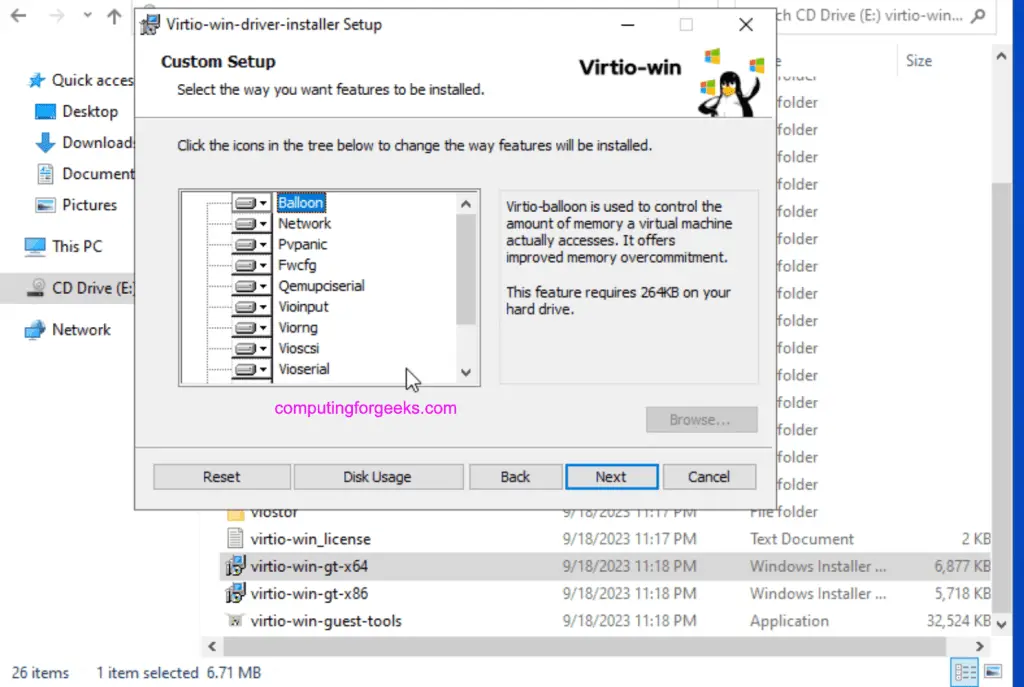
Leave every feature selected unless you have a reason not to. When the installer finishes, stop and start the VM from the hypervisor rather than rebooting inside Windows. A cold start re-enumerates the PCI bus, which is what lets newly-driven devices like the balloon and serial channel come up cleanly.
Verify the Drivers Are Active
The fastest check is one PowerShell query for every signed Red Hat driver on the system:
Get-WmiObject Win32_PnPSignedDriver | Where-Object { $_.Manufacturer -like '*Red Hat*' } | Select-Object DeviceName, DriverVersionOn our Windows Server 2025 guest, every VirtIO device reports the same driver build:
DeviceName                                  DriverVersion
----------                                  -------------
QEMU FwCfg Device                           100.101.104.28500
Red Hat VirtIO SCSI pass-through controller 100.101.104.28500
Red Hat VirtIO Ethernet Adapter             100.101.104.28500
VirtIO Serial Driver                        100.101.104.28500
Device Manager tells the same story visually. After the swap to VirtIO you should see these names in place of the emulated hardware:
| Device Manager category | With VirtIO drivers | Emulated (before) |
|---|---|---|
| Storage controllers | Red Hat VirtIO SCSI pass-through controller | Standard SATA AHCI Controller |
| Network adapters | Red Hat VirtIO Ethernet Adapter | Intel(R) PRO/1000 |
| System devices | VirtIO Balloon Driver, VirtIO Serial Driver | absent |
Confirm the Guest Agent service is running while you are in PowerShell:
Get-Service QEMU-GAThe service reports as started:
Status   Name               DisplayName
------   ----               -----------
Running  QEMU-GA            QEMU Guest Agent
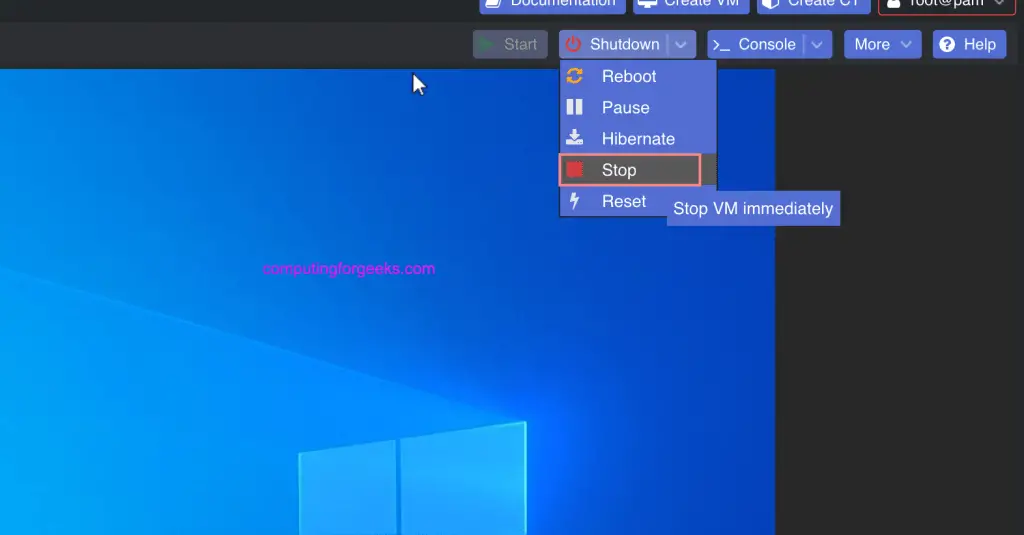
On the Proxmox side, enable the agent under Options > QEMU Guest Agent if it is not already on. Once the agent talks, the VM summary shows the guest’s IP addresses and a graceful shutdown from the UI actually shuts Windows down instead of pulling the virtual power cord:
If you build Windows VMs regularly, do all of this once and turn the result into a reusable image; the Windows Server 2025 template guide walks through exactly that.
Load the VirtIO Storage Driver During Windows Setup
When you create a new VM with a VirtIO disk from the start (the right move), Windows Setup cannot see the disk at all, because the installer image carries no VirtIO storage driver. You reach the disk-selection screen and the list is simply empty:

The fix needs the VirtIO ISO attached as a second CD drive alongside the Windows installer ISO. Click Load Driver (on the current Server 2025 installer the screen is titled “Install driver to show hardware”), then Browse, and drill into the VirtIO disc. The folder tree confirms which driver build the disc carries:

Select the folder that matches your controller and OS. For a virtio-scsi disk on Windows Server 2025 that is vioscsi\2k25\amd64; a Windows 11 guest uses vioscsi\w11\amd64, and a virtio-blk disk uses the viostor tree instead. Setup scans the folder and offers the matching driver:

Select it, click Install, and a few seconds later the disk appears and installation proceeds normally:

You can load NetKVM from the same dialog if you want networking available during the out-of-box experience, but it is usually simpler to finish Setup and run virtio-win-guest-tools.exe once you reach the desktop, which installs everything else in one pass.
Switch an Existing Windows VM From SATA or IDE to VirtIO
This is where people break their VMs. Windows only loads boot-critical storage drivers that were bound to hardware it has actually seen. If you flip the boot disk from SATA to VirtIO in one step, Windows finds an unknown storage controller at boot, throws INACCESSIBLE_BOOT_DEVICE, and after a failed auto-repair drops you into the recovery environment. We reproduced it deliberately:

If you are already stuck here, switch the disk back to SATA and boot; nothing is damaged. The safe sequence uses a temporary second disk to force the driver binding first. Before attaching it, confirm the VM’s SCSI controller type. Proxmox defaults to the old LSI controller unless the creation wizard set something better, and the dummy-disk trick only proves the right driver if the controller is VirtIO:
VMID="201"
qm config ${VMID} | grep scsihw
qm set ${VMID} --scsihw virtio-scsi-single
Now attach a 1 GB throwaway VirtIO disk to the running VM:
qm set ${VMID} --scsi1 local-lvm:1Inside Windows, the new controller shows up as an error device, which is exactly the problem we are about to fix:
Get-PnpDevice -Status Error | Select-Object Status, Class, FriendlyNameThe unbound controller has no class and no driver yet:
Status Class FriendlyName
------ ----- ------------
Error        SCSI Controller
With the VirtIO CD still attached, check its drive letter first (it is not always the same one), then install the storage driver against the live controller. No reboot is required for the binding:
Get-Volume | Select-Object DriveLetter, FileSystemLabel, DriveType
pnputil /add-driver D:\vioscsi\2k25\amd64\vioscsi.inf /install
pnputil confirms the package landed on the VirtIO controller:
Adding driver package:  vioscsi.inf
Driver package added successfully.
Published Name:         oem3.inf
Driver package installed on device: PCI\VEN_1AF4&DEV_1004&SUBSYS_00081AF4&REV_00\...

Total driver packages:  1
Added driver packages:  1
Run Get-Disk and the 1 GB dummy disk is now visible, which proves the driver is bound and boot-ready. Shut Windows down, then swap the boot disk to VirtIO and drop the helper disk:
qm set ${VMID} --delete sata0,scsi1
qm set ${VMID} --scsi0 local-lvm:vm-201-disk-0,discard=on,iothread=1 --boot order=scsi0
qm start ${VMID}
Adjust the volume name to match your storage (it is listed under the VM’s Hardware tab as “Unused Disk” after the delete; in the UI the same swap is Detach on the disk, then Edit the unused disk and re-add it as SCSI). The 1 GB helper volume also lands under Unused Disks, so remove it there to free the space. Windows boots straight onto the VirtIO controller. The final check from inside the guest:
Get-Disk | Select-Object Number, FriendlyName, BusType, Size, OperationalStatusThe boot disk now sits behind the paravirtual controller (virtio-scsi enumerates as SAS in Windows):
Number FriendlyName       BusType        Size OperationalStatus
------ ------------       -------        ---- -----------------
     0 QEMU QEMU HARDDISK SAS     68719476736 Online
The network swap needs no such ceremony. Once the drivers are installed, change the NIC model from e1000 to VirtIO in the VM’s hardware settings and reboot; Windows binds NetKVM from the driver store on its own. Expect the adapter to come up as a new interface, so static IP settings have to be re-entered.
Which Installer Path Should You Use
Four paths, one decision each. For a VM that already boots: virtio-win-guest-tools.exe, it covers drivers and agents in one run, and for most people that is the whole answer. For automation and golden images: the MSI, which upstream documents for unattended installs (msiexec /i virtio-win-gt-x64.msi /qn). For a fresh install onto a VirtIO disk: load vioscsi (or viostor) from the second CD at the disk screen, then run the guest tools after first login. For converting an existing SATA/IDE VM: the dummy-disk method above, and never the one-step flip. If the VM you are converting still lives on VMware, the ESXi to Proxmox migration guide folds this driver work into the full move, and on a fresh KVM/QEMU host the same ISO and steps apply unchanged. Once virtio is doing the work, disk speed inside the guest is essentially host drive speed; the NVMe and SSD picks for home servers are the other half of that equation.