

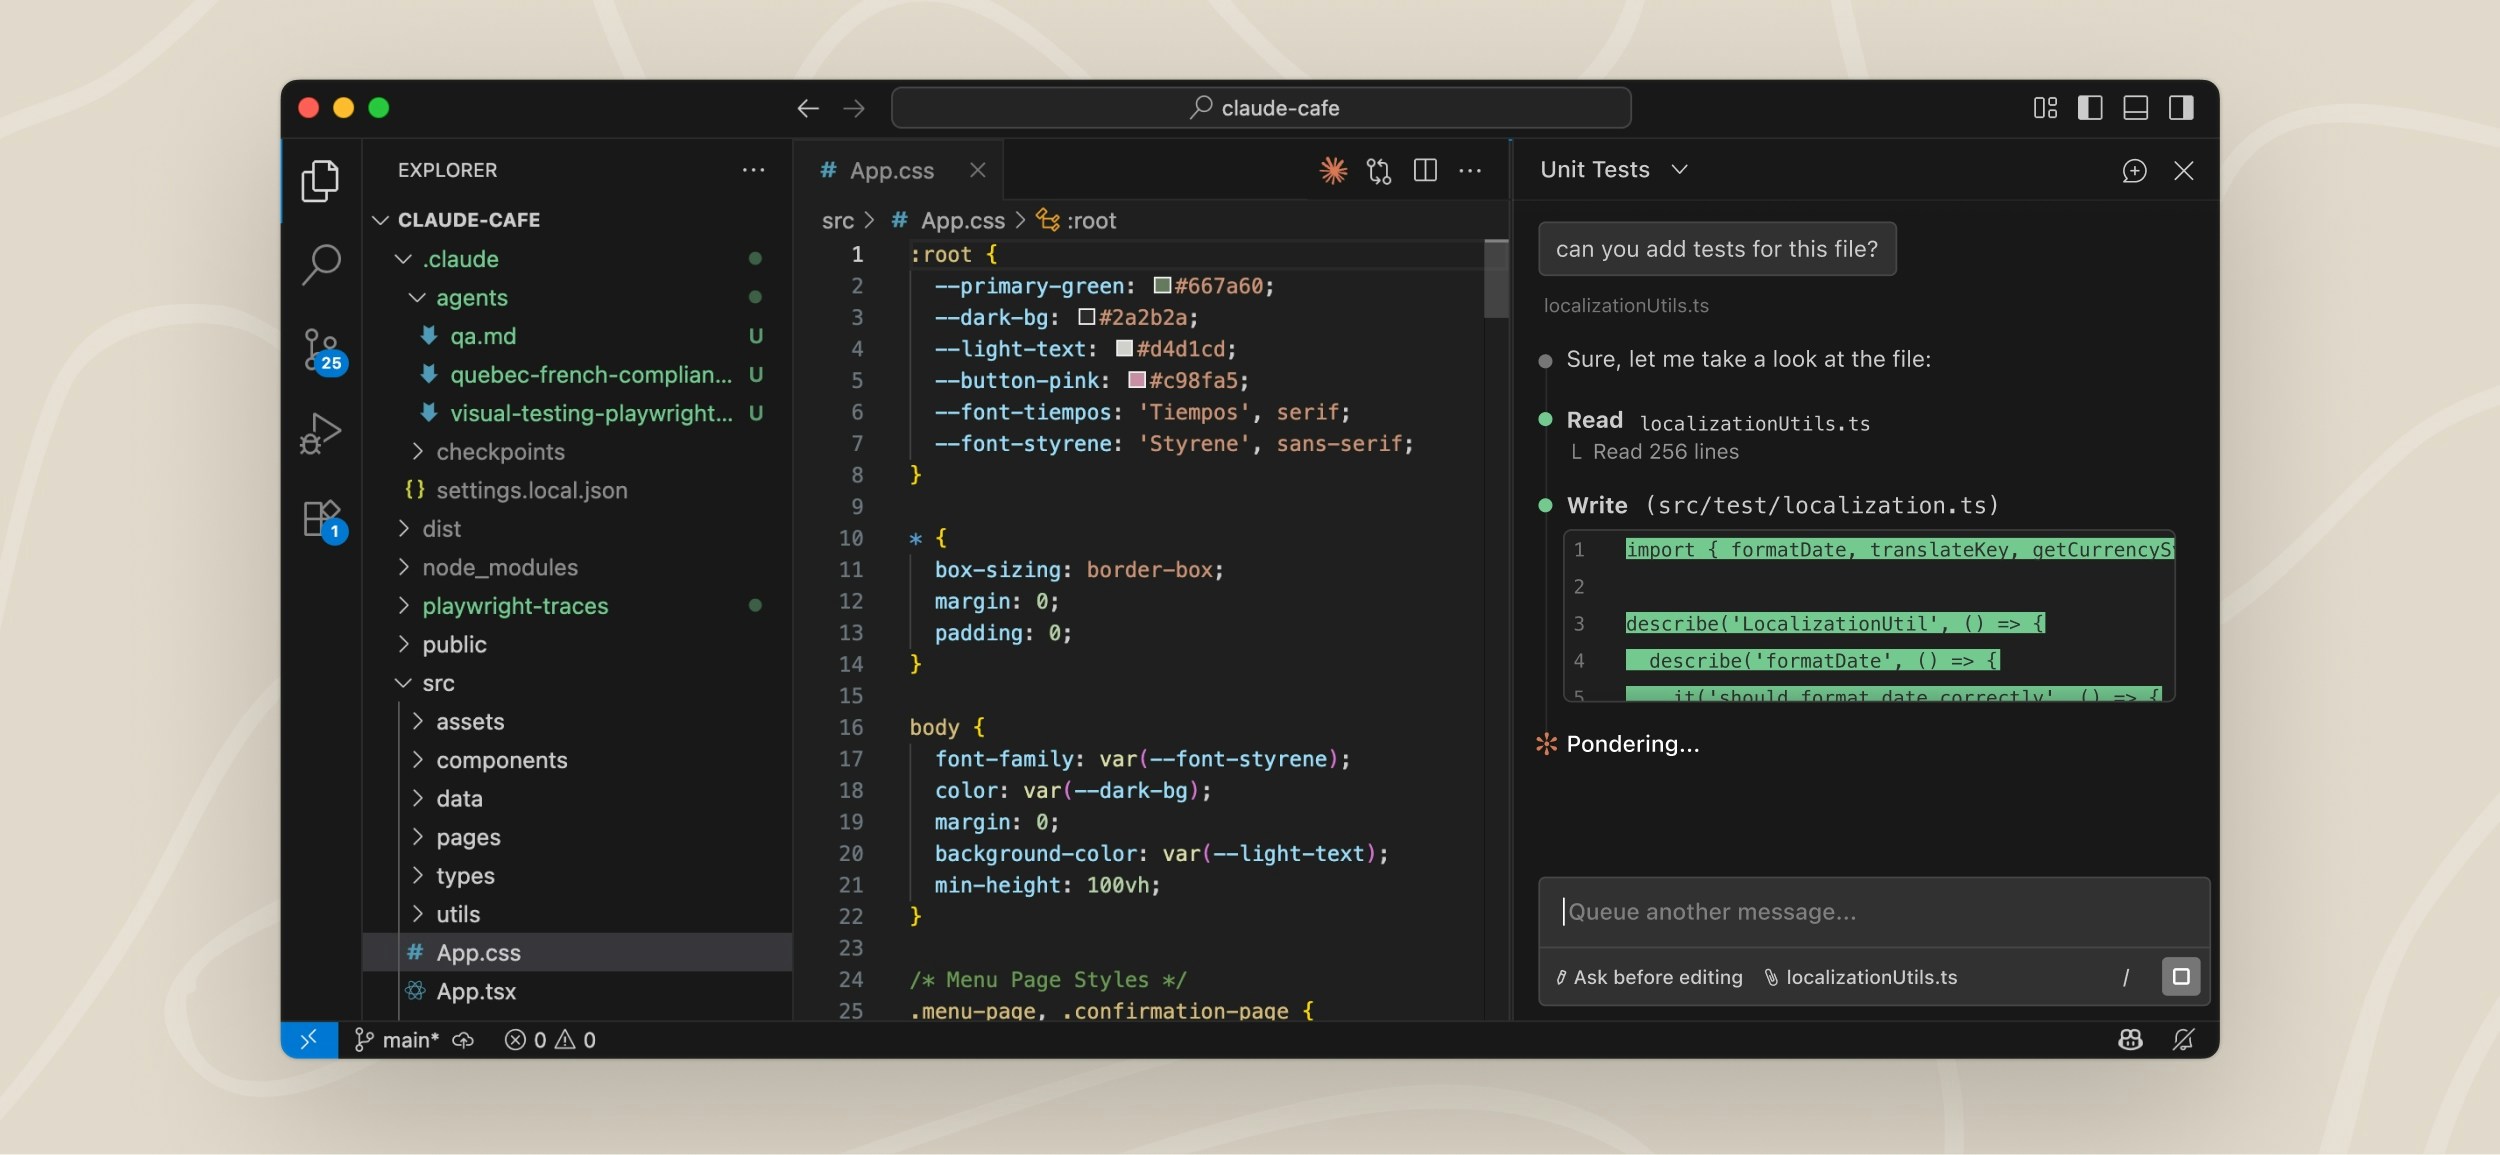
Prerequisites
Before installing, make sure you have:- VS Code 1.94.0 or higher
- An Anthropic account: any paid Claude subscription (Pro, Max, Team, or Enterprise) or a Claude Console account works, and no API key is required. You’ll sign in with this account when you first open the extension. If you access Claude through a third-party provider like Amazon Bedrock or Google Cloud’s Agent Platform, see Use third-party providers for setup instructions.
Install the extension
Click the link for your IDE to install directly: Or in VS Code, pressCmd+Shift+X (Mac) or Ctrl+Shift+X (Windows/Linux) to open the Extensions view, search for “Claude Code”, and click Install.
The extension also installs in other VS Code forks like Devin Desktop or Kiro. Search for “Claude Code” in the editor’s Extensions view, or install from the Open VSX registry. If your editor can’t install the extension, install the CLI and run claude in its integrated terminal instead. The CLI works in any terminal.
If the extension doesn’t appear after installation, restart VS Code or run “Developer: Reload Window” from the Command Palette.
Get started
Once installed, you can start using Claude Code through the VS Code interface:1
Open the Claude Code panel
Throughout VS Code, the Spark icon indicates Claude Code:  The quickest way to open Claude is to click the Spark icon in the Editor Toolbar (top-right corner of the editor). The icon only appears when you have a file open.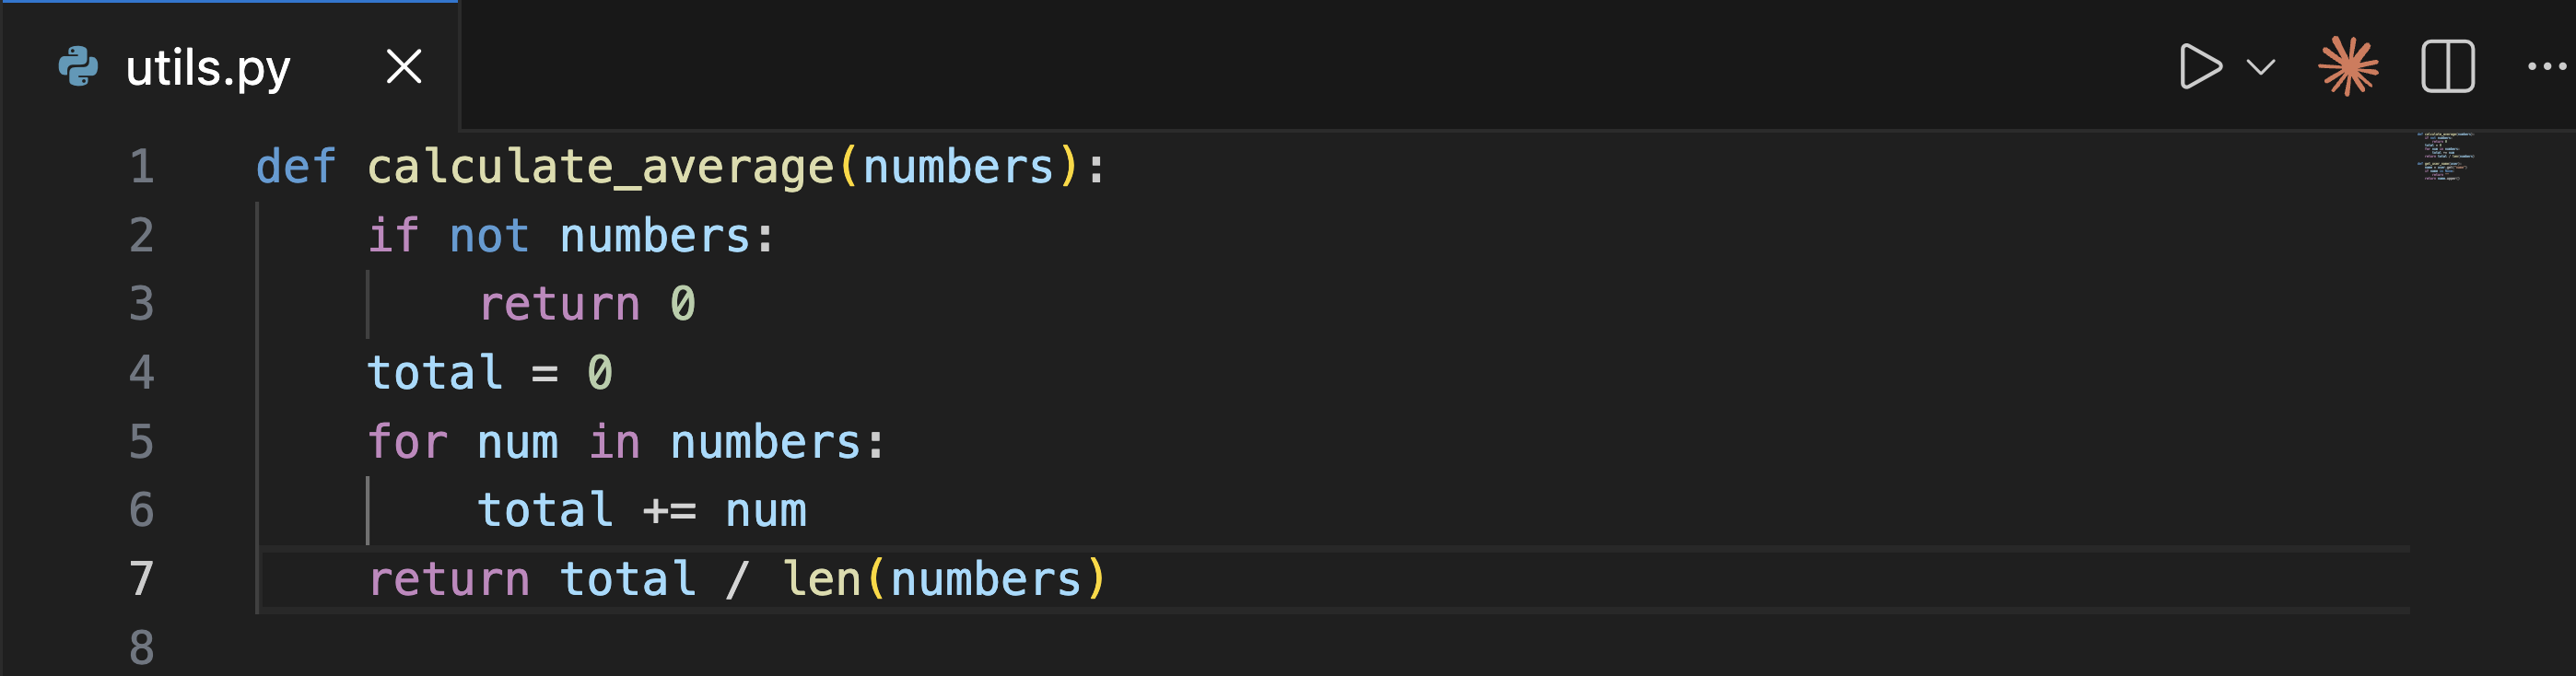
The quickest way to open Claude is to click the Spark icon in the Editor Toolbar (top-right corner of the editor). The icon only appears when you have a file open.- Activity Bar: click the Spark icon in the left sidebar to open the sessions list. Click any session to open it as a full editor tab, or start a new one. This icon is always visible in the Activity Bar.
- Command Palette:
Cmd+Shift+P(Mac) orCtrl+Shift+P(Windows/Linux), type “Claude Code”, and select an option like “Open in New Tab” - Status Bar: if you’ve set
preferredLocationtosidebar, or opened Claude with Claude Code: Open in Side Bar, click ✱ Claude Code in the bottom-right corner of the window. This works even when no file is open.
2
Sign in
The first time you open the panel, a sign-in screen appears. Click Sign in and complete authorization in your browser.If you see Not logged in · Please run /login later, the extension reopens the sign-in screen automatically. If it doesn’t appear, reload the window from the Command Palette with Developer: Reload Window.If you have
ANTHROPIC_API_KEY set in your shell but still see the sign-in prompt, VS Code may not have inherited your shell environment. Launch VS Code from a terminal with code . so it inherits your environment variables, or sign in with your Claude account instead.After you sign in, a Learn Claude Code checklist appears. Work through each item by clicking Show me, or dismiss it with the X. To reopen it later, uncheck Hide Onboarding in VS Code settings under Extensions → Claude Code.3
Send a prompt
Ask Claude to help with your code or files, whether that’s explaining how something works, debugging an issue, or making changes.Here’s an example of asking about a particular line in a file: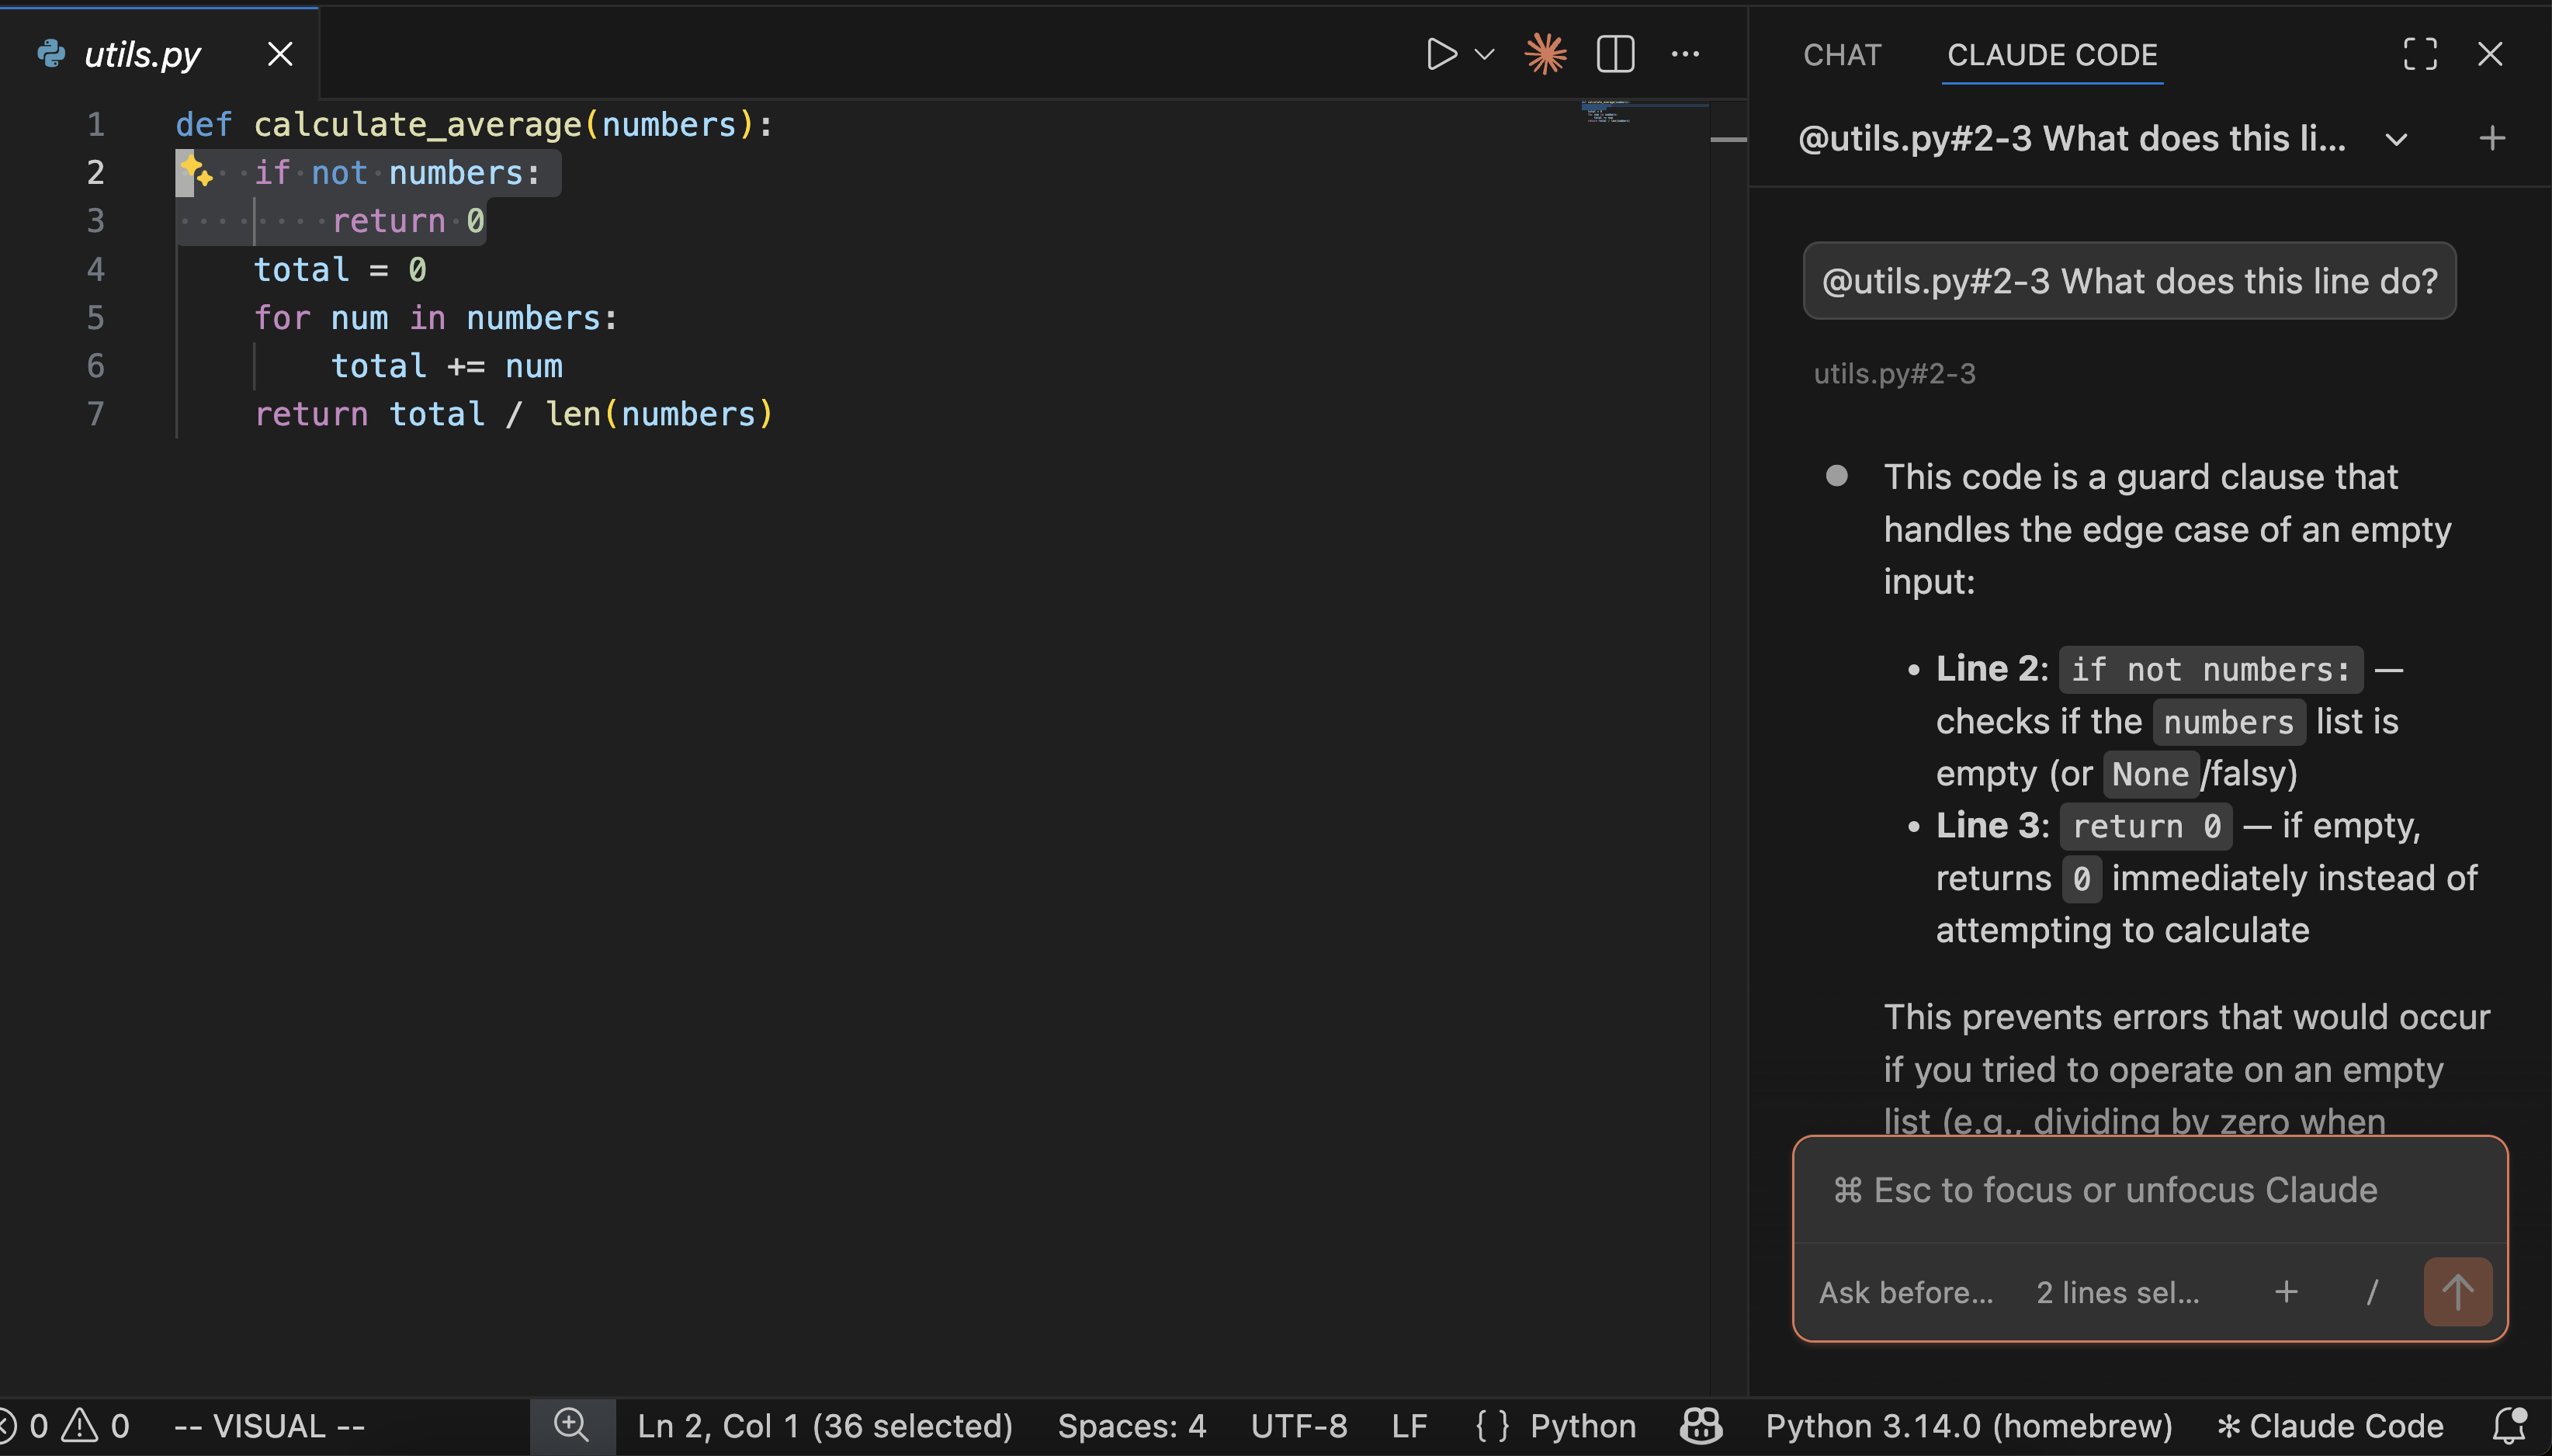
4
Review changes
What you see depends on the permission mode shown at the bottom of the prompt box:
- In Auto or Edit automatically mode, Claude edits most files in your workspace without asking.
-
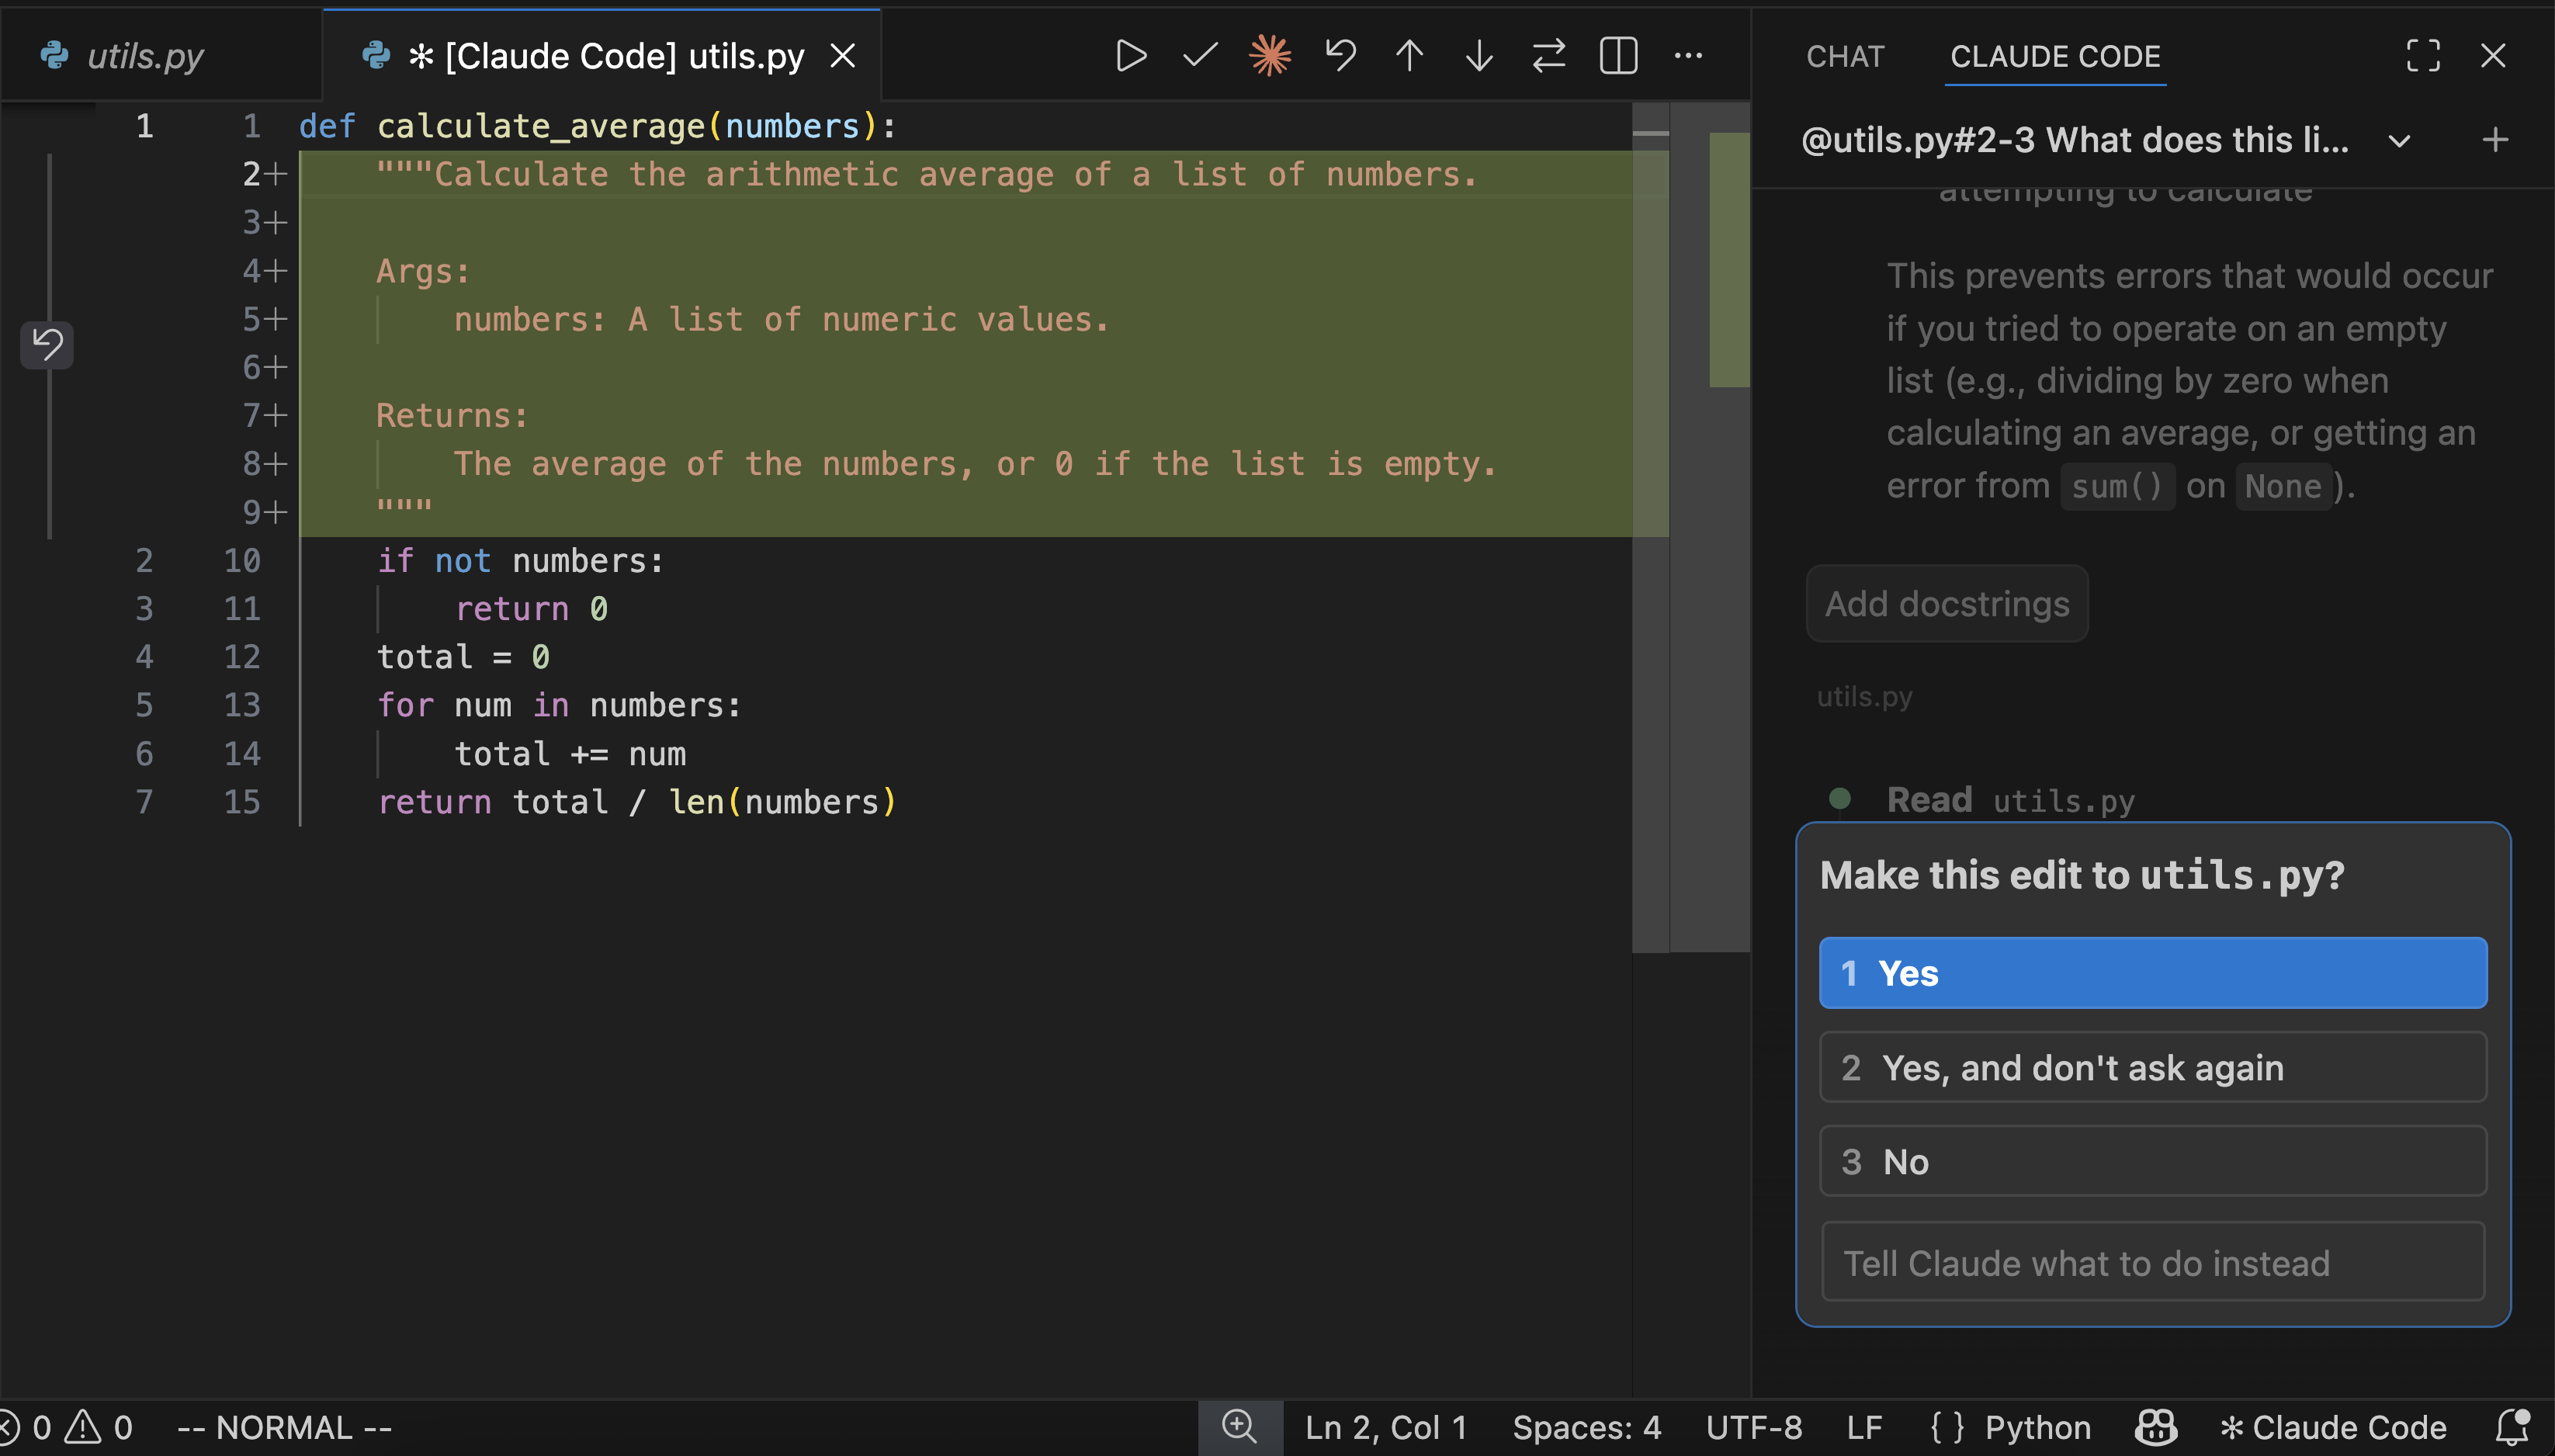
In Manual mode, when Claude wants to edit a file, it shows a side-by-side comparison of the original and proposed changes, then asks for permission. You can accept, reject, or tell Claude what to do instead. If you edit the proposed content directly in the diff view before accepting, Claude is told that you modified it so it doesn’t assume the file matches its original proposal.
Use the prompt box
The prompt box supports several features:- Permission modes: click the mode indicator at the bottom of the prompt box to switch permission modes. On Pro, Max, and Team plans, Auto is the built-in starting permission mode. See how the extension chooses the starting permission mode for what changes that, and every permission mode the indicator offers.
- Auto: a classifier reviews most actions instead of asking you. See auto mode for what it reviews and blocks.
- Manual: Claude asks permission before file edits and most shell commands.
- Plan: Claude describes what it will do and waits for approval before making changes. VS Code automatically opens the plan as a full Markdown document where you can add inline comments to give feedback before Claude begins.
- Edit automatically: Claude makes edits without asking.
- Command menu: click
/or type/to open the command menu. Options include attaching files, switching models, toggling extended thinking, viewing plan usage (/usage), and starting a Remote Control session (/remote-control). The Customize section provides access to MCP servers, hooks, memory, permissions, and plugins. Items with a terminal icon open in the integrated terminal.- The Settings section includes Enable Remote Control for all sessions, which sets
remoteControlAtStartupto control whether new interactive sessions connect to Remote Control automatically. Requires Claude Code v2.1.203 or later. - The Settings section also includes Focus view, which hides tool calls, tool results, and thinking behind expandable rows, leaving your prompts and Claude’s responses. Claude’s latest to-do list stays visible, and so does the text a pending question from Claude is asking about; this requires Claude Code v2.1.225 or later. Toggle it there, with
Ctrl+Option+F(Mac) /Ctrl+Alt+F(Windows/Linux), or from the Command Palette with Claude Code: Toggle Focus view. The change applies to every open session and persists across sessions. Requires Claude Code v2.1.221 or later. - To report a bug, click Report a problem at the bottom of the menu, or type
/bugor/feedbackwith an optional description that prefills the report. When you submit the report and you’re signed in to Anthropic on a first-party connection, Claude Code sends it to Anthropic. On a third-party provider, or without Anthropic credentials, the dialog still opens, but submitting shows an error and sends nothing: unlike the CLI’s/bug, the extension doesn’t write a local archive. Requires Claude Code v2.1.229 or later.
- The Settings section includes Enable Remote Control for all sessions, which sets
- Side questions: type
/btwfollowed by a question, or pick it from the command menu, to ask about your session without adding to the conversation. The answer opens in a panel beside the chat, where you can ask follow-up questions. The thread survives window reloads. Claude Code keeps the newest 20 exchanges and expires stored threads on thecleanupPeriodDaysschedule, as long as Claude Code can safely determine the retention period. To clear a thread, click the trash icon in the panel. Requires Claude Code v2.1.227 or later. - Context indicator: the prompt box shows how much of Claude’s context window you’re using. Claude automatically compacts when needed, or you can run
/compactmanually. - Extended thinking: lets Claude spend more time reasoning through complex problems. Toggle it on via the command menu (
/). Claude’s reasoning appears in the conversation as collapsed blocks: click a block to read it, or pressCtrl+Oto expand or collapse every thinking block in the session. See Extended thinking for details. - Multi-line input: press
Shift+Enterto add a new line without sending. This also works in the “Other” free-text input of question dialogs.
Reference files and folders
Use @-mentions to give Claude context about specific files or folders. When you type@ followed by a file or folder name, Claude reads that content and can answer questions about it or make changes to it. Claude Code supports fuzzy matching, so you can type partial names to find what you need:
Option+K (Mac) / Alt+K (Windows/Linux) to insert an @-mention with the file path and line numbers (e.g., @app.ts#5-10). Click the selection indicator to toggle whether Claude can see your highlighted text - the eye-slash icon means the selection is hidden from Claude.
You can also hold Shift while dragging files into the prompt box to add them as attachments. Click the X on any attachment to remove it from context.
Resume past conversations
Click the Session history button at the top of the Claude Code panel to access your conversation history. You can search by keyword or browse by time (Today, Yesterday, Last 7 days, etc.). Click any conversation to resume it with the full message history. New sessions receive AI-generated titles based on your first message. Hover over a session to reveal rename and remove actions: rename to give it a descriptive title, or remove to delete it from the list. For more on resuming sessions, see Manage sessions.Resume cloud sessions from Claude.ai
If you use Claude Code on the web, you can resume those cloud sessions directly in VS Code. This requires signing in with Claude.ai Subscription, not Anthropic Console.1
Open session history
Click the Session history button at the top of the Claude Code panel.
2
Select the Web tab
The dialog shows two tabs: Local and Web. Click Web to see sessions from claude.ai.
3
Select a session to resume
Browse or search your cloud sessions. Click any session to download it and continue the conversation locally.
Only web sessions started with a GitHub repository appear in the Web tab. Resuming loads the conversation history locally; changes are not synced back to claude.ai.
Check account and usage
Run/usage from the command menu to open the Account & usage dialog. It shows your signed-in account, plan, and usage bars for the current session and week with how long until each limit resets.
The dialog also breaks down what is contributing to your plan limits. It flags behaviors that account for 10% or more of recent usage, such as cache misses, long context, and subagent-heavy or highly parallel sessions, each with a tip to reduce it. Attribution tables show how much usage came from each skill, subagent, plugin, and MCP server. Requires Claude Code v2.1.174 or later.
Use the Day and Week toggle to switch between the last 24 hours and the last 7 days. The figures are approximate and computed from local sessions on this machine, so usage from other devices or claude.ai is not included. For more on tracking and reducing usage, see Track your costs.
Customize your workflow
You can reposition the Claude panel, run multiple conversations, organize the sessions list into groups, or switch to terminal mode.Choose where Claude lives
You can drag the Claude panel to reposition it anywhere in VS Code. Grab the panel’s tab or title bar and drag it to:- Secondary sidebar: the right side of the window. Keeps Claude visible while you code.
- Primary sidebar: the left sidebar with icons for Explorer, Search, etc.
- Editor area: opens Claude as a tab alongside your files. Useful for side tasks.
Run multiple conversations
Use Open in New Tab or Open in New Window from the Command Palette to start additional conversations. Each conversation maintains its own history and context, allowing you to work on different tasks in parallel. When using tabs, a small colored dot on the spark icon indicates status: blue means a permission request is pending, orange means Claude finished while the tab was hidden.Organize sessions into groups
In the sessions list in the Activity Bar, you can collect related sessions into named, collapsible groups. Requires Claude Code v2.1.229 or later.- Group or ungroup a session: right-click a session to create a group from it, move it into an existing group, or remove it from its group. Each session belongs to one group at a time, so moving it into another group removes it from the first.
- Move several sessions at once:
Cmd-click (Mac) /Ctrl-click (Windows/Linux) each session, orShift-click to select a range, then right-click the selection. - Rename or delete a group: right-click a group header. Deleting a group removes only the group, and its sessions return to the ungrouped list.
Switch to terminal mode
By default, the extension opens a graphical chat panel. If you prefer the CLI-style interface, open the Use Terminal setting and check the box. You can also open VS Code settings (Cmd+, on Mac or Ctrl+, on Windows/Linux), go to Extensions → Claude Code, and check Use Terminal.
Manage plugins
The VS Code extension includes a graphical interface for installing and managing plugins. Type/plugins in the prompt box to open the Manage plugins interface.
Install plugins
The plugin dialog shows two tabs: Plugins and Marketplaces. In the Plugins tab:- Installed plugins appear at the top with toggle switches to enable or disable them
- Available plugins from your configured marketplaces appear below
- Search to filter plugins by name or description
- Click Install on any available plugin
- Install for you: available in all your projects (user scope)
- Install for this project: shared with project collaborators (project scope)
- Install locally: only for you, only in this repository (local scope)
Manage marketplaces
Switch to the Marketplaces tab to add or remove plugin sources:- Enter a GitHub repo, URL, or local path to add a new marketplace
- Click the refresh icon to update a marketplace’s plugin list
- Click the trash icon to remove a marketplace
Plugin management in VS Code uses the same CLI commands under the hood. Plugins and marketplaces you configure in the extension are also available in the CLI, and vice versa.
Automate browser tasks with Chrome
Connect Claude to your Chrome browser to test web apps, debug with console logs, and automate browser workflows without leaving VS Code. This requires the Claude in Chrome extension version 1.0.36 or higher. Type@browser in the prompt box followed by what you want Claude to do:
VS Code commands and shortcuts
Open the Command Palette (Cmd+Shift+P on Mac or Ctrl+Shift+P on Windows/Linux) and type “Claude Code” to see all available VS Code commands for the Claude Code extension.
Some shortcuts depend on which panel is “focused” (receiving keyboard input). When your cursor is in a code file, the editor is focused. When your cursor is in Claude’s prompt box, Claude is focused. Use Cmd+Esc / Ctrl+Esc to toggle between them.
These are VS Code commands for controlling the extension. Not all built-in Claude Code commands are available in the extension. See VS Code extension vs. Claude Code CLI for details.
Launch a VS Code tab from other tools
The extension registers a URI handler atvscode://anthropic.claude-code/open. Use it to open a new Claude Code tab from your own tooling: a shell alias, a browser bookmarklet, or any script that can open a URL. If VS Code isn’t already running, opening the URL launches it first. If VS Code is already running, the URL opens in whichever window is currently focused.
Invoke the handler with your operating system’s URL opener.
- macOS
- Linux
- Windows
For example, to open a tab pre-filled with “review my changes”:
claude-cli:// handler. See Launch sessions from links.
Configure settings
The extension has two types of settings:- Extension settings in VS Code: control the extension’s behavior within VS Code. Open with
Cmd+,(Mac) orCtrl+,(Windows/Linux), then go to Extensions → Claude Code. You can also type/and select General Config to open settings. - Claude Code settings in
~/.claude/settings.json: shared between the extension and CLI. Use it for allowed commands, environment variables, hooks, and MCP servers. On Pro, Max, and Team plans, it’s also one input to the permission mode conversations start in. Switch permission modes lists the order. See Settings for details.
Extension settings
VS Code readsinitialPermissionMode from your user settings and ignores workspace values. Before v2.1.225, VS Code defaulted the setting to default and applied workspace values.
Use a screen reader
The extension’s chat panel works with screen readers. You don’t need to turn anything on: the extension announces conversation activity for every user, with no visual change. This is separate from the CLI’s opt-in screen reader mode, which adapts the terminal interface. Screen reader support in the chat panel requires Claude Code v2.1.236 or later. During a conversation, the extension announces:- Claude’s replies: the extension announces each reply once, when it’s complete, and stays silent while text streams in. Your screen reader reads code blocks as a line-count summary, reads links by their label, and reads tables cell by cell; the full reply stays readable in the transcript.
- Permission requests and questions: the extension announces a request when its permission prompt appears, naming the tool Claude wants to use. It announces in the same way when Claude asks you a question and when Claude finishes a plan and waits for your review.
- Status changes: the extension announces when Claude starts working, when Claude is ready for your input, and when Claude Code starts compacting the conversation.
- Errors and model prompts: the extension announces errors in the conversation, and announces when the usage-credits consent prompt or the flagged-request prompt appears.
Tab, since the extension exposes it as a labeled region, and read it at your own pace. While Claude works, your screen reader reads a text label in place of the progress spinner’s animation.
When you reopen a session or switch to another one, the extension announces nothing: restored history, pending permission prompts, and in-progress status stay silent until something new happens.
VS Code extension vs. Claude Code CLI
Claude Code is available as both a VS Code extension (graphical panel) and a CLI (command-line interface in the terminal). Some features are only available in the CLI. If you need a CLI-only feature, runclaude in VS Code’s integrated terminal. This requires the standalone CLI install: the extension does not add claude to your PATH. See Run CLI in VS Code.
Rewind with checkpoints
The VS Code extension supports checkpoints, which track Claude’s file edits and let you rewind to a previous state. Hover over any message to reveal the rewind button, then choose from three options:- Fork conversation from here: start a new conversation branch from this message while keeping all code changes intact
- Rewind code to here: revert file changes back to this point in the conversation while keeping the full conversation history
- Fork conversation and rewind code: start a new conversation branch and revert file changes to this point
Run CLI in VS Code
To use the CLI while staying in VS Code, open the integrated terminal (Ctrl+` on Windows/Linux or Cmd+` on Mac) and run claude. The CLI automatically integrates with your IDE for features like diff viewing and diagnostic sharing.
Installing the extension does not put claude on your shell PATH. The extension bundles a private copy of the CLI for its chat panel, but typing claude in a terminal requires the standalone CLI install. Run the install once and the commands on this page, including claude mcp add and claude --resume, work in any terminal. If claude is still not found after installing, verify your PATH.
If using an external terminal, run /ide inside Claude Code to connect it to VS Code.
Switch between extension and CLI
The extension and CLI share the same conversation history. To continue an extension conversation in the CLI, runclaude --resume in the terminal. This opens an interactive picker where you can search for and select your conversation.
Include terminal output in prompts
Reference terminal output in your prompts using@terminal:name where name is the terminal’s title. This lets Claude see command output, error messages, or logs without copy-pasting.
Monitor background processes
Visibility for background tasks in the extension is limited compared to the CLI. For better visibility, have Claude output the command so you can run it in VS Code’s integrated terminal.Connect to external tools with MCP
MCP (Model Context Protocol) servers give Claude access to external tools, databases, and APIs. To add an MCP server, open the integrated terminal (Ctrl+` or Cmd+`) and run claude mcp add. The example below adds GitHub’s remote MCP server, which authenticates with a personal access token passed as a header:
YOUR_GITHUB_PAT with your personal access token. The claude mcp add command saves the configuration without validating credentials, so a placeholder value is accepted here but the server fails to connect later. To verify the connection, type /mcp in the chat panel and check that the server shows connected. A server with bad credentials shows failed.
Once configured, ask Claude to use the tools (e.g., “Review PR #456”).
To manage MCP servers without leaving VS Code, type /mcp in the chat panel. The MCP management dialog lets you enable or disable servers, reconnect to a server, and manage OAuth authentication. See the MCP documentation for available servers.
Work with git
Claude Code integrates with git to help with version control workflows directly in VS Code. Ask Claude to commit changes, create pull requests, or work across branches. To start Claude in an isolated worktree with its own files and branch, see Run parallel sessions with worktrees.Create commits and pull requests
Claude can stage changes, write commit messages, and create pull requests based on your work:Use third-party providers
By default, Claude Code connects directly to Anthropic’s API. If your organization uses Amazon Bedrock, Google Cloud’s Agent Platform, or Microsoft Foundry to access Claude, configure the extension to use your provider instead:1
Disable login prompt
Open the Disable Login Prompt setting and check the box.You can also open VS Code settings (
Cmd+, on Mac or Ctrl+, on Windows/Linux), search for “Claude Code login”, and check Disable Login Prompt.2
Configure your provider
Follow the setup guide for your provider:
- Claude Code on Amazon Bedrock
- Claude Code on Google Cloud’s Agent Platform
- Claude Code on Microsoft Foundry
~/.claude/settings.json, which ensures your settings are shared between the VS Code extension and the CLI.Security and privacy
Your code stays private. Claude Code processes your code to provide assistance but does not use it to train models. For details on data handling and how to opt out of logging, see Data and privacy. With auto-edit permissions enabled, Claude Code can modify VS Code configuration files (likesettings.json or tasks.json) that VS Code may execute automatically. To reduce risk when working with untrusted code:
- Enable VS Code Restricted Mode for untrusted workspaces
- Use Manual mode instead of Edit automatically or Auto for edits
- Review changes carefully before accepting them
The built-in IDE MCP server
When the extension is active, it runs a local MCP server that the CLI connects to automatically. This is how the CLI opens diffs in VS Code’s native diff viewer, reads your current selection for@-mentions, and — when you’re working in a Jupyter notebook — asks VS Code to execute cells.
The server is named ide and is hidden from /mcp because there’s nothing to configure. If your organization uses a PreToolUse hook to allowlist MCP tools, though, you’ll need to know it exists.
Selection and open-file context. While connected, the CLI includes your current editor selection and the path of the active file as context on each prompt you send. The transcript shows a ⧉ Selected N lines from <file> line when this happens. To exclude a sensitive file such as .env, add a Read deny rule for its path. A matching deny rule prevents both the selected text and the open-file notice for that file from reaching Claude.
Transport and authentication. The server binds to 127.0.0.1 on a random port in the range 10000–65535, and the port is not configurable. The transport is unencrypted ws://; because the socket is loopback-only, any process that could capture the traffic can also read the token from the lock file, so TLS would not add protection. Each extension activation generates a fresh random auth token, writes it to a lock file at ~/.claude/ide/<port>.lock, and the CLI must present it as the X-Claude-Code-Ide-Authorization header to connect. The lock file has 0600 permissions in a 0700 directory, so only the user running VS Code can read it. If CLAUDE_CONFIG_DIR is set, the lock file is written to $CLAUDE_CONFIG_DIR/ide/ instead.
Tools exposed to the model. The server hosts a dozen tools, but only two are visible to the model. The rest are internal RPC the CLI uses for its own UI — opening diffs, reading selections, saving files — and are filtered out before the tool list reaches Claude.
Jupyter execution always asks first.
mcp__ide__executeCode can’t run anything silently. On each call, the code is inserted as a new cell at the end of the active notebook, VS Code scrolls it into view, and a native Quick Pick asks you to Execute or Cancel. Cancelling — or dismissing the picker with Esc — returns an error to Claude and nothing runs. The tool also refuses outright when there’s no active notebook, when the Jupyter extension (ms-toolsai.jupyter) isn’t installed, or when the kernel isn’t Python.
The Quick Pick confirmation is separate from
PreToolUse hooks. An allowlist entry for mcp__ide__executeCode lets Claude propose running a cell; the Quick Pick inside VS Code is what lets it actually run.Fix common issues
Extension won’t install
- Ensure you have a compatible version of VS Code (1.94.0 or later)
- Check that VS Code has permission to install extensions
- Try installing directly from the VS Code Marketplace
Spark icon not visible
The Spark icon appears in the Editor Toolbar (top-right of editor) when you have a file open. If you don’t see it:- Open a file: The icon requires a file to be open. Having just a folder open isn’t enough.
- Check VS Code version: Requires 1.94.0 or higher (Help → About)
- Restart VS Code: Run “Developer: Reload Window” from the Command Palette
- Disable conflicting extensions: Temporarily disable other AI extensions (Cline, Continue, etc.)
- Check workspace trust: The extension doesn’t work in Restricted Mode
preferredLocation to sidebar, or opened Claude with Claude Code: Open in Side Bar, click ”✱ Claude Code” in the Status Bar (bottom-right corner). This works even without a file open. You can also use the Command Palette (Cmd+Shift+P / Ctrl+Shift+P) and type “Claude Code”.
Cmd+Esc does nothing on macOS
On macOS Tahoe and later, the system Game Overlay shortcut is bound toCmd+Esc by default and intercepts the keypress before it reaches VS Code. To free the shortcut:
- Open System Settings
- Go to Keyboard, then Keyboard Shortcuts, then Game Controllers
- Clear the Game Overlay checkbox
Cmd+K Cmd+S), search for Claude Code: Focus input, and assign a new binding.
Claude Code never responds
If Claude Code isn’t responding to your prompts:- Check your internet connection: Ensure you have a stable internet connection
- Start a new conversation: Try starting a fresh conversation to see if the issue persists
- Try the CLI: Run
claudefrom the terminal to see if you get more detailed error messages
Uninstall the extension
To uninstall the Claude Code extension:- Open the Extensions view (
Cmd+Shift+Xon Mac orCtrl+Shift+Xon Windows/Linux) - Search for “Claude Code”
- Click Uninstall
claude in a VS Code integrated terminal, Claude Code reinstalls the extension automatically. To keep it uninstalled, turn off Auto-install IDE extension in /config, or set autoInstallIdeExtension to false. You can also set the CLAUDE_CODE_IDE_SKIP_AUTO_INSTALL environment variable to 1.
To also remove extension data and reset all settings, delete the extension’s storage directory for your platform.
On macOS:
Next steps
Now that you have Claude Code set up in VS Code:- Explore common workflows to get the most out of Claude Code
- Set up MCP servers to extend Claude’s capabilities with external tools. Add servers using the CLI, then manage them with
/mcpin the chat panel. - Configure Claude Code settings to customize allowed commands, hooks, and more. These settings are shared between the extension and CLI.
