Despite the overwhelming popularity of Tailwind CSS, many developers have struggled to become comfortable with the framework, largely due to a decrease in markup readability as an application scales.

daisyUI is a customizable Tailwind CSS component library that prevents verbose markup in frontend applications. With a focus on customizing and creating themes for user interfaces, daisyUI uses pure CSS and Tailwind utility classes, allowing developers to write clean HTML.
In this article, we’ll explore daisyUI by building an image gallery in React that fetches and organizes photos, learning how to achieve Tailwind’s performance and customization without writing verbose markup.
To follow along with this tutorial, you’ll need the following:
Let’s get started!
The code for the example application in this tutorial can be found on GitHub.
First, we’ll create a new React application and bootstrap it using Create React App; run the command below in your terminal:
npx create-react-app daisyui-app
Although I’ve named this example project daisyui-app, you can swap it with whatever name you choose. Next, navigate into your project directory and start your development server by running the following command:
cd daisyui-app && yarn start
The command above will open a browser tab displaying the default boilerplate application. Finally, you’ll need to set up Tailwind CSS for your application following the steps listed in this article.
With our new React project generated and Tailwind CSS configured for Create React App, let’s install the following required dependencies in our application:
Run the following code in your terminal:
yarn add daisyui tailwindcss postcss axios
Next, navigate to your tailwind.config.js file and add the following code:
plugins: [require("daisyui")],
The code above includes daisyUI support in our Tailwind CSS configuration, providing access to Tailwind’s utility classes, which we’ll use to customize our daisyUI component styles.
In this section, we’ll build three components needed for our application: an Intro component for our application’s header, a Navbar component for our application’s navbar, and a Photo component for displaying and organizing photos.
To access images and build components for our application, we’ll use Unsplash. If you don’t have one already, set up an account.
Intro componentThe Intro component will contain an image URL from Unsplash and a background image for our application’s landing page. Inside of your components/intro/intro.jsx file, add the following code:
const Intro = () => {
    const imgURL =
        "https://images.unsplash.com/photo-1606819717115-9159c900370b?ixid=MnwxMjA3fDB8MHxwaG90by1wYWdlfHx8fGVufDB8fHx8&ixlib=rb-1.2.1&auto=format&fit=crop&w=800&q=80";
    return (
        <div
            className="hero h-96"
            style={{
                backgroundImage: `url(${imgURL})`,
            }}
        >
            <div className="hero-overlay bg-opacity-60" />
            <div className="text-center hero-content text-neutral-content">
                <div className="w-full">
                    <h1 className="mb-6 text-5xl font-bold">
                        Hello there, welcome to our daisy gallery
                    </h1>
                    <p className="text-lg">
                        Built with images from{" "}
                        <a
                            href="https://unsplash.com/developers"
                            className="hover underline mt-8 bg-white px-2 py-1.5 rounded-sm text-black"
                        >
                            Unsplash API
                        </a>
                    </p>
                </div>
            </div>
        </div>
    );
};
export default Intro;
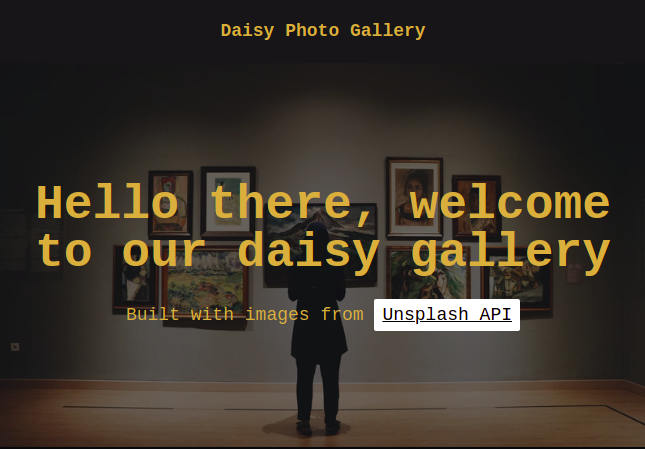
In the code above, we created an Intro component; inside, we initialized an imgURL, which contains the URL for the image on our landing page.
Next, we customized styles for our application’s landing page components using Tailwind CSS classes. We also added a link to the Unsplash Developers API. Now, your app should look like the image below:
Navbar componentNow, let’s build a simple Navbar component and add customization using daisyUI’s component classes:
const Navbar = () => {

    return (
        <div className="navbar flex-col shadow-lg bg-neutral text-neutral-content">
            <div className="flex-1 px-2 mx-2">
                <span className="text-lg font-bold">Daisy Photo Gallery</span>
            </div>
        </div>
    );
};

export default Navbar;
In the code above, we made the fonts for our Navbar bold by using font-bold, and we specified a large font using the text-leg component.
Photo componentNext, we’ll build a simple Photo component to render images fetched from Unsplash; to render our Photo component, we’ll wrap it in a figure component:
const Photo = ({ imgURL }) => {
    return (
        <>
            <div className="card">
                <figure>
                  <img src={imgURL} alt="unsplash img" />
                </figure>
            </div>
        </>
    );
};

export default Photo;
In the code block above, we destructured our Photo component and passed it our Unsplash imgURL. Next, we created a card for our photos using daisyUI’s card component class. Finally, we wrapped our images in the figure tag, scaling them down to fit our Photo component container.
Now, we’ll use our components to fetch random photos from our Unsplash API, then create categories to organize them. First, let’s import our packages by adding the following code block to our App.js file:
import { useState, useEffect } from "react";
import axios from "axios";
import Intro from "./components/Intro/Intro";
import Navbar from "./components/Navbar/Navbar";
import Photo from "./components/Photo/Photo";
In the code above, we imported our components, as well as the useState and useEffect Hooks. Next, we’ll initialize an app component by adding the code below:
const App = () => {
    const [selectedCategory, setSelectedCategory] = useState("RANDOM");
    const [photos, setPhotos] = useState([]);
    const [categories] = useState([
        "RANDOM",
        "TECHNOLOGIES",
        "ARTS",
        "SPORTS",
        "GAMES",
    ]);
Inside our app component, we created states for categories and Photos using React’s useState variable. Then, we created an array of different categories, including RANDOM, TECHNOLOGIES, ARTS, SPORTS, and GAMES.
Now, let’s write a function to fetch random photos from our Unsplash API:
const fetchRandomPhotos = async () => {
        try {
            const res = await axios.get("https://api.unsplash.com/photos/random", {
                params: {
                    client_id: process.env.REACT_APP_UNSPLASH_ACCESS_KEY,
                    count: 12,
                },
            });
            const photoArr = res.data?.map((photo) => photo?.urls?.regular);
            setPhotos(photoArr);
        } catch (error) {
            setPhotos([]);
            console.error(error?.response?.data?.message);
        }
    };
In the code block above, we created the getRandomPhotos function, which fetches random photos from our Unsplash API. To set all of our images, we mapped the photo array. For authentication, we passed our client_id, which we got from our Unsplash Developers API dashboard. Lastly, we specified the number of images as count: 12.
Now, we’ll write a function that returns a photo based on the photo category:
  const fetchPhotoBasedonCategory = async () => {
        try {
            const res = await axios.get("https://api.unsplash.com/search/photos", {
                params: {
                    client_id: process.env.REACT_APP_UNSPLASH_ACCESS_KEY,
                    query: selectedCategory.toLowerCase(),
                },
            });
            const photoArr = res.data?.results?.map((photo) => photo?.urls?.regular);
            setPhotos(photoArr);
        } catch (error) {
            setPhotos([])
            console.error(error?.response?.data?.message);
        }
    };
Similar to our getRandomPhotos function, we specified the categories and used map to sort through a list of photos, returning only the photos in the category specified by the user. To render an image, we mapped the array of images from Unsplash, setting only the specified number of images. We also logged any errors to the console:
useEffect(() => {
        if (selectedCategory === "RANDOM") {
            return fetchRandomPhotos();
        }
        fetchPhotoBasedonCategory();
        // eslint-disable-next-line react-hooks/exhaustive-deps
    }, [selectedCategory]);

    return (
        <>
            <Navbar />
            <main className="mb-10">
                <Intro />
                <nav>
                    <div className="tabs mt-10 justify-center">
                        {categories.map((category) => (
                            <p
                                key={category}
                                onClick={() => setSelectedCategory(category)}
                                role="button"
                                className={`tab tab-bordered
                            ${selectedCategory === category && "tab-active"}`}
                            >
                                {category}
                            </p>
                        ))}
                    </div>
                </nav>
                <section className="mt-4 mx-auto w-10/12 relative">
                    <div className="grid grid-cols-3 justify-center gap-3">
                        {photos?.length ? (
                            photos.map((photo) => <Photo key={photo} imgURL={photo} />)
                        ) : (
                            <p className="mt-10 alert alert-info absolute left-1/2 -ml-20">
                                No photo at the moment!
                            </p>
                        )}
                    </div>
                </section>
            </main>
        </>
    );
};

export default App;
In the code block above, we used React’s useEffect Hook to specify RANDOM if a user selects the random category. If a user specifies a category, the API returns images from the selected category.
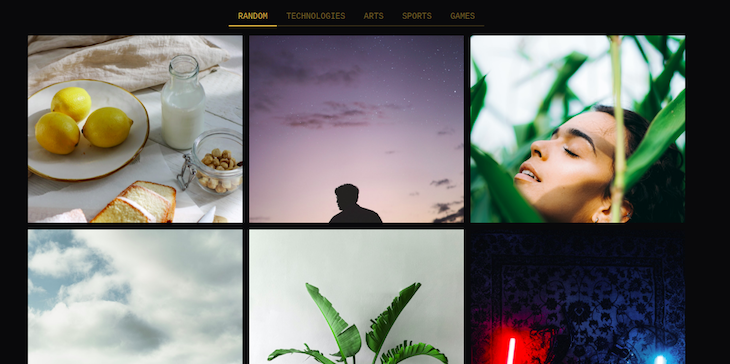
Finally, we rendered our entire application and added an onClick event to the category sections. Additionally, we added a function to specify that only images from the selected category will be displayed to the user. Lastly, we added a message for when there are no photos available from our API. Though this is highly unlikely, it is good practice.
If done correctly, our application should look similar to the image below:
With the addition of component classes like btn, card, and footer, daisyUI significantly improves upon Tailwind CSS by allowing developers to write clean HTML. In this tutorial, we explored building and customizing our own React application with CSS variables and Tailwind CSS utility classes.
Although our example focused on building an image gallery, you can take the information in this tutorial and apply it to your own application, enjoying Tailwind’s styling performance without harming your code’s readability as you scale your project. I hope you enjoyed this tutorial!
Install LogRocket via npm or script tag. LogRocket.init() must be called client-side, not
server-side
$ npm i --save logrocket

// Code:

import LogRocket from 'logrocket';
LogRocket.init('app/id');
// Add to your HTML:

<script src="https://cdn.lr-ingest.com/LogRocket.min.js"></script>
<script>window.LogRocket && window.LogRocket.init('app/id');</script>

Learn how to use the TypeScript Compiler API and AST traversal to extract imports and build a file dependency graph CLI.

Stop generating AI slop with Claude Code. Discover 5 actionable developer tips to manage context windows, enforce rules with hooks, and improve code quality.
Choosing between skills and MCP tools comes down to auditability versus flexibility. By building the exact same capability twice, this guide reveals when your agent needs a deterministic tool and when it needs an interpretive skill.

Learn how to replace React state, Context, and event handlers with native HTML and CSS features for dark mode, modals, accordions, carousels, and more.
Would you be interested in joining LogRocket's developer community?
Join LogRocket’s Content Advisory Board. You’ll help inform the type of content we create and get access to exclusive meetups, social accreditation, and swag.
Sign up now



 Learn more →