


一.命令式对象管理
1.命名空间管理
命名空间是 K8s 里的资源隔离单元,用来在同一个集群中划分出多个虚拟集群。不同命名空间下的资源(Pod、Deployment、Service、ConfigMap 等)相互独立,同名资源互不冲突。
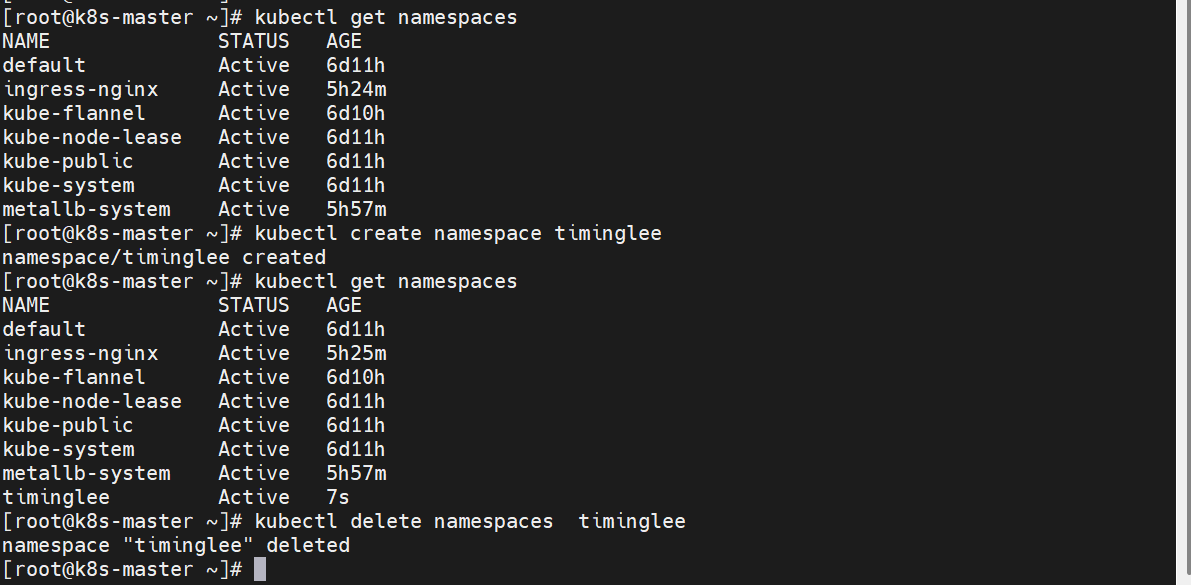
查看命名空间
[root@k8s-master ~]# kubectl get namespaces
NAME STATUS AGE
default Active 6d11h
ingress-nginx Active 5h24m
kube-flannel Active 6d10h
kube-node-lease Active 6d11h
kube-public Active 6d11h
kube-system Active 6d11h
metallb-system Active 5h57m创建命名空间
[root@k8s-master ~]# kubectl create namespace timinglee
namespace/timinglee created
[root@k8s-master ~]# kubectl get namespaces
NAME STATUS AGE
default Active 6d11h
ingress-nginx Active 5h25m
kube-flannel Active 6d10h
kube-node-lease Active 6d11h
kube-public Active 6d11h
kube-system Active 6d11h
metallb-system Active 5h57m
timinglee Active 7s删除命名空间
[root@k8s-master ~]# kubectl delete namespaces timinglee
namespace "timinglee" deleted
2.pod管理
查看当前集群pods
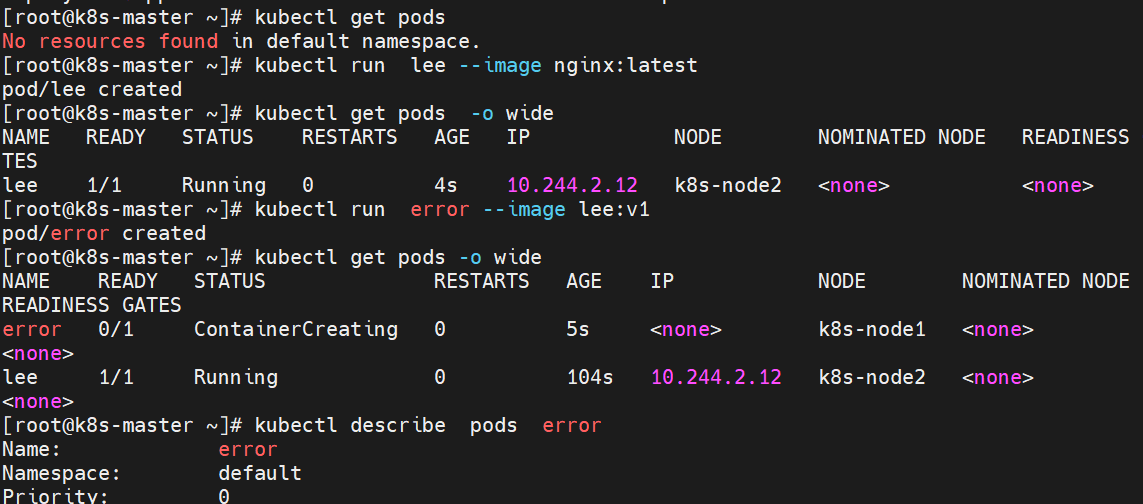
[root@k8s-master ~]# kubectl get pods
No resources found in default namespace创建pod
[root@k8s-master ~]# kubectl run lee --image nginx:latest
pod/lee created
[root@k8s-master ~]# kubectl get pods -o wide
NAME READY STATUS RESTARTS AGE IP NODE NOMINATED NODE READINESS GATES
lee 1/1 Running 0 4s 10.244.2.12 k8s-node2 <none> <none>
若创建pod出问题
[root@k8s-master ~]# kubectl run error --image lee:v1
pod/error created
[root@k8s-master ~]# kubectl get pods -o wide
NAME READY STATUS RESTARTS AGE IP NODE NOMINATED NODE READINESS GATES
error 0/1 ContainerCreating 0 5s <none> k8s-node1 <none> <none>
lee 1/1 Running 0 104s 10.244.2.12 k8s-node2 <none> <none>查看pod描述详细信息
[root@k8s-master ~]# kubectl describe pods error
Name: error
Namespace: default
Priority: 0
Service Account: default
Node: k8s-node1/172.25.254.10
Start Time: Wed, 26 Aug 2026 22:19:04 +0800
Labels: run=error
Annotations: <none>
Status: Pending
IP:
IPs: <none>
Containers:
error:
Container ID:
Image: lee:v1
Image ID:
Port: <none>
Host Port: <none>
State: Waiting
Reason: ContainerCreating
Ready: False
Restart Count: 0
Environment: <none>
Mounts:
/var/run/secrets/kubernetes.io/serviceaccount from kube-api-access-7bjfx (ro)
Conditions:
Type Status
PodReadyToStartContainers False
Initialized True
Ready False
ContainersReady False
PodScheduled True
Volumes:
kube-api-access-7bjfx:
Type: Projected (a volume that contains injected data from multiple sources)
TokenExpirationSeconds: 3607
ConfigMapName: kube-root-ca.crt
Optional: false
DownwardAPI: true
QoS Class: BestEffort
Node-Selectors: <none>
Tolerations: node.kubernetes.io/not-ready:NoExecute op=Exists for 300s
node.kubernetes.io/unreachable:NoExecute op=Exists for 300s
删除pod
[root@k8s-master ~]# kubectl delete pods error
pod "error" deleted from default namespace
[root@k8s-master ~]# kubectl delete pods --all
pod "lee" deleted from default namespace
[root@k8s-master ~]#

二.kubectl 命令实操
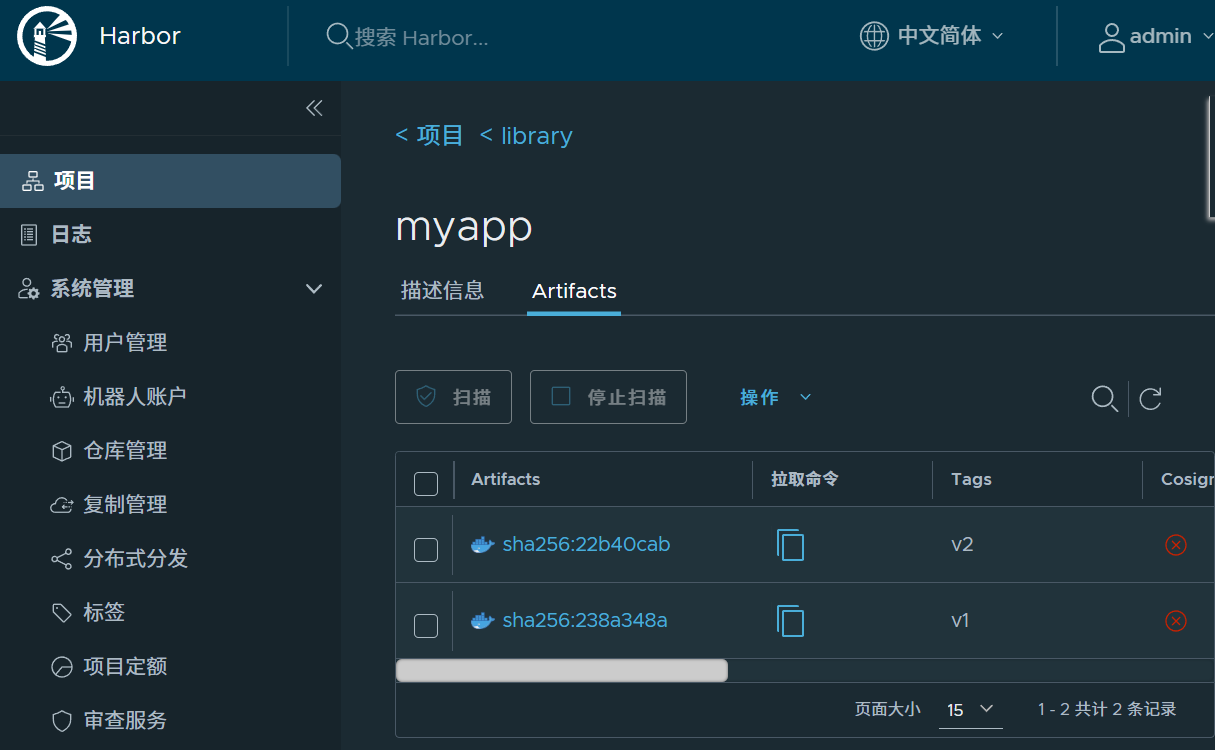
1.上传实验镜像到harbor仓库library中(harbor仓库查看上一篇文章k8s集群搭建)
[root@k8s-master ~]# docker load -i myapp.tar.gz
[root@k8s-master ~]# docker tag timinglee/myapp:v1 reg.timinglee.org/library/myapp:v1
[root@k8s-master ~]# docker push reg.timinglee.org/library/myapp:v1
[root@k8s-master ~]# docker tag timinglee/myapp:v2 reg.timinglee.org/library/myapp:v2
[root@k8s-master ~]# docker push reg.timinglee.org/library/myapp:v2
2.生成实验所需yml文件
[root@k8s-master ~]# vim replica.yml
apiVersion: apps/v1
kind: ReplicaSet
metadata:
labels:
app: replica #设定控制器标签
name: replica
spec:
replicas: 2 #启动pod数量
selector:
matchLabels:
app: replica #控制器标签选择器
template:
metadata:
labels:
app: replica #开启pod的属性模板
spec:
containers:
- image: myapp:v1
name: myapp
3.kubectl命令使用方法
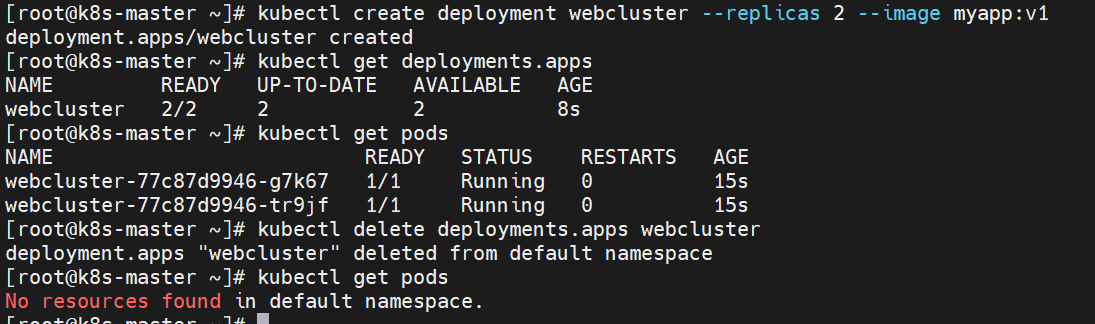
1.create
[root@k8s-master ~]# kubectl create deployment webcluster --replicas 2 --image myapp:v1
deployment.apps/webcluster created
[root@k8s-master ~]# kubectl get deployments.apps
NAME READY UP-TO-DATE AVAILABLE AGE
webcluster 2/2 2 2 8s
[root@k8s-master ~]# kubectl get pods
NAME READY STATUS RESTARTS AGE
webcluster-77c87d9946-g7k67 1/1 Running 0 15s
webcluster-77c87d9946-tr9jf 1/1 Running 0 15s
[root@k8s-master ~]# kubectl delete deployments.apps webcluster
deployment.apps "webcluster" deleted from default namespace
[root@k8s-master ~]# kubectl get pods
No resources found in default namespace.
[root@k8s-master ~]#
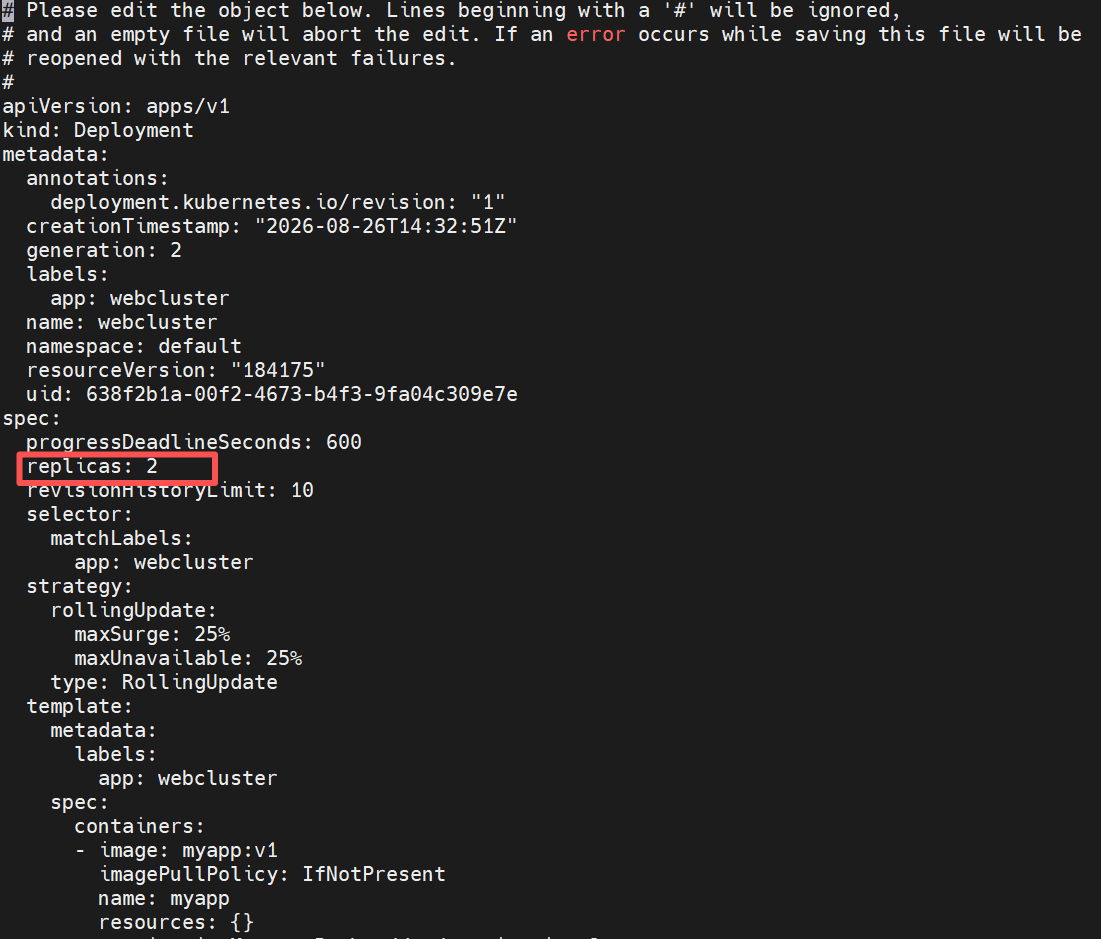
2.edit
[root@k8s-master ~]# kubectl create deployment webcluster --image myapp:v1
deployment.apps/webcluster created
[root@k8s-master ~]# kubectl get pods
NAME READY STATUS RESTARTS AGE
webcluster-77c87d9946-ldjjx 1/1 Running 0 4s
[root@k8s-master ~]# kubectl edit deployments.apps webcluster
deployment.apps/webcluster edited
[root@k8s-master ~]# kubectl get pods
NAME READY STATUS RESTARTS AGE
webcluster-77c87d9946-76jvh 1/1 Running 0 5s
webcluster-77c87d9946-ldjjx 1/1 Running 0 31s
[root@k8s-master ~]#
3.patch
[root@k8s-master ~]# kubectl patch deployments.apps webcluster -p '{"spec":{"replicas":1}}'
deployment.apps/webcluster patched[root@k8s-master ~]# kubectl get pods
NAME READY STATUS RESTARTS AGE
webcluster-77c87d9946-2wqn7 1/1 Running 0 6m20s
4.expose
[root@k8s-master ~]# kubectl expose deployment webcluster --port 80 --target-port 80
service/webcluster exposed
[root@k8s-master ~]# kubectl get service
NAME TYPE CLUSTER-IP EXTERNAL-IP PORT(S) AGE
kubernetes ClusterIP 10.96.0.1 <none> 443/TCP 28m
webcluster ClusterIP 10.98.87.129 <none> 80/TCP 5s
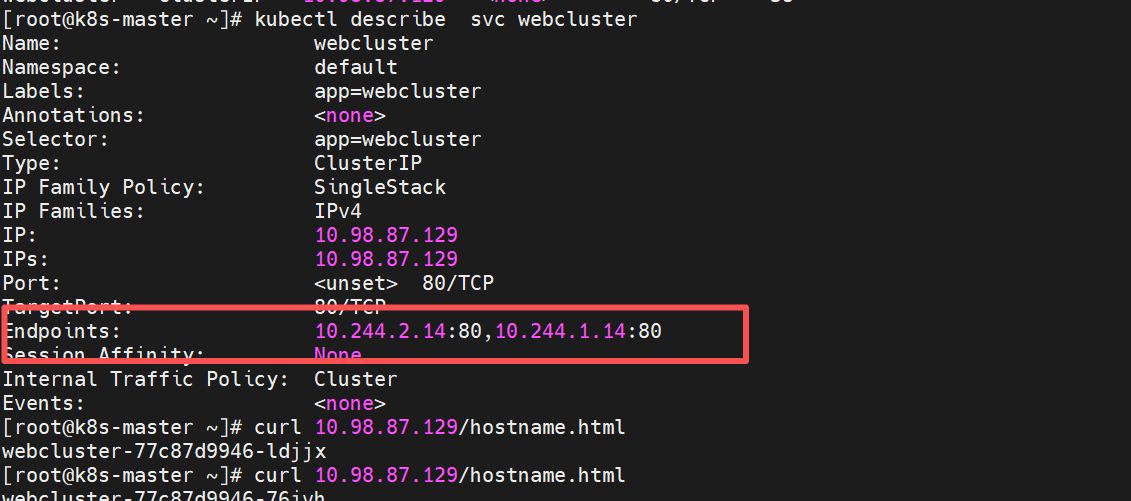
[root@k8s-master ~]# kubectl describe svc webcluster
Name: webcluster
Namespace: default
Labels: app=webcluster
Annotations: <none>
Selector: app=webcluster
Type: ClusterIP
IP Family Policy: SingleStack
IP Families: IPv4
IP: 10.98.87.129
IPs: 10.98.87.129
Port: <unset> 80/TCP
TargetPort: 80/TCP
Endpoints: 10.244.2.14:80,10.244.1.14:80
Session Affinity: None
Internal Traffic Policy: Cluster
Events: <none>
[root@k8s-master ~]# curl 10.98.87.129/hostname.html
webcluster-77c87d9946-ldjjx
[root@k8s-master ~]# curl 10.98.87.129/hostname.html
webcluster-77c87d9946-76jvh
[root@k8s-master ~]#expose可以暴露pods的IP
5.logs
查看pod的日志
[root@k8s-master ~]# curl 10.98.87.129/hostname.html
webcluster-77c87d9946-76jvh
[root@k8s-master ~]# kubectl logs pods/webcluster-77c87d9946-76jvh
10.244.0.0 - - [26/Aug/2026:14:38:12 +0000] "GET /hostname.html HTTP/1.1" 200 28 "-" "curl/7.76.1" "-"
[root@k8s-master ~]#
6.attach
attach能进入pod内部系统交互
[root@k8s-master ~]# docker load -i busybox-latest.tar.gz
Loaded image: busybox:latest
[root@k8s-master ~]# docker tag busybox:latest reg.timinglee.org/library/busybox:latest[root@k8s-master ~]# kubectl run -it testpod --image busybox:latest
All commands and output from this session will be recorded in container logs, including credentials and sensitive information passed through the command prompt.
If you don't see a command prompt, try pressing enter.
/ # <ctrl+pq>[root@k8s-master ~]# kubectl get pods
NAME READY STATUS RESTARTS AGE
testpod 1/1 Running 0 55s[root@k8s-master ~]# kubectl attach pods/testpod -it
All commands and output from this session will be recorded in container logs, including credentials and sensitive information passed through the command prompt.
If you don't see a command prompt, try pressing enter.
/ #
7.exec
在正在运行的 Pod 内部执行命令,最常用就是进入容器终端。
[root@k8s-master ~]# kubectl run testpod --image nginx:latest
pod/testpod created
[root@k8s-master ~]# kubectl get pods
NAME READY STATUS RESTARTS AGE
testpod 1/1 Running 0 4s
root@k8s-master ~]# kubectl exec -it pods/testpod -c testpod -- /bin/bash
root@testpod:/#
8.cp
在 本地机器 和 Pod 容器 之间互相传输文件 / 目录
[root@k8s-master ~]# kubectl cp testpod:/usr/share/nginx/html/index.html /mnt/test
tar: Removing leading `/' from member names[root@k8s-master ~]# kubectl cp testpod:/usr/share/nginx/html /mnt/
tar: Removing leading `/' from member names
[root@k8s-master ~]# ls /mnt/
50x.html docker.service file1 hgfs index.html test
[root@k8s-master ~]# echo timinglee > /mnt/index.html
[root@k8s-master ~]# kubectl cp /mnt/index.html testpod:/usr/share/nginx/html/index.html
[root@k8s-master ~]# kubectl get pods -o wide
NAME READY STATUS RESTARTS AGE IP NODE NOMINATED NODE READINESS GATES
testpod 1/1 Running 0 6m3s 10.244.1.12 k8s-node1 <none> <none>
[root@k8s-master ~]# curl 10.244.1.12
timinglee
9.rollout
管理 Deployment、DaemonSet、StatefulSet 的滚动更新、版本历史、回滚、重启
[root@k8s-master pod]# kubectl create deployment webcluster --image myapp:v1 --replicas 2 --dry-run=client -o yaml > webcluster.yml
[root@k8s-master pod]# vim webcluster.yml
apiVersion: apps/v1
kind: Deployment
metadata:
labels:
app: webcluster
name: webcluster
spec:
replicas: 2
selector:
matchLabels:
app: webcluster
template:
metadata:
labels:
app: webcluster
spec:
containers:
- image: myapp:v1
name: myapp[root@k8s-master pod]# kubectl apply -f webcluster.yml
deployment.apps/webcluster created
[root@k8s-master pod]# kubectl get deployments.apps
NAME READY UP-TO-DATE AVAILABLE AGE
webcluster 2/2 2 2 7s
[root@k8s-master pod]# kubectl get pods
NAME READY STATUS RESTARTS AGE
webcluster-77c87d9946-5qbxt 1/1 Running 0 16s
webcluster-77c87d9946-95b2g 1/1 Running 0 16s
[root@k8s-master pod]# kubectl rollout status deployment webcluster
deployment "webcluster" successfully rolled outdeployment.apps/webcluster resumed
[root@k8s-master pod]# kubectl rollout restart deployment webcluster
deployment.apps/webcluster restarted
[root@k8s-master pod]# kubectl get pods
NAME READY STATUS RESTARTS AGE
webcluster-7bfd865747-jmhwl 1/1 Running 0 6s
webcluster-7bfd865747-qv2xt 1/1 Running 0 8s
[root@k8s-master pod]# kubectl rollout restart deployment webcluster
deployment.apps/webcluster restarted
[root@k8s-master pod]# kubectl get pods
NAME READY STATUS RESTARTS AGE
webcluster-7bfd865747-jmhwl 1/1 Running 0 19s
webcluster-7bfd865747-qv2xt 0/1 Completed 0 21s
webcluster-9787d97f6-z7xv5 1/1 Running 0 1s
webcluster-9787d97f6-zl6q2 0/1 ContainerCreating 0 0s
10.scale
调整 Deployment、StatefulSet、ReplicaSet 等控制器的副本数量,实现扩容 / 缩容。只能用来修改副本数,不能改镜像、配置等其他内容。
[root@k8s-master pod]# kubectl scale deployment webcluster --replicas 4
deployment.apps/webcluster scaled
[root@k8s-master pod]# kubectl get pods
NAME READY STATUS RESTARTS AGE
webcluster-9787d97f6-bh796 1/1 Running 0 2s
webcluster-9787d97f6-bh8jd 1/1 Running 0 2s
webcluster-9787d97f6-z7xv5 1/1 Running 0 89s
webcluster-9787d97f6-zl6q2 1/1 Running 0 88s
[root@k8s-master pod]# kubectl scale deployment webcluster --replicas 1
deployment.apps/webcluster scaled
[root@k8s-master pod]# kubectl get pods
NAME READY STATUS RESTARTS AGE
webcluster-9787d97f6-zl6q2 1/1 Running 0 93s
11.label
给 K8s 资源打标签(key=value),标签是资源的标识,用于筛选、匹配(比如 Service、Deployment) 标签本质就是资源上的键值对,用于筛选,不是用来描述详情
[root@k8s-master pod]# kubectl get pods --show-labels
NAME READY STATUS RESTARTS AGE LABELS
webcluster-9787d97f6-zl6q2 1/1 Running 0 6m57s app=webcluster,pod-template-hash=9787d97f6
[root@k8s-master pod]# kubectl get deployments.apps webcluster --show-labels
NAME READY UP-TO-DATE AVAILABLE AGE LABELS
webcluster 1/1 1 1 12m app=webcluster[root@k8s-master pod]# kubectl label pods webcluster-9787d97f6-zl6q2 app-
pod/webcluster-9787d97f6-zl6q2 unlabeled
[root@k8s-master pod]# kubectl label pods webcluster-9787d97f6-zl6q2 app=webcluster
pod/webcluster-9787d97f6-zl6q2 labeled
三.利用控制器实现版本更替
1.建立控制器
做这个实验harbor仓库必须要有myapp:v1和myapp:v2两个镜像,依据harbor仓库来创建
建立控制器pod
[root@k8s-master ~]# kubectl create deployment webcluster --image myapp:v1 --replicas 2 --dry-run=client -o yaml > webcluster.yml
[root@k8s-master ~]# vim webcluster.yml
[root@k8s-master ~]# kubectl apply -f webcluster.yml
deployment.apps/webcluster created
[root@k8s-master ~]# kubectl get pods
NAME READY STATUS RESTARTS AGE
webcluster-77c87d9946-2fdc5 1/1 Running 0 4s
webcluster-77c87d9946-xkzdp 1/1 Running 0 4s
[root@k8s-master ~]# kubectl rollout history deployment webcluster
deployment.apps/webcluster
REVISION CHANGE-CAUSE
1 <none>#为名为
webcluster的 Deployment 创建 NodePort 类型 Service
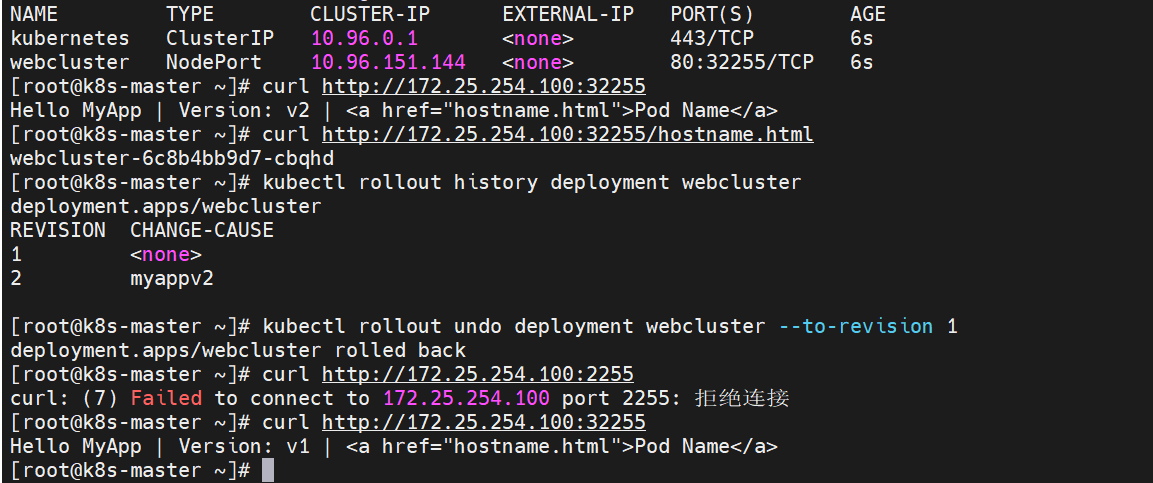
[root@k8s-master ~]# kubectl expose deployment webcluster --port 80 --target-port 80 --type NodePort
service/webcluster exposed
[root@k8s-master ~]# kubectl get svc
NAME TYPE CLUSTER-IP EXTERNAL-IP PORT(S) AGE
kubernetes ClusterIP 10.96.0.1 <none> 443/TCP 6s
webcluster NodePort 10.96.151.144 <none> 80:32255/TCP 6s[root@k8s-master ~]# curl http://172.25.254.100:32255/hostname.html
webcluster-6c8b4bb9d7-cbqhd
2.更新业务版本
[root@k8s-master ~]# kubectl set image deployments webcluster myapp=myapp:v2
deployment.apps/webcluster image updated为此次更新设定标签
[root@k8s-master ~]# kubectl annotate deployment webcluster kubernetes.io/change-cause="myappv2" --overwrite
deployment.apps/webcluster annotated
[root@k8s-master ~]# kubectl get pods
NAME READY STATUS RESTARTS AGE
webcluster-6c8b4bb9d7-cbqhd 1/1 Running 0 14s
webcluster-6c8b4bb9d7-kq796 1/1 Running 0 15s
[root@k8s-master ~]# kubectl rollout history deployment webcluster
deployment.apps/webcluster
REVISION CHANGE-CAUSE
1 <none>
2 myappv2
[root@k8s-master ~]# curl http://172.25.254.100:32255
Hello MyApp | Version: v2 | <a href="hostname.html">Pod Name</a>
[root@k8s-master ~]#
3.版本回退
[root@k8s-master ~]# kubectl rollout history deployment webcluster
deployment.apps/webcluster
REVISION CHANGE-CAUSE
1 <none>
2 myappv2[root@k8s-master ~]# kubectl rollout undo deployment webcluster --to-revision 1
deployment.apps/webcluster rolled back
[root@k8s-master ~]# curl http://172.25.254.100:32255
Hello MyApp | Version: v1 | <a href="hostname.html">Pod Name</a>
[root@k8s-master ~]#
四.利用yaml文件声明资源
1.在pod中运行多容器
[root@k8s-master ~]# kubectl run testpod --image myapp:v1 --dry-run=client -o yaml > testpod.yaml
[root@k8s-master ~]# vim testpod.yaml
apiVersion: v1
kind: Pod
metadata:
labels:
run: testpod
name: testpod
spec:
containers:
- image: myapp:v1
name: myapp1
- image: busyboxplus:latest
name: busybox
command:
- /bin/sh
- -c
- sleep 10000
[root@k8s-master ~]# kubectl apply -f testpod.yamlpod/testpod configured
[root@k8s-master ~]# kubectl get pods
NAME READY STATUS RESTARTS AGE
testpod 2/2 Running 0 67s
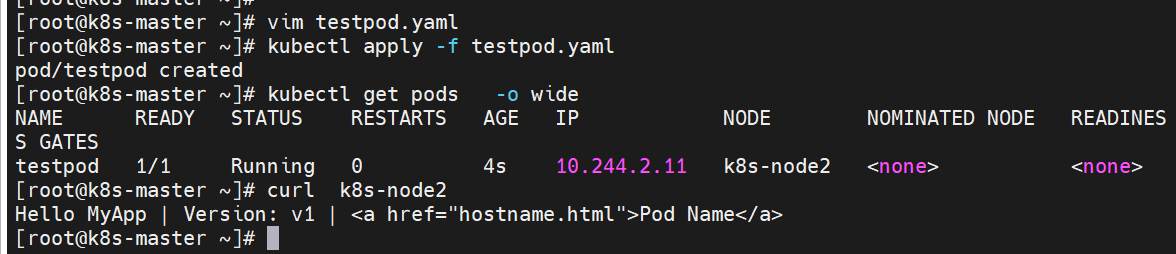
2.在pod运行主机中暴漏端口
[root@k8s-master ~]# vim testpod.yamlapiVersion: v1
kind: Pod
metadata:
labels:
run: testpod
name: testpod
spec:
containers:
- image: myapp:v1
name: myapp1
ports:
- name: http
containerPort: 80 #pod内部容器端口
hostPort: 80 #pod所在节点端口
protocol: TCP #端口所用协议
[root@k8s-master ~]# kubectl apply -f testpod.yaml
pod/testpod created
[root@k8s-master ~]# kubectl get pods -o wide
NAME READY STATUS RESTARTS AGE IP NODE NOMINATED NODE READINESS GATES
testpod 1/1 Running 0 4s 10.244.2.11 k8s-node2 <none> <none>
[root@k8s-master ~]# curl k8s-node2
Hello MyApp | Version: v1 | <a href="hostname.html">Pod Name</a>
[root@k8s-master ~]#
3.在pod中指定变量
[root@k8s-master pod]# vim mysql.ymlapiVersion: v1
kind: Pod
metadata:
labels:
run: mysql
name: mysql
spec:
containers:
- image: mysql:8.0
name: mysql8
env:
- name: MYSQL_ROOT_PASSWORD
value: lee- image: phpmyadmin:latest
name: mysqladmin
env:
- name: PMA_ARBITRARY
value: "1"
ports:
- name: phpadminport
containerPort: 80
hostPort: 80
protocol: TCP[root@k8s-master pod]# kubectl apply -f mysql.yml
pod/mysql created
[root@k8s-master pod]# kubectl get pods -o wide
NAME READY STATUS RESTARTS AGE IP NODE NOMINATED NODE READINESS GATES
mysql 2/2 Running 0 4s 10.244.1.10 k8s-node1 <none> <none>
testpod 1/1 Running 0 2m16s 10.244.2.11 k8s-node2 <none> <none>
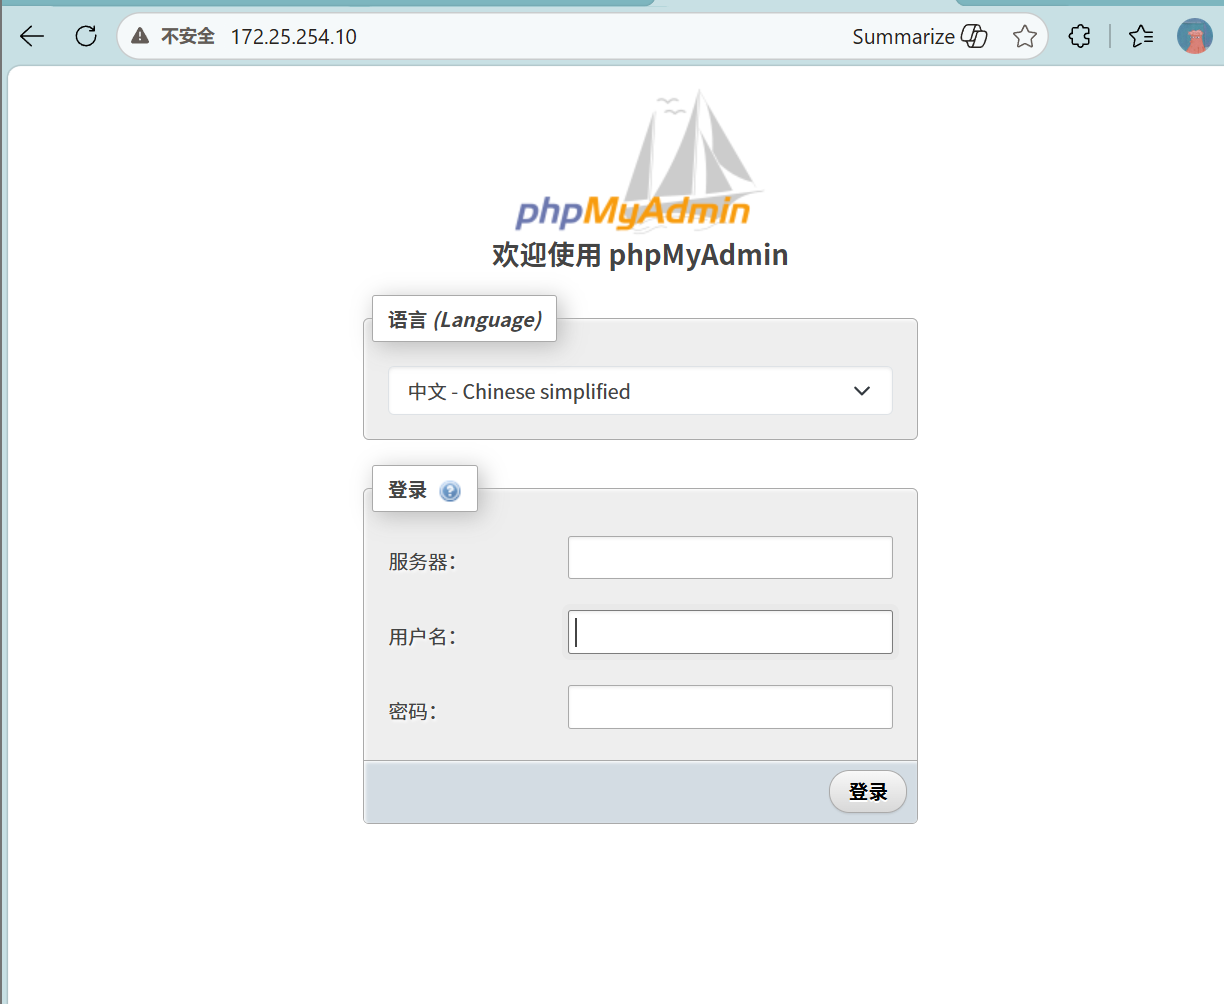
[root@k8s-master pod]#这里访问我们看见的node主机的IP
4.选择运行节点
列出所有 K8s 节点,并显示每个节点身上的标签(label)
[root@k8s-master ~]# kubectl get nodes --show-labels
NAME STATUS ROLES AGE VERSION LABELS
k8s-master Ready control-plane 8d v1.35.7 beta.kubernetes.io/arch=amd64,beta.kubernetes.io/os=linux,kubernetes.io/arch=amd64,kubernetes.io/hostname=k8s-master,kubernetes.io/os=linux,node-role.kubernetes.io/control-plane=,node.kubernetes.io/exclude-from-external-load-balancers=
k8s-node1 Ready <none> 8d v1.35.7 beta.kubernetes.io/arch=amd64,beta.kubernetes.io/os=linux,kubernetes.io/arch=amd64,kubernetes.io/hostname=k8s-node1,kubernetes.io/os=linux
k8s-node2 Ready <none> 8d v1.35.7 beta.kubernetes.io/arch=amd64,beta.kubernetes.io/os=linux,kubernetes.io/arch=amd64,kubernetes.io/hostname=k8s-node2,kubernetes.io/os=linux
[root@k8s-master ~]#自主更改需要运行pod在哪个节点
[root@k8s-master pod]# vim mysql.ymlapiVersion: v1
kind: Pod
metadata:
labels:
run: mysql
name: mysql
spec:
nodeSelector:
kubernetes.io/hostname: k8s-node2
containers:
- image: mysql:8.0
name: mysql8
env:
- name: MYSQL_ROOT_PASSWORD
value: lee- image: phpmyadmin:latest
name: mysqladmin
env:
- name: PMA_ARBITRARY
value: "1"
ports:
- name: phpadminport
containerPort: 80
hostPort: 80
protocol: TCP[root@k8s-master pod]# kubectl delete deployments.apps --all
No resources found
[root@k8s-master pod]# kubectl delete pods --all
pod "mysql" deleted from default namespace
pod "testpod" deleted from default namespace
[root@k8s-master pod]# kubectl apply -f mysql.yml
pod/mysql created
[root@k8s-master pod]# kubectl get pods -o wide
NAME READY STATUS RESTARTS AGE IP NODE NOMINATED NODE READINESS GATES
mysql 0/2 ContainerCreating 0 5s <none> k8s-node2 <none> <none>
[root@k8s-master pod]#
5.共享宿主机网络
[root@k8s-master pod]# vim testpod.yaml
apiVersion: v1
kind: Pod
metadata:
labels:
run: testpod
name: testpod
spec:
hostNetwork: true
containers:
- image: busybox:latest
name: busybox
command:
- /bin/sh
- -c
- sleep 10000
[root@k8s-master pod]# kubectl apply -f testpod.yaml
pod/testpod created
[root@k8s-master pod]# kubectl exec -it pods/testpod -c busybox -- /bin/sh
/ # ifconfig
cni0 Link encap:Ethernet HWaddr DA:EE:17:B2:97:0C
inet addr:10.244.1.1 Bcast:10.244.1.255 Mask:255.255.255.0
inet6 addr: fe80::d8ee:17ff:feb2:970c/64 Scope:Link
UP BROADCAST RUNNING MULTICAST MTU:1450 Metric:1
RX packets:3800 errors:0 dropped:0 overruns:0 frame:0
TX packets:4005 errors:0 dropped:0 overruns:0 carrier:0
collisions:0 txqueuelen:1000
RX bytes:980898 (957.9 KiB) TX bytes:792099 (773.5 KiB)docker0 Link encap:Ethernet HWaddr 16:FC:CF:C1:03:29
inet addr:172.17.0.1 Bcast:172.17.255.255 Mask:255.255.0.0
UP BROADCAST MULTICAST MTU:1500 Metric:1
RX packets:0 errors:0 dropped:0 overruns:0 frame:0
TX packets:0 errors:0 dropped:14 overruns:0 carrier:0
collisions:0 txqueuelen:0
RX bytes:0 (0.0 B) TX bytes:0 (0.0 B)eth0 Link encap:Ethernet HWaddr 00:0C:29:52:48:1F
inet addr:172.25.254.10 Bcast:172.25.254.255 Mask:255.255.255.0
inet6 addr: fe80::86a9:689a:27fc:4a06/64 Scope:Link
UP BROADCAST RUNNING MULTICAST MTU:1500 Metric:1
RX packets:14056 errors:0 dropped:0 overruns:0 frame:0
TX packets:13669 errors:0 dropped:0 overruns:0 carrier:0
collisions:0 txqueuelen:1000
RX bytes:4402669 (4.1 MiB) TX bytes:2372120 (2.2 MiB)flannel.1 Link encap:Ethernet HWaddr 86:AB:EE:04:77:3D
inet addr:10.244.1.0 Bcast:0.0.0.0 Mask:255.255.255.255
inet6 addr: fe80::84ab:eeff:fe04:773d/64 Scope:Link
UP BROADCAST RUNNING MULTICAST MTU:1450 Metric:1
RX packets:14 errors:0 dropped:0 overruns:0 frame:0
TX packets:10 errors:0 dropped:51 overruns:0 carrier:0
collisions:0 txqueuelen:0
RX bytes:925 (925.0 B) TX bytes:1101 (1.0 KiB)lo Link encap:Local Loopback
inet addr:127.0.0.1 Mask:255.0.0.0
inet6 addr: ::1/128 Scope:Host
UP LOOPBACK RUNNIN
6.资源优先级
BestEffort没有做任何资源限制,资源使用优先级最低
[root@k8s-master pod]# vim testpod.yaml
apiVersion: v1
kind: Pod
metadata:
labels:
run: testpod
name: testpod
spec:
hostNetwork: true
containers:
- image: busybox:latest
name: busybox
command:
- /bin/sh
- -c
- sleep 10000
apiVersion: v1
kind: Pod
metadata:
labels:
run: testpod
name: testpod
spec:
hostNetwork: true
containers:
- image: busybox:latest
name: busybox
command:
- /bin/sh
- -c
- sleep 10000
[root@k8s-master pod]# kubectl describe pods testpod | grep "QoS Class:"
QoS Class: BestEffort
Burstable 设定了资源限制,但是期望值和限制值不同,资源使用优先级次之
[root@k8s-master pod]# vim testpod.yaml
apiVersion: v1
kind: Pod
metadata:
labels:
run: testpod
name: testpod
spec:
hostNetwork: true
containers:
- image: busybox:latest
name: busybox
command:
- /bin/sh
- -c
- sleep 10000
apiVersion: v1
kind: Pod
metadata:
labels:
run: testpod
name: testpod
spec:
hostNetwork: true
containers:
- image: busybox:latest
name: busybox
command:
- /bin/sh
- -c
- sleep 10000
resources:
limits:
cpu: 700m
memory: 200M
requests:
cpu: 500m
memory: 100M[root@k8s-master pod]# kubectl apply -f testpod.yaml
pod/testpod unchanged[root@k8s-master pod]# kubectl describe pods testpod | grep "QoS Class:"
QoS Class: Burstable
Guaranteed期望值和最大使用限制相同,优先级最高
[root@k8s-master pod]# vim testpod.yaml
apiVersion: v1
kind: Pod
metadata:
labels:
run: testpod
name: testpod
spec:
hostNetwork: true
containers:
- image: busybox:latest
name: busybox
command:
- /bin/sh
- -c
- sleep 10000
apiVersion: v1
kind: Pod
metadata:
labels:
run: testpod
name: testpod
spec:
hostNetwork: true
containers:
- image: busybox:latest
name: busybox
command:
- /bin/sh
- -c
- sleep 10000
resources:
limits:
cpu: 500m
memory: 100M
requests:
cpu: 500m
memory: 100M
[root@k8s-master pod]# kubectl apply -f testpod.yaml
pod/testpod created
[root@k8s-master pod]# kubectl describe pods testpod | grep "QoS Class:"
QoS Class: Guaranteed
7.容器重启规则
重启规则只作用于Pod 内容器退出时,控制是否重启容器(注意:控制器 Deployment/StatefulSet 等会重建 Pod,和这个不是一回事) Always(默认值)无论容器正常退出、异常崩溃,只要容器终止,就自动重启容器 | OnFailure 只有异常退出(退出码≠0)才重启;正常退出(退出码 = 0)不重启 | Never 容器不管正常 / 异常退出,一律不重启 |
Always 无论什么原因都会从新运行pod
apiVersion: v1
kind: Pod
metadata:
labels:
run: testpod
name: testpod
spec:
hostNetwork: true
restartPolicy: Always
containers:
- image: busybox:latest
name: busybox
command:
- /bin/sh
- -c
- sleep 60
OnFailure 非正常管关闭会从其pod
apiVersion: v1
kind: Pod
metadata:
labels:
run: testpod
name: testpod
spec:
hostNetwork: true
restartPolicy: OnFailure
containers:
- image: busybox:latest
name: busybox
command:
- /bin/sh
- -c
- sleep 30
Never pod关闭后不重启
apiVersion: v1
kind: Pod
metadata:
labels:
run: testpod
name: testpod
spec:
hostNetwork: true
restartPolicy: Never
containers:
- image: busybox:latest
name: busybox
command:
- /bin/sh
- -c
- sleep 30
五.pod的生命周期
1.init容器
Init 容器会优先顺序执行,必须成功退出后,主容器才会启动;这个例子里 init 容器循环等待/testfile文件存在,文件出现才启动 myapp 主容器。
[root@k8s-master pod]# kubectl run webserver --image myapp:v1 --dry-run=client -o yaml > init-example.yml
[root@k8s-master pod]# vim init-example.yml
apiVersion: v1
kind: Pod
metadata:
labels:
run: webserver
name: webserver
spec:
initContainers:
- name: busybox
image: busybox:latest
command:
- /bin/sh
- -c
- "until test -e /testfile;do echo wating for myservice; sleep 2;done"
containers:
- image: myapp:v1
name: webserver
restartPolicy: Always
[root@k8s-master pod]# watch -n 1 kubectl get pods -o wide[root@k8s-master pod]# kubectl apply -f init-example.yml
pod/webserver created[root@k8s-master pod]# kubectl exec -it pods/webserver -c busybox -- /bin/sh
/ #
/ # touch /testfile
2.Livness存活探针
存活探针 (livenessProbe) 用来检测容器内应用是否正常运行,应用卡死 / 不可用但进程没退出时,K8s 会重启容器;当前 yaml 没配置存活探针,所以 nginx 停了 Pod 依旧显示 Running,无法自愈。
[root@k8s-master pod]# kubectl run testpod --image myapp:v1 --dry-run=client -o yaml > livness-example.yaml
[root@k8s-master pod]# vim livness-example.yaml
apiVersion: v1
kind: Pod
metadata:
labels:
run: webserver
name: webserver
spec:
containers:
- image: myapp:v1
name: webserver
command: ["/bin/sh", "-c"]
args:
- |
nginx -g "daemon off;"
sleep 10000
restartPolicy: Always[root@k8s-master pod]# kubectl apply -f livness-example.yaml
#监控程序
[root@k8s-master pod]# watch -n 1 kubectl get pods -o wide#测试操作:
[root@k8s-master pod]# kubectl exec -it pods/webserver -c webserver -- /bin/sh
# nginx -s stop#查看pod的状态仍然是runing,但是访问此pod时访问失败
[root@k8s-node2 ~]# curl 10.244.5.47
curl: (7) Failed to connect to 10.244.5.47 port 80: 拒绝连接
3.存活探针livness
基于 tcpSocket 的存活探针会持续检测 80 端口连通性,nginx 停止后端口探测失败,达到失败阈值就自动重启容器,端口恢复可访问。
[root@k8s-master pod]# kubectl delete -f livness-example.yaml --force
kind: Pod
metadata:
labels:
run: webserver
name: webserver
spec:
containers:
- image: myapp:v1
name: testpod
command: ["/bin/sh", "-c"]
args:
- |
nginx -g "daemon off;"
sleep 10000
livenessProbe:
tcpSocket:
port: 80
initialDelaySeconds: 3
periodSeconds: 1
timeoutSeconds: 1
restartPolicy: Always
[root@k8s-master pod]# kubectl get pods -o wide -w[root@k8s-master pod]# kubectl exec -it pods/webserver -c webserver -- /bin/sh
/ # nginx -s stop
2026/08/23 03:59:45 [notice] 15#15: signal process started/ # exit
[root@k8s-master pod]# curl 10.244.5.66
curl: (7) Failed to connect to 10.244.5.66 port 80: 拒绝连接
[root@k8s-master pod]# curl 10.244.5.66
curl: (7) Failed to connect to 10.244.5.66 port 80: 拒绝连接
[root@k8s-master pod]# curl 10.244.5.66
curl: (7) Failed to connect to 10.244.5.66 port 80: 拒绝连接
[root@k8s-master pod]# curl 10.244.5.66
curl: (7) Failed to connect to 10.244.5.66 port 80: 拒绝连接
[root@k8s-master pod]# curl 10.244.5.66
Hello MyApp | Version: v1 | <a href="hostname.html">Pod Name</a>
4.readness 就绪探针
就绪探针 readinessProbe 判断 Pod 业务是否就绪,探测失败时会把该 Pod 从 Service 的 Endpoints 中剔除,不再接收流量,但不会重启容器。
实验现象梳理
① 无就绪探针
Pod 正常 Running,不管页面文件丢失、业务报错,IP 一直留在 Service 的 Endpoints 里。 访问 Service 时流量依然转发给这个异常 Pod,直接返回 403 错误。
② 配置 httpGet 就绪探针(检测/index.html)
- 正常:探测成功 → Pod 就绪 (1/1),加入 Endpoints,接收流量
- 删除
index.html:httpGet 访问/index.html失败 → Pod 变为0/1 Ready,自动从 Service Endpoints 移除,流量不会转发过来 - 恢复 index.html 文件:探测成功 → 重新加入 Endpoints,恢复流量
没有就绪探针
[root@k8s-master pod]# vim readness-example.yml
apiVersion: v1
kind: Pod
metadata:
labels:
run: webserver
name: webserver
spec:
containers:
- image: myapp:v1
name: webserver
restartPolicy: Always---
apiVersion: v1
kind: Service
metadata:
labels:
run: webserver
name: webserver
spec:
ports:
- port: 80
protocol: TCP
targetPort: 80
selector:
run: webserver[root@k8s-master pod]# kubectl apply -f readness-example.yml
pod/webserver unchanged
service/webserver created
[root@k8s-master pod]# kubectl describe svc webserver
Name: webserver
Namespace: default
Labels: run=webserver
Annotations: <none>
Selector: run=webserver
Type: ClusterIP
IP Family Policy: SingleStack
IP Families: IPv4
IP: 10.102.162.217
IPs: 10.102.162.217
Port: <unset> 80/TCP
TargetPort: 80/TCP
Endpoints: 10.244.5.67:80
Session Affinity: None
Internal Traffic Policy: Cluster
Events: <none>#删除默认发布文件
[root@k8s-master ~]# kubectl exec -it pods/webserver -c webserver -- /bin/sh
/ # cd /usr/share/nginx/
/usr/share/nginx # ls
html
/usr/share/nginx # cd html/
/usr/share/nginx/html # ls
50x.html index.html
/usr/share/nginx/html # rm -fr index.html
/usr/share/nginx/html # ls
50x.html
/usr/share/nginx/html ##验证是否在访问service时endpoints中被下架
[root@k8s-master pod]# kubectl describe svc webserver
Name: webserver
Namespace: default
Labels: run=webserver
Annotations: <none>
Selector: run=webserver
Type: ClusterIP
IP Family Policy: SingleStack
IP Families: IPv4
IP: 10.102.162.217
IPs: 10.102.162.217
Port: <unset> 80/TCP
TargetPort: 80/TCP
Endpoints: 10.244.5.67:80 #还在
Session Affinity: None
Internal Traffic Policy: Cluster
Events: <none>
#业务问题
[root@k8s-master pod]# curl 10.102.162.217
<html>
<head><title>403 Forbidden</title></head>
<body bgcolor="white">
<center><h1>403 Forbidden</h1></center>
<hr><center>nginx/1.12.2</center>
</body>
</html>
有就绪探针情况
[root@k8s-master pod]# vim readness-example.yml
apiVersion: v1
kind: Pod
metadata:
labels:
run: webserver
name: webserver
spec:
containers:
- image: myapp:v1
name: webserver
readinessProbe:
httpGet:
path: /index.html
port: 80
initialDelaySeconds: 3 # 启动3s后开始探测periodSeconds: 2 # 每2s探测一次
timeoutSeconds: 1 # 1s没响应算失败
restartPolicy: Always
---
apiVersion: v1
kind: Service
metadata:
labels:
run: webserver
name: webserver
spec:
ports:
- port: 80
protocol: TCP
targetPort: 80
selector:
run: webserver
[root@k8s-master pod]# kubectl get pods -o wide
NAME READY STATUS RESTARTS AGE IP NODE NOMINATED NODE READINESS GATES
webserver 1/1 Running 0 7s 10.244.5.69 k8s-node2 <none> <none>
[root@k8s-master pod]# kubectl describe svc webserver
Name: webserver
Namespace: default
Labels: run=webserver
Annotations: <none>
Selector: run=webserver
Type: ClusterIP
IP Family Policy: SingleStack
IP Families: IPv4
IP: 10.110.248.237
IPs: 10.110.248.237
Port: <unset> 80/TCP
TargetPort: 80/TCP
Endpoints: 10.244.5.69:80
Session Affinity: None
Internal Traffic Policy: Cluster
Events: <none>
#复现问题
/usr/share/nginx/html # command terminated with exit code 137
[root@k8s-master ~]#
/ # rm -fr /usr/share/nginx/html/index.html
/ # echo timinglee > /usr/share/nginx/html/index.html
/ #


 扫一扫
扫一扫


 4万+
4万+

 被折叠的 条评论
为什么被折叠?
被折叠的 条评论
为什么被折叠?
 到【灌水乐园】发言


