


 博客介绍了Python中matplotlib库的使用,包括画散点图、彩色变换,设置坐标轴、legend等;提及了try用法;还介绍了python - opencv读取摄像头,包括set()、isOpend()等常用方法,以及使用opencv写入视频的注意事项。
用matplotlib库画散点图,彩色变换
https://www.cnblogs.com/OliverQin/p/7965435.html
matplotlib库的使用
常用来做数据
x = np.linspace(-1,2,5)
y1 = x*2+1
创建画布
plt.figure()
设置坐标取值范围
plt.xlim((-1,2))
plt.ylim((-2,3))
设置坐标轴显示出来的坐标点,比如尺子显示出来的(1,2,3,4…),这个x轴就是显示的-2,1…,y轴在-2,-1…处显示的 really bad …
注意这个really\ bad 如果去掉\ 就会连在一起,可能是正则化的部分先不管
 plt.gca()获得坐标轴的句柄,它就同时代表了上下左右四个轴,然后拿这个句柄操作坐标轴就好,set_color设置颜色('none’就是默认白色,看起来就不显示了)
xaxis是说坐标轴上的数据显示
spines是坐标轴本身
spines[aaa].set_position((‘xxx’,0))是说设置aaa坐标轴在xxx表示的位置,取data就是数据决定,取axes就是百分比决定
ax = plt.gca()
ax.spines[‘right’].set_color(‘none’)
ax.spines[‘top’].set_color(‘none’)
ax.xaxis.set_ticks_position(‘bottom’)
ax.spines[‘bottom’].set_position((‘data’,0))
legend用法 就是这个东西
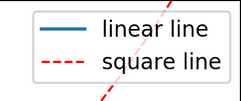
legend取决于label,在画图的时候就要指定出来
这里l1, l2,后面的逗号是因为输出的是一个list
l1, = plt.plot(x, y1, label=‘linear line’)
l2, = plt.plot(x, y2, color=‘red’, linewidth=1.0, linestyle=’–’, label=‘square line’)
然后标出legend
plt.legend(loc=‘upper right’)#loc表示位置,这里是在右上角
散点图
n = 1024 # data size
X = np.random.normal(0, 1, n) # 每一个点的X值
Y = np.random.normal(0, 1, n) # 每一个点的Y值
T = np.arctan2(Y,X) # for color value
plt.scatter(X, Y, s=75, c=T, alpha=.5)
plt.xlim(-1.5, 1.5)
plt.xticks(()) # ignore xticks
plt.ylim(-1.5, 1.5)
plt.yticks(()) # ignore yticks
plt.show()
try用法
https://www.runoob.com/python/python-exceptions.html
python-opencv读取摄像头
主要是里面的
set()
isOpend()
比较常用
import cv2
import numpy as np
cap_1 = cv2.VideoCapture(1)
cap_1.set(3,320)
cap_1.set(4,240)
num = 1
while True:
    if cap_1.isOpened():
        flag_1, img_1 = cap_1.read()
        cv2.imwrite("/home/xbw/robot_com/picture_6_4/" + "caiji" + str(num) + ".jpg",img_1)
        num += 1
        cv2.imshow("camera_1",img_1)
        print("save picture "+ str(num-1))
        k = cv2.waitKey(200) & 0xff
        if k == ord('q'):
            break
        elif k == ord('p'):
            cv2.waitKey()
    else:
        print("there is sth wrong!!!")
cap_1.release()
cv2.destroyAllWindows()
使用opencv写入视频
注意size是 宽乘高
#take pic to video
import os
import cv2
fps = 15
size = (320,240)
save_name = 111
save_name_end = ".avi"
fourcc = cv2.VideoWriter_fourcc('M','J','P','G')
source_path = "/home/xbw/robot_com/train/"
target_path = "/home/xbw/robot_com/gif_result/"
#os.mkdir(target_path)
path_list = os.listdir(source_path)
path_list.sort(key=lambda x: int(x[:-4]))
#cv2.namedWindow("result",cv2.WINDOW_NORMAL)
video_writer = cv2.VideoWriter(target_path + str(save_name) + save_name_end, cv2.VideoWriter_fourcc('M','J','P','G'), fps, size)
#video_writer = cv2.VideoWriter(target_path + str(save_name) + save_name_end,cv2.VideoWriter_fourcc(*'XVID'), fps, size)
for filename in path_list:
#    if filename == "100.bmp":
#        break
    print(source_path + filename)
    img = cv2.imread(source_path + filename)
#    result = SrcnnModel.predict(img).reshape(1080,1920,3)
#    cv2.imwrite(target_path + str(save_name) + save_name_end , result*255)
#    print(result.dtype)
    cv2.imshow("result",img)
    cv2.waitKey(1)
#    result = result*255
#    result = result.astype(np.uint8)
    video_writer.write(img)
#    cv2.imshow("result",result/255)
#    cv2.waitKey(1)
#    save_name += 1
video_writer.release()


 扫一扫
扫一扫


 9523
9523

 被折叠的 条评论
为什么被折叠?
被折叠的 条评论
为什么被折叠?
 到【灌水乐园】发言


