


原因:由于Activity只能到onResume时,才能展示到前台,所以,如果为MAIN activity设置背景的话,无论onCreate-onResume速度多快,都会出现短暂的白屏。
解决办法:
1:只要在配置文件内activity属性配置内加上android:theme="@android:style/Theme.Translucent" 就好了。
这样就调用了android的透明样式!
2:通过style样式来解决问题,在解决透明问题并且设定了NoTitle
<style name="DlgWithoutBorderTitlebar" parent="android:style/Theme.Dialog">
<item name="android:windowFrame">@null</item>
<item name="android:windowNoTitle">true</item>
<item name="android:background">#00000000</item>
<item name="android:windowBackground">@android:color/transparent</item>
<item name="android:colorBackgroundCacheHint">@null</item>
<item name="android:windowIsTranslucent">true</item>
</style>
主题Theme就是用来设置界面UI风格,可以设置整个应用或者某个活动Activity的界面风格。在Android SDK中内置了下面的Theme,可以按标题栏Title Bar和状态栏Status Bar是否可见来分类:
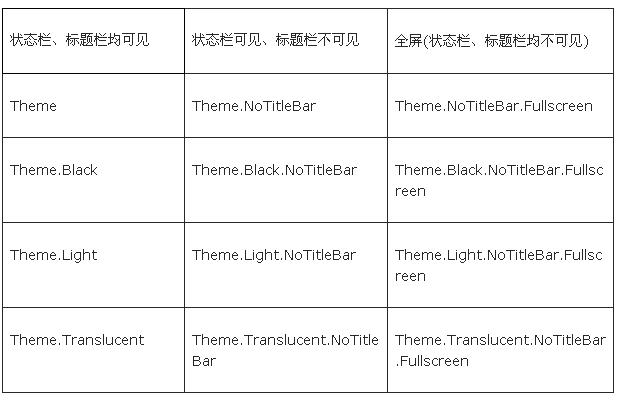
- •android:theme="@android:style/Theme.Dialog" 将一个Activity显示为能话框模式
- •android:theme="@android:style/Theme.NoTitleBar" 不显示应用程序标题栏
- •android:theme="@android:style/Theme.NoTitleBar.Fullscreen" 不显示应用程序标题栏,并全屏
- •android:theme="Theme.Light" 背景为白色
- •android:theme="Theme.Light.NoTitleBar" 白色背景并无标题栏
- •android:theme="Theme.Light.NoTitleBar.Fullscreen" 白色背景,无标题栏,全屏
- •android:theme="Theme.Black" 背景黑色
- •android:theme="Theme.Black.NoTitleBar" 黑色背景并无标题栏
- •android:theme="Theme.Black.NoTitleBar.Fullscreen" 黑色背景,无标题栏,全屏
- •android:theme="Theme.Wallpaper" 用系统桌面为应用程序背景
- •android:theme="Theme.Wallpaper.NoTitleBar" 用系统桌面为应用程序背景,且无标题栏
- •android:theme="Theme.Wallpaper.NoTitleBar.Fullscreen" 用系统桌面为应用程序背景,无标题栏,全屏
- •android:theme="Translucent" 半透明
- •android:theme="Theme.Translucent.NoTitleBar" 半透明、无标题栏
- •android:theme="Theme.Translucent.NoTitleBar.Fullscreen" 半透明、无标题栏、全屏
- •android:theme="Theme.Panel"
- •android:theme="Theme.Light.Panel"
Drawable资源是对图像的一个抽象,你可以通过getDrawable(int)得到并绘制到屏幕上。这里有几种不同类型的Drawable:
Bitmap File
一个Bitmap图像文件(.png、.jpg或.gif)。BitmapDrawable。
Nine-Patch File
一个带有伸缩区域的PNG文件,可以基于content伸缩图片(.9.png)。NinePatchDrawable。
State List
一个XML文件,为不同的状态引用不同的Bitmap图像(例如,当按钮按下时使用不同的图片)。StateListDrawable。
Color
定义在XML中的资源,指定一个矩形(圆角可以有)的颜色。PaintDrawable。
Shape
一个XML文件,定义了一个几何形状,包括颜色和渐变。ShapeDrawable。
AnimationDrawable资源的说明在【Animation资源】文章中。
Bitmap File
基本的Bitmap图像。Android支持几种不同格式的Bitmap文件:.png(最佳)、.jpg(可接受)、.gif(不要)。
注意:Bitmap文件可能会被aapt工具进行无损图像压缩优化。例如,一个真彩色的PNG(不超过256色)可能会被转换成一个带有颜色板的8位PNG。这样做能保证图片质量一样,但减少内存占用。因此,需要了解的是放在这个文件夹下的二进制图像在编译时可能会发生变更。如果你打算以位流方式读取图像来转化成Bitmap的话,可以把它们放到res/raw文件中,在这里,它们不会被优化。
File Location:
res/drawable/filename.png (.png, .jpg, 或.gif)
文件名会被当作资源ID使用。
Complied Resource Datatype:
指向BitmapDrawable的资源指针。
Resource Reference:
R.drawable.filename(Java)
@[package:]drawable/filename(XML)
Example:
在res/drawable/myimage.png位置保存了一张图片,在Layout XML中可以应用这个图片到一个View上:
<ImageView
android:layout_height="wrap_content"
android:layout_width="wrap_content"
android:src="@drawable/myimage" />
下面的代码可以以Drawable方式得到图片:
Resources res = getResources();
Drawable drawable = res.getDrawable(R.drawable.myimage);
Nine-Patch File
NinePatch是一种PNG图像,可以定义拉伸区域,当View的content超出图像边界的话,Android会拉伸它。典型用法是把这个图像设置为View的背景,而这个View至少有一个尺寸设置为“wrap_content”,当这个View变大来容纳content时,Nine-Patch图像也会拉伸来匹配View的大小。
File Location:
res/drawable/filename.9.png
文件名将被当作资源ID使用。
Complied Resource Datatype:
指向NinePatchDrawable的资源指针。
Resource Reference:
R.drawable.filename(Java)
@[package:]drawable/filename(XML)
Example:
在res/drawable/myninepatch.9.png位置保存了一张图片,在Layout XML中可以应用这个图片到一个View上:
<Button
android:layout_height="wrap_content"
android:layout_width="wrap_content"
android:background="@drawable/myninepatch" />
State List
StateListDrawable是定义在XML中的Drawable对象,能根据状态来呈现不同的图像。例如,Button存在多种不同的状态(pressed、focused或other),使用StateListDrawable,你可以为Button的每个状态提供不同的按钮图像。
你可以在XML文件中描述状态列表。在<selector>元素里的每个<item>代表每个图像。每个<item>使用不同的特性来描述使用的时机。
当每次状态改变时,StateList都会从上到下遍历一次,第一个匹配当前状态的item将被使用——选择的过程不是基于“最佳匹配”,只是符合state的最低标准的第一个item。
File Location
Res/drawable/filename.xml
文件名将被当作资源ID使用。
Complied Resource Datatype:
指向StateListDrawable的资源指针。
Resource Reference:
R.drawable.filename(Java)
@[package:]drawable/filename(XML)
Syntax:
<?xml version="1.0" encoding="utf-8"?>
<selector xmlns:android="http://schemas.android.com/apk/res/android"
android:constantSize=["true" | "false"]
android:dither=["true" | "false"]
android:variablePadding=["true" | "false"] >
<item
android:drawable="@[package:]drawable/drawable_resource"
android:state_pressed=["true" | "false"]
android:state_focused=["true" | "false"]
android:state_selected=["true" | "false"]
android:state_active=["true" | "false"]
android:state_checkable=["true" | "false"]
android:state_checked=["true" | "false"]
android:state_enabled=["true" | "false"]
android:state_window_focused=["true" | "false"] />
</selector>
Elements:
<selector>
必须。必须是根元素。可以包含一个或多个<item>元素。
Attributes:
xmlns:android
String。必须。定义XML的命名空间,必须是
“http://schemas.android.com/apk/res/android”。
android:constantSize
Boolean。“true”表示随着状态变化,Drawable的大小保持不变(所有状态中最大的size);“false”表示大小会变化。默认是false。
android:dither
Boolean。“true”表示当Bitmap和屏幕的不是相同的像素设定时支持Bitmap抖动(例如,ARGB 8888的Bitmap和RGB 565的屏幕);“false”表示不支持。默认是“true”。
android:variablePadding
Boolean。“true”表示Drawable的Padding可以变化;“false”表示Padding保持相同(所有状态的最大Padding)。使能这一特征需要在状态变化时处理Layout,一般都不支持。默认值是false。
<item>
定义特定状态的Drawable,通过它的特性指定。必须是<selector>的子元素。
Attributes:
android:drawable
Drawable资源。必须。指向一个Drawable资源。
android:state_pressed
Boolean。“true”表示按下状态使用(例如按钮按下);“false”表示非按下状态使用。
android:state_focused
Boolean。“true”表示聚焦状态使用(例如使用滚动球/D-pad聚焦Button);“false”表示非聚焦状态使用。
android:state_selected
Boolean。“true”表示选中状态使用(例如Tab打开);“false”表示非选中状态使用。
android:state_checkable
Boolean。“true”表示可勾选状态时使用;“false”表示非可勾选状态使用。(只对能切换可勾选—非可勾选的构件有用。)
android:state_checked
Boolean。“true”表示勾选状态使用;“false”表示非勾选状态使用。
android:state_enabled
Boolean。“true”表示可用状态使用(能接收触摸/点击事件);“false”表示不可用状态使用。
android:window_focused
Boolean。“true”表示应用程序窗口有焦点时使用(应用程序在前台);“false”表示无焦点时使用(例如Notification栏拉下或对话框显示)。
注意:记住一点,StateList中第一个匹配当前状态的item会被使用。因此,如果第一个item没有任何状态特性的话,那么它将每次都被使用,这也是为什么默认的值必须总是在最后(如下面的例子所示)。
Example:
XML文件保存在res/drawable/button.xml。
<?xml version="1.0" encoding="utf-8"?>
<selector xmlns:android="http://schemas.android.com/apk/res/android">
<item android:state_pressed="true"
android:drawable="@drawable/button_pressed" /> <!-- pressed -->
<item android:state_focused="true"
android:drawable="@drawable/button_focused" /> <!-- focused -->
<item android:drawable="@drawable/button_normal" /> <!-- default -->
</selector>
Layout XML将这个Drawable应用到一个View上:
<ImageView
android:layout_height="wrap_content"
android:layout_width="wrap_content"
android:src="@drawable/button" />
Color
定义在XML中的color,可以当作Drawable使用,来填充矩形区域(圆角可以有)。这种Drawable的行为很像是颜色填充。
注意:Color Drawable是一种简单的资源,可以使用name特性来引用其值(不再是XML文件的名)。因此,你可以在一个XML文件中的<resources>元素下添加多个Color Drawable。
File Location:
res/drawable/filename.xml
文件名随意。元素的name将会当作资源ID使用。
Complied Resource Datatype:
指向PaintDrawable资源的指针。
Resource Reference:
R.drawable.color_name(Java)
@[package:]drawable/color_name(XML)
Syntax:
<?xml version="1.0" encoding="utf-8"?>
<resources>
<drawable name="color_name"
>color</drawable>
</resources>
Elements:
<resources>
必须。必须是根节点。
没有特性。
<drawable>
一个color Drawable。其值可以是任何有效的十六进制颜色值或者Color资源。Color值总是以“#”开头,后面紧跟Alpha-Red-Green-Blue信息,格式是:#RGB、#ARGB或者#AARRGGBB。
Attributes:
name
String。必须。Color的名字。这个名字将被当作资源ID使用。
Example:
XML文件保存在res/drawable/color.xml。
<?xml version="1.0" encoding="utf-8"?>
<resources>
<drawable name="solid_red">#f00</drawable>
<drawable name="solid_blue">#0000ff</drawable>
</resources>
Layout XML将会把这个Color Drawable应用到一个View上:
<TextView
android:layout_width="fill_parent"
android:layout_height="wrap_content"
android:background="@drawable/solid_blue" />
代码中获取Color Drawable并应用到View上:
Resources res = getResources();
Drawable redDrawable = res.getDrawable(R.drawable.solid_red);
TextView tv = (TextView) findViewByID(R.id.text);
tv.setBackground(redDrawable);
Shape
定义在XML中的几何形状。
File Location:
res/drawable/filename.xml
文件名将被当作资源ID使用。
Complied Resource Datatype:
指向ShapeDrawable的资源指针。
Resource Reference:
R.drawable.filename(Java)
@[package:]drawable/filename(XML)
Syntax:
<?xml version="1.0" encoding="utf-8"?>
<shape xmlns:android="http://schemas.android.com/apk/res/android"
android:shape=["rectangle" | "oval" | "line" | "ring"] >
<gradient
android:angle="integer"
android:centerX="integer"
android:centerY="integer"
android:centerColor="integer"
android:endColor="color"
android:gradientRadius="integer"
android:startColor="color"
android:type=["linear" | "radial" | "sweep"]
android:usesLevel=["true" | "false"] />
<solid
android:color="color" />
<stroke
android:width="integer"
android:color="color"
android:dashWidth="integer"
android:dashGap="integer" />
<padding
android:left="integer"
android:top="integer"
android:right="integer"
android:bottom="integer" />
<corners
android:radius="integer"
android:topLeftRadius="integer"
android:topRightRadius="integer"
android:bottomLeftRadius="integer"
android:bottomRightRadius="integer" />
</shape>
Elements:
<shape>
必须。必须是根元素。
Attributes:
android:shape
Keyword。定义Shape的类型。有效的值包括:
Value
Desciption
"rectangle"
矩形。默认形状。
"oval"
椭圆。
"line"
水平直线。需要<stroke>元素定义线的宽度。
"ring"
环形。
接下来的特性只能在android:shape=”ring”时使用:
android:innerRadius
Dimension。内环的半径。
android:innerRadiusRatio
Float。以环的宽度比率来表示内环的半径。例如,如果android:innerRadiusRatio=”5”,内环半径等于环的宽度除以5。这个值可以被android:innerRadius覆盖。默认值是9。
android:thickness
Dimension。环的厚度。
android:thicknessRatio
Float。以环的宽度比率来表示环的厚度。例如,如果android:thicknessRatio=”2”,厚度就等于环的宽度除以2。这个值可以被android:thickness覆盖。默认值是3。
android:useLevel
Boolean。“true”表示可以当作LevelListDrawable使用。一般都为“false”。
<gradient>
为Shape指定渐变色。
Attributes:
android:angle
Integer。渐变色的角度值。0表示从左到右,90表示从下到上。必须是45的倍数,默认是0。
android:centerX
Float。渐变色中心的X相对位置(0-1.0)。当android:type=”linear”时无效。
android:centerY
Float。渐变色中心的Y相对位置(0-1.0)。当android:type=”linear”时无效。
android:centerColor
Color。可选的颜色,出现在start和end颜色之间。
android:endColor
Color。end颜色。
android:gradientRadius
Float。渐变色的半径。当android:type=”radial”时有效。
android:startColor
Color。start颜色。
android:type
Keyword。渐变色的样式。有效值为:
Value
Description
"linear"
线性渐变,默认值。
"radial"
环形渐变。start颜色是处于中间的颜色。
"sweep"
sweep渐变
android:useLevel
Boolean。“true”表示可以当作LevelListDrawable使用。
<solid>
填充shape的单一色。
Attributes:
android:color
Color。这个颜色会应用到shape上。
<stroke>
shape的线形。
Attributes:
android:width
Dimension。线的厚度。
android:color
Color。线的颜色。
android:dashGap
Dimension。间断线间的距离。仅在android:dashWidth设定时有效。
android:dashWidth
Dimension。间断线的大小。仅在android:dashGap设定时有效。
<padding>
内部View元素的边距。
Attributes:
android:left
Dimension。左内边距。
android:top
Dimension。上内边距。
android:right
Dimension。右内边距。
android:bottom
Dimension。下内边距。
<corners>
为shape创建圆角。当shape是一个矩形时有效。
Attributes:
android:radius
Dimension。圆角的半径。会被下面的特性覆盖。
android:topLeftRadius
Dimension。左上圆角半径。
android:topRightRadius
Dimension。右上圆角半径。
android:bottomLeftRadius
Dimension。左下圆角半径。
android:bottomRightRadius
Dimension。右下圆角半径。
Examples:
XML文件保存在res/drawable/gradient_box.xml
<?xml version="1.0" encoding="utf-8"?>
<shape xmlns:android="http://schemas.android.com/apk/res/android"
android:shape="rectangle">
<gradient
android:startColor="#FFFF0000"
android:endColor="#80FF00FF"
android:angle="45"/>
<padding android:left="7dp"
android:top="7dp"
android:right="7dp"
android:bottom="7dp" />
<corners android:radius="8dp" />
</shape>
Layout XML将被当作ShapeDrawable应用到一个View上:
<TextView
android:background="@drawable/gradient_box"
android:layout_height="wrap_content"
android:layout_width="wrap_content" />
代码中也可以获得ShapeDrawable,然后应用到View上:
Resources res = getResources();
Drawable shape = res. getDrawable(R.drawable.gradient_box);
TextView tv = (TextView)findViewByID(R.id.textview);
tv.setBackground(shape);
在做搜芽的过程中,发现那个外包人缘做的不行,因为启动的时候会停顿,然后白屏一会,联想到几个月前我在我的三僚企业通信软件里面拉起9K-Mail的时候也会黑屏,所以决定学习一下。解决一下。这不,万能的网络还是非常有用的。
在这里总结一下。
(参考及转载:http://www.2cto.com/kf/201409/339293.html)
欢迎页启动的线程由于请求和处理的数据量过大而,导致欢迎页在出现之前界面上会有一个短暂的白色闪屏停留,当然白色闪屏的停留是因为 application 的主题样式android:theme=@style/AppTheme 使用了 Theme.Light 题导致的,Light 样式的 windowBackground、colorBackground、colorForeground 等属性的值均为 light 也就是白色偏亮,所以才会出现白色闪屏。下面是我的 APP 出现白色闪屏时样式引用的代码:
|
1
|
<style name=
"AppTheme"
parent=
"android:Theme.Light"
type=
"text/css"
><br><br> </style>
|
简单的修改后,闪屏颜色为黑色,代码如下:
|
1
|
<style name=
"AppTheme"
parent=
"android:style/Theme.Black.NoTitleBar.Fullscreen"
type=
"text/css"
> </style>
|
代码修改后引用的样式为黑色主题,但欢迎页仍然会有黑色闪屏短暂的停留。继续进行修改,设置透明属性为 true,代码如下:
|
1
|
<style name=
"AppTheme"
parent=
"android:style/Theme.Black.NoTitleBar.Fullscreen"
type=
"text/css"
><item name=android:windowIsTranslucent>
true
</item></style>
|
经过这次的修改之后黑色闪屏现象消失了,最终达到了自己理想的效果。最后,经过查阅资料发现已经有人总结和处理过这类问题了,并且给出了优缺点的分析,我在这里以我的理解对其进行引用。
原来避免黑色闪屏有2种方法,分别为:1.为 Theme 设置背景图;2.为 Theme 设置透明属性。显然我采用的是第二种方式,先分别看看这2种方式所引用的代码:
|
1
|
<!-- 为 Theme 设置背景图 --><style name=
"AppTheme"
parent=
"android:style/Theme.Black.NoTitleBar.Fullscreen"
type=
"text/css"
><item name=android:windowBackground>
@drawable
/splash_bg</item></style>
|
|
1
|
<!-- 为 Theme 设置透明属性 --><style name=
"AppTheme"
parent=
"android:style/Theme.Black.NoTitleBar.Fullscreen"
type=
"text/css"
><item name=android:windowIsTranslucent>
true
</item></style>
|
上面的2种 Theme 中,为 Theme 设置背景图后程序在启动的时候,会首先显示这张图,避免发生黑屏;为 Theme 设置透明属性,程序启动后不会黑屏而是透明,等到界面初始化完成后才一次性显示出来。下面是两种方式的优缺点:
- 为 Theme 设置背景图 给人程序启动快的感觉,界面先显示背景图,然后再刷新其他界面控件,刷新不同步。
- 为 Theme 设置透明属性 给人程序启动慢的感觉,界面会一次性刷出来,刷新同步。
但是问题有出现了,原先在配置了activity的切换动画效果,设置完android:windowIsTranslucent=true之后切换动画失效了。暂时我也不知道android系统的theme属性之间关系的错综复杂,继承来继承去的。。。为什么会出现这种问题,不过还好无意间找到了解决办法
12345678910111213141516<style name="AppTheme"parent="AppBaseTheme"type="text/css"><!-- <item name=android:windowAnimationStyle>@style/Animation.Activity.Style</item> --><item name=android:windowAnimationStyle>@style/Animation.Activity.Translucent.Style</item><item name=android:windowBackground>@android:color/transparent</item><item name=android:windowIsTranslucent>true</item></style><style name="Animation.Activity.Style"parent="@android:style/Animation.Activity"type="text/css"><item name=android:activityOpenEnterAnimation>@anim/base_slide_right_in</item><item name=android:activityOpenExitAnimation>@anim/base_stay_orig</item><item name=android:activityCloseEnterAnimation>@anim/base_stay_orig</item><item name=android:activityCloseExitAnimation>@anim/base_slide_right_out</item><item name=android:taskOpenEnterAnimation>@anim/base_slide_right_in</item><item name=android:taskOpenExitAnimation>@anim/base_stay_orig</item><item name=android:taskCloseEnterAnimation>@anim/base_stay_orig</item><item name=android:taskCloseExitAnimation>@anim/base_slide_right_out</item><item name=android:taskToFrontEnterAnimation>@anim/base_slide_right_in</item><item name=android:taskToFrontExitAnimation>@anim/base_stay_orig</item><item name=android:taskToBackEnterAnimation>@anim/base_stay_orig</item><item name=android:taskToBackExitAnimation>@anim/base_slide_right_out</item></style><style name="Animation.Activity.Translucent.Style"parent="@android:style/Animation.Translucent"type="text/css"><item name=android:windowEnterAnimation>@anim/base_slide_right_in</item><item name=android:windowExitAnimation>@anim/base_slide_right_out</item></style>
配置style继承的parent为12<style name="Animation.Activity.Translucent.Style"parent="@android:style/Animation.Translucent"type="text/css"><item name=android:windowEnterAnimation>@anim/base_slide_right_in</item><item name=android:windowExitAnimation>@anim/base_slide_right_out</item></style>
然后让apptheme的1android:windowAnimationStyle为上面的style123<style name="AppTheme"parent="AppBaseTheme"type="text/css"><item name=android:windowAnimationStyle>@style/Animation.Activity.Translucent.Style</item><item name=android:windowBackground>@android:color/transparent</item><item name=android:windowIsTranslucent>true</item></style>
如果想在所有的activity切换时候使用该theme,可以配置application,也可以单个单个配置在activity里面。当然首页退出的时候可以单独配置MainActivity的退出动画和进入动画
1<style name="Animation.Activity.Translucent.Style.Main"parent="@android:style/Animation.Translucent"type="text/css"><item name=android:windowExitAnimation>@anim/slide_right_out</item></style>MainActivity的退出和进入动画可以引用系统提供的,但是好像在style里面配置引用不了有些系统的anim,
在文件夹sdkplatformsandroid-20data es下面,activity_open_enter.xml,activity_close_exit.xml可以直接拷贝到项目中,修改
单独写一个进入或者退出,然后其它默认。。。。。。。多动手,测试,如果有错误的地方麻烦留言一起交流,谢谢
前几天Boss就反应说,机器每次启动程序都会闪一下黑屏,这个客户不接受。没办法,只能想想怎么解决,最后找到了下面的方法。闪黑屏的原因主要是我们启动Activity的时候,需要跑完onCreate和onResume才会显示界面。也就是说需要处理一些数据后,才会显示。按照这种思路,是不是我把初始化的工作尽量减少就可以避免黑屏?事实是,就算你onCreate啥都不做,仍然会闪一下黑屏,因为初始化解析界面时需要一定时间。下面是解决办法:
(PS:新建的QQ群,有兴趣可以加入一起讨论:Android群:322599434)
1、自定义Theme

//Edited by mythou
//http://www.cnblogs.com/mythou/
//1、设置背景图Theme
<style name="Theme.AppStartLoad" parent="android:Theme">
    <item name="android:windowBackground">@drawable/ipod_bg</item>
    <item name="android:windowNoTitle">true</item>
</style>

//2、设置透明Theme
<style name="Theme.AppStartLoadTranslucent" parent="android:Theme">
    <item name="android:windowIsTranslucent">true</item>
    <item name="android:windowNoTitle">true</item>
</style>
上面我定义了两种Theme,第一种Theme就是设置一张背景图。当程序启动时,首先显示这张背景图,避免出现黑屏。第二种Theme是把样式设置为透明,程序启动后不会黑屏而是整个透明了,等到界面初始化完才一次性显示出来。下面说说两种方式的优缺点:
- Theme1 程序启动快,界面先显示背景图,然后再刷新其他界面控件。给人刷新不同步感觉。
- Theme2 给人程序启动慢感觉,界面一次性刷出来,刷新同步。
2、修改AndroidManifest.xml
为了使上面Theme生效,我们需要设置一些Activity的Theme
//Edited by mythou
//http://www.cnblogs.com/mythou/
<application
    android:allowBackup="true"
    android:icon="@drawable/ipod_icon"
    android:label="@string/app_name"
    android:launchMode="singleTask">

<!-- iPod主界面 -->
<activity
    android:name="com.apical.apicalipod.IPodMainActivity"
  <!-- 使用上面定义的样式 mythou-->
    android:theme="@style/Theme.AppStartLoad"
    android:label="@string/app_name" >
    <intent-filter>
    <action android:name="android.intent.action.MAIN" />
    <category android:name="android.intent.category.LAUNCHER" />
    </intent-filter>
</activity>

//......

</application>
- 可以在Activity里面增加上面自定义的样式。另外在Application里面增加也是可以的,而且是全局效果。
- 自定义Theme放在 /res/values/styles.xml 里面。如果没有这个文件,自己添加一个即可。
- 如果存在多个Activity切换,中间也可能会存在短暂黑屏问题。原因也是Activity启动的时候需要初始化加载数据,如果想避免这种情况,可以在你切换的Activity里面增加上面的样式。
- 上面两种样式都可以避免黑屏。可以实际测试一下你的程序选择一种效果。
- 这个只是把黑屏避免了,但是如果你程序初始化启动慢,还是会给人程序启动慢的感觉。需要自行优化程序初始化过程。
3、Theme属性详解
//Edited by mythou
//http://www.cnblogs.com/mythou/
android:theme="@android:style/Theme.Dialog" //Activity显示为对话框模式

android:theme="@android:style/Theme.NoTitleBar" //不显示应用程序标题栏

android:theme="@android:style/Theme.NoTitleBar.Fullscreen" //不显示应用程序标题栏,并全屏

android:theme="Theme.Light " //背景为白色

android:theme="Theme.Light.NoTitleBar" //白色背景并无标题栏

android:theme="Theme.Light.NoTitleBar.Fullscreen" //白色背景,无标题栏,全屏

android:theme="Theme.Black" //背景黑色

android:theme="Theme.Black.NoTitleBar" //黑色背景并无标题栏

android:theme="Theme.Black.NoTitleBar.Fullscreen" //黑色背景,无标题栏,全屏

android:theme="Theme.Wallpaper" //用系统桌面为应用程序背景

android:theme="Theme.Wallpaper.NoTitleBar" //用系统桌面为应用程序背景,且无标题栏

android:theme="Theme.Wallpaper.NoTitleBar.Fullscreen" //用系统桌面为应用程序背景,无标题栏,全屏

android:theme="Theme.Translucent" //透明背景

android:theme="Theme.Translucent.NoTitleBar" //透明背景并无标题

android:theme="Theme.Translucent.NoTitleBar.Fullscreen" //透明背景并无标题,全屏

android:theme="Theme.Panel " //面板风格显示

android:theme="Theme.Light.Panel" //平板风格显示
4、Theme和Style
Android里面除了Theme外还有Style,例如下面是Launcher里面配置workspace的一个Style
//Edited by mythou
//http://www.cnblogs.com/mythou/
  <style name="WorkspaceIcon">
        <item name="android:layout_width">match_parent</item>
        <item name="android:layout_height">match_parent</item>
        <item name="android:layout_gravity">center</item>
        <item name="android:gravity">center_horizontal</item>
        <item name="android:singleLine">true</item>
        <item name="android:ellipsize">marquee</item>
        <item name="android:textSize">12sp</item>
        <item name="android:textColor">#FFF</item>
        <item name="android:shadowRadius">2.0</item>
        <item name="android:shadowColor">#B0000000</item>
    </style>
Style可以理解为一组属性集合,方便不同的View设置使用,我们在View里面使用Style的时候,跟使用Theme是一样的应用方法。那么Style和Theme有什么区别?下面列出两者区别:
- 样式用在单独的View,如:Button、TextView等
- 主题通过AndroidManifest.xml中的<application>和<activity>用在整个应用或者某个 Activity,主题对整个应用或某个Activity存在全局性影响。
- 如果一个应用使用了主题,同时应用下的view也使用了样式,那么当主题与样式属性发生冲突时,样式的优先级高于主题。
上面就是通过Theme解决程序启动闪黑屏问题,并且讲解了Theme和Style,通过Theme配置,其实还可以做个欢迎页面。不过我们都希望程序启动速度越快越好,因此还是需要多多优化自己的程序。
Edited by mythou
原创博文,转载请标明出处:http://www.cnblogs.com/mythou/p/3196042.html

 1040
1040


 扫一扫
扫一扫


 被折叠的 条评论
为什么被折叠?
被折叠的 条评论
为什么被折叠?
 到【灌水乐园】发言


