


前三篇我们搭好了骨架,但还缺两块关键拼图:接口参数没有校验(前端传啥都信),接口没有文档(前端不知道该怎么调)。
本篇目标:用 class-validator 做参数校验,用 @nestjs/swagger 自动生成接口文档,并解决 v8+ 的 ESM 报错问题。
一、为什么需要参数校验
问题:现在我们的接口"来者不拒"。
@Post('user')
createUser(@Body() body: any) {
  return body;
}
前端传 {}、传 null、传 { name: 123 }(name 应该是字符串),后端全收,数据脏了都不知道。
企业级标准:后端必须校验参数,不合法直接拒绝。
怎么做? 用 class-validator + class-transformer + NestJS 内置的 ValidationPipe。
二、安装依赖
npm install class-validator class-transformer
class-validator:用装饰器定义校验规则。class-transformer:把普通对象转换成类实例(ValidationPipe需要)。
三、创建 DTO(数据传输对象)
DTO 是什么? 就是"定义接口参数长什么样"的类。
前端类比:就像 TypeScript 的 interface,但 DTO 是运行时的,能配合 class-validator 做校验。
创建文件 src/user/dto/create-user.dto.ts:
import { IsString, IsInt, Min, Max, IsNotEmpty } from 'class-validator';

export class CreateUserDto {
  @IsString({ message: 'name 必须是字符串' })
  @IsNotEmpty({ message: 'name 不能为空' })
  name: string;

  @IsInt({ message: 'age 必须是整数' })
  @Min(0, { message: 'age 不能小于 0' })
  @Max(150, { message: 'age 不能大于 150' })
  age: number;

  @IsString({ message: 'role 必须是字符串' })
  role?: string;  // 可选字段
}
逐行解释:
@IsString():校验这个字段必须是字符串。@IsNotEmpty():校验不能为空。@IsInt():校验必须是整数。@Min()/@Max():校验数值范围。message:校验失败时的提示信息。?:表示可选字段。
四、启用全局 ValidationPipe
打开 src/main.ts,添加全局校验管道:
import { NestFactory } from '@nestjs/core';
import { AppModule } from './app.module';
import { ValidationPipe } from '@nestjs/common';
import { TransformInterceptor } from './common/interceptors/transform.interceptor';
import { HttpExceptionFilter } from './common/filters/http-exception.filter';

async function bootstrap() {
  const app = await NestFactory.create(AppModule);

  // 启用全局参数校验
  app.useGlobalPipes(
    new ValidationPipe({
      whitelist: true,          // 自动过滤掉 DTO 中没有定义的字段
      forbidNonWhitelisted: true, // 如果传了未定义的字段,直接报错
      transform: true,          // 自动把请求体转换成 DTO 类的实例
    }),
  );

  // 注册全局响应拦截器
  app.useGlobalInterceptors(new TransformInterceptor());

  // 注册全局异常过滤器
  app.useGlobalFilters(new HttpExceptionFilter());

  await app.listen(3000);
}
bootstrap();
三个配置项解释:
whitelist: true:只保留 DTO 中定义的字段,多余的自动删掉。防止前端传垃圾字段污染数据库。forbidNonWhitelisted: true:如果传了未定义的字段,直接返回 400 错误。比whitelist更严格。transform: true:自动把请求体(普通对象)转换成 DTO 类的实例。class-validator需要类实例才能校验。
五、在 Controller 中使用 DTO
创建文件 src/user/user.controller.ts:
import { Controller, Post, Body } from '@nestjs/common';
import { CreateUserDto } from './dto/create-user.dto';

@Controller('user')
export class UserController {
  @Post()
  createUser(@Body() createUserDto: CreateUserDto) {
    // createUserDto 已经被校验过了,不合法会直接返回 400
    return {
      message: '用户创建成功',
      data: createUserDto,
    };
  }
}
注册模块 src/user/user.module.ts:
import { Module } from '@nestjs/common';
import { UserController } from './user.controller';

@Module({
  controllers: [UserController],
})
export class UserModule {}
在根模块中导入 src/app.module.ts:
import { Module } from '@nestjs/common';
import { AppController } from './app.controller';
import { AppService } from './app.service';
import { UserModule } from './user/user.module';

@Module({
  imports: [UserModule],  // 导入 UserModule
  controllers: [AppController],
  providers: [AppService],
})
export class AppModule {}
六、测试参数校验
启动项目:
npm run start:dev
正常请求:
curl -X POST http://localhost:3000/user \
  -H "Content-Type: application/json" \
  -d '{"name": "张三", "age": 25}'
返回:
{
  "code": 200,
  "message": "success",
  "data": {
    "message": "用户创建成功",
    "data": {
      "name": "张三",
      "age": 25
    }
  }
}
异常请求(age 不是整数):
curl -X POST http://localhost:3000/user \
  -H "Content-Type: application/json" \
  -d '{"name": "张三", "age": "abc"}'
返回:
{
  "code": 400,
  "message": "age 必须是整数",
  "data": null
}
校验生效了。
七、集成 Swagger 接口文档
Swagger 是什么? 一个自动生成接口文档的工具。写完接口后,自动生成一个网页,前端可以直接在上面看接口、调接口。
安装依赖:
npm install @nestjs/swagger
⚠️ 重要提醒:如果你安装的是 @nestjs/swagger v8 或更高版本,可能会遇到 ESM 报错。请直接跳到下面的"ESM 踩坑"章节解决。如果安装的是 v7,则无需处理。
配置 Swagger,修改 src/main.ts:
import { NestFactory } from '@nestjs/core';
import { AppModule } from './app.module';
import { ValidationPipe } from '@nestjs/common';
import { SwaggerModule, DocumentBuilder } from '@nestjs/swagger';
import { TransformInterceptor } from './common/interceptors/transform.interceptor';
import { HttpExceptionFilter } from './common/filters/http-exception.filter';

async function bootstrap() {
  const app = await NestFactory.create(AppModule);

  // 启用全局参数校验
  app.useGlobalPipes(
    new ValidationPipe({
      whitelist: true,
      forbidNonWhitelisted: true,
      transform: true,
    }),
  );

  // 注册全局响应拦截器
  app.useGlobalInterceptors(new TransformInterceptor());

  // 注册全局异常过滤器
  app.useGlobalFilters(new HttpExceptionFilter());

  // 配置 Swagger
  const config = new DocumentBuilder()
    .setTitle('企业级 Todo API')
    .setDescription('NestJS 从入门到企业级实战系列教程的接口文档')
    .setVersion('1.0')
    .build();

  const document = SwaggerModule.createDocument(app, config);
  SwaggerModule.setup('api-docs', app, document);

  await app.listen(3000);
}
bootstrap();
解释:
DocumentBuilder:配置文档的标题、描述、版本等。SwaggerModule.createDocument():根据项目中所有的 Controller 和 DTO,自动生成文档。SwaggerModule.setup('api-docs', app, document):把文档挂载到/api-docs路径上。
八、给接口和 DTO 添加 Swagger 装饰器
给 Controller 添加装饰器 src/user/user.controller.ts:
import { Controller, Post, Body } from '@nestjs/common';
import { ApiTags, ApiOperation, ApiResponse } from '@nestjs/swagger';
import { CreateUserDto } from './dto/create-user.dto';

@ApiTags('用户管理')  // 在文档中给接口分组
@Controller('user')
export class UserController {
  @Post()
  @ApiOperation({ summary: '创建用户' })  // 接口描述
  @ApiResponse({ status: 200, description: '创建成功' })
  @ApiResponse({ status: 400, description: '参数校验失败' })
  createUser(@Body() createUserDto: CreateUserDto) {
    return {
      message: '用户创建成功',
      data: createUserDto,
    };
  }
}
给 DTO 添加装饰器 src/user/dto/create-user.dto.ts:
import { IsString, IsInt, Min, Max, IsNotEmpty } from 'class-validator';
import { ApiProperty } from '@nestjs/swagger';

export class CreateUserDto {
  @ApiProperty({ description: '用户名称', example: '张三' })
  @IsString({ message: 'name 必须是字符串' })
  @IsNotEmpty({ message: 'name 不能为空' })
  name: string;

  @ApiProperty({ description: '用户年龄', example: 25 })
  @IsInt({ message: 'age 必须是整数' })
  @Min(0, { message: 'age 不能小于 0' })
  @Max(150, { message: 'age 不能大于 150' })
  age: number;

  @ApiProperty({ description: '用户角色', required: false, example: 'admin' })
  @IsString({ message: 'role 必须是字符串' })
  role?: string;
}
@ApiProperty() 的作用:告诉 Swagger 这个字段在文档中怎么展示,包括描述、示例值、是否必填等。
九、访问 Swagger 文档
启动项目后,打开浏览器访问:
http://localhost:3000/api-docs
你会看到一个漂亮的接口文档页面,可以:
- 查看所有接口分组
- 查看每个接口的参数、返回值
- 直接在页面上填写参数、发送请求
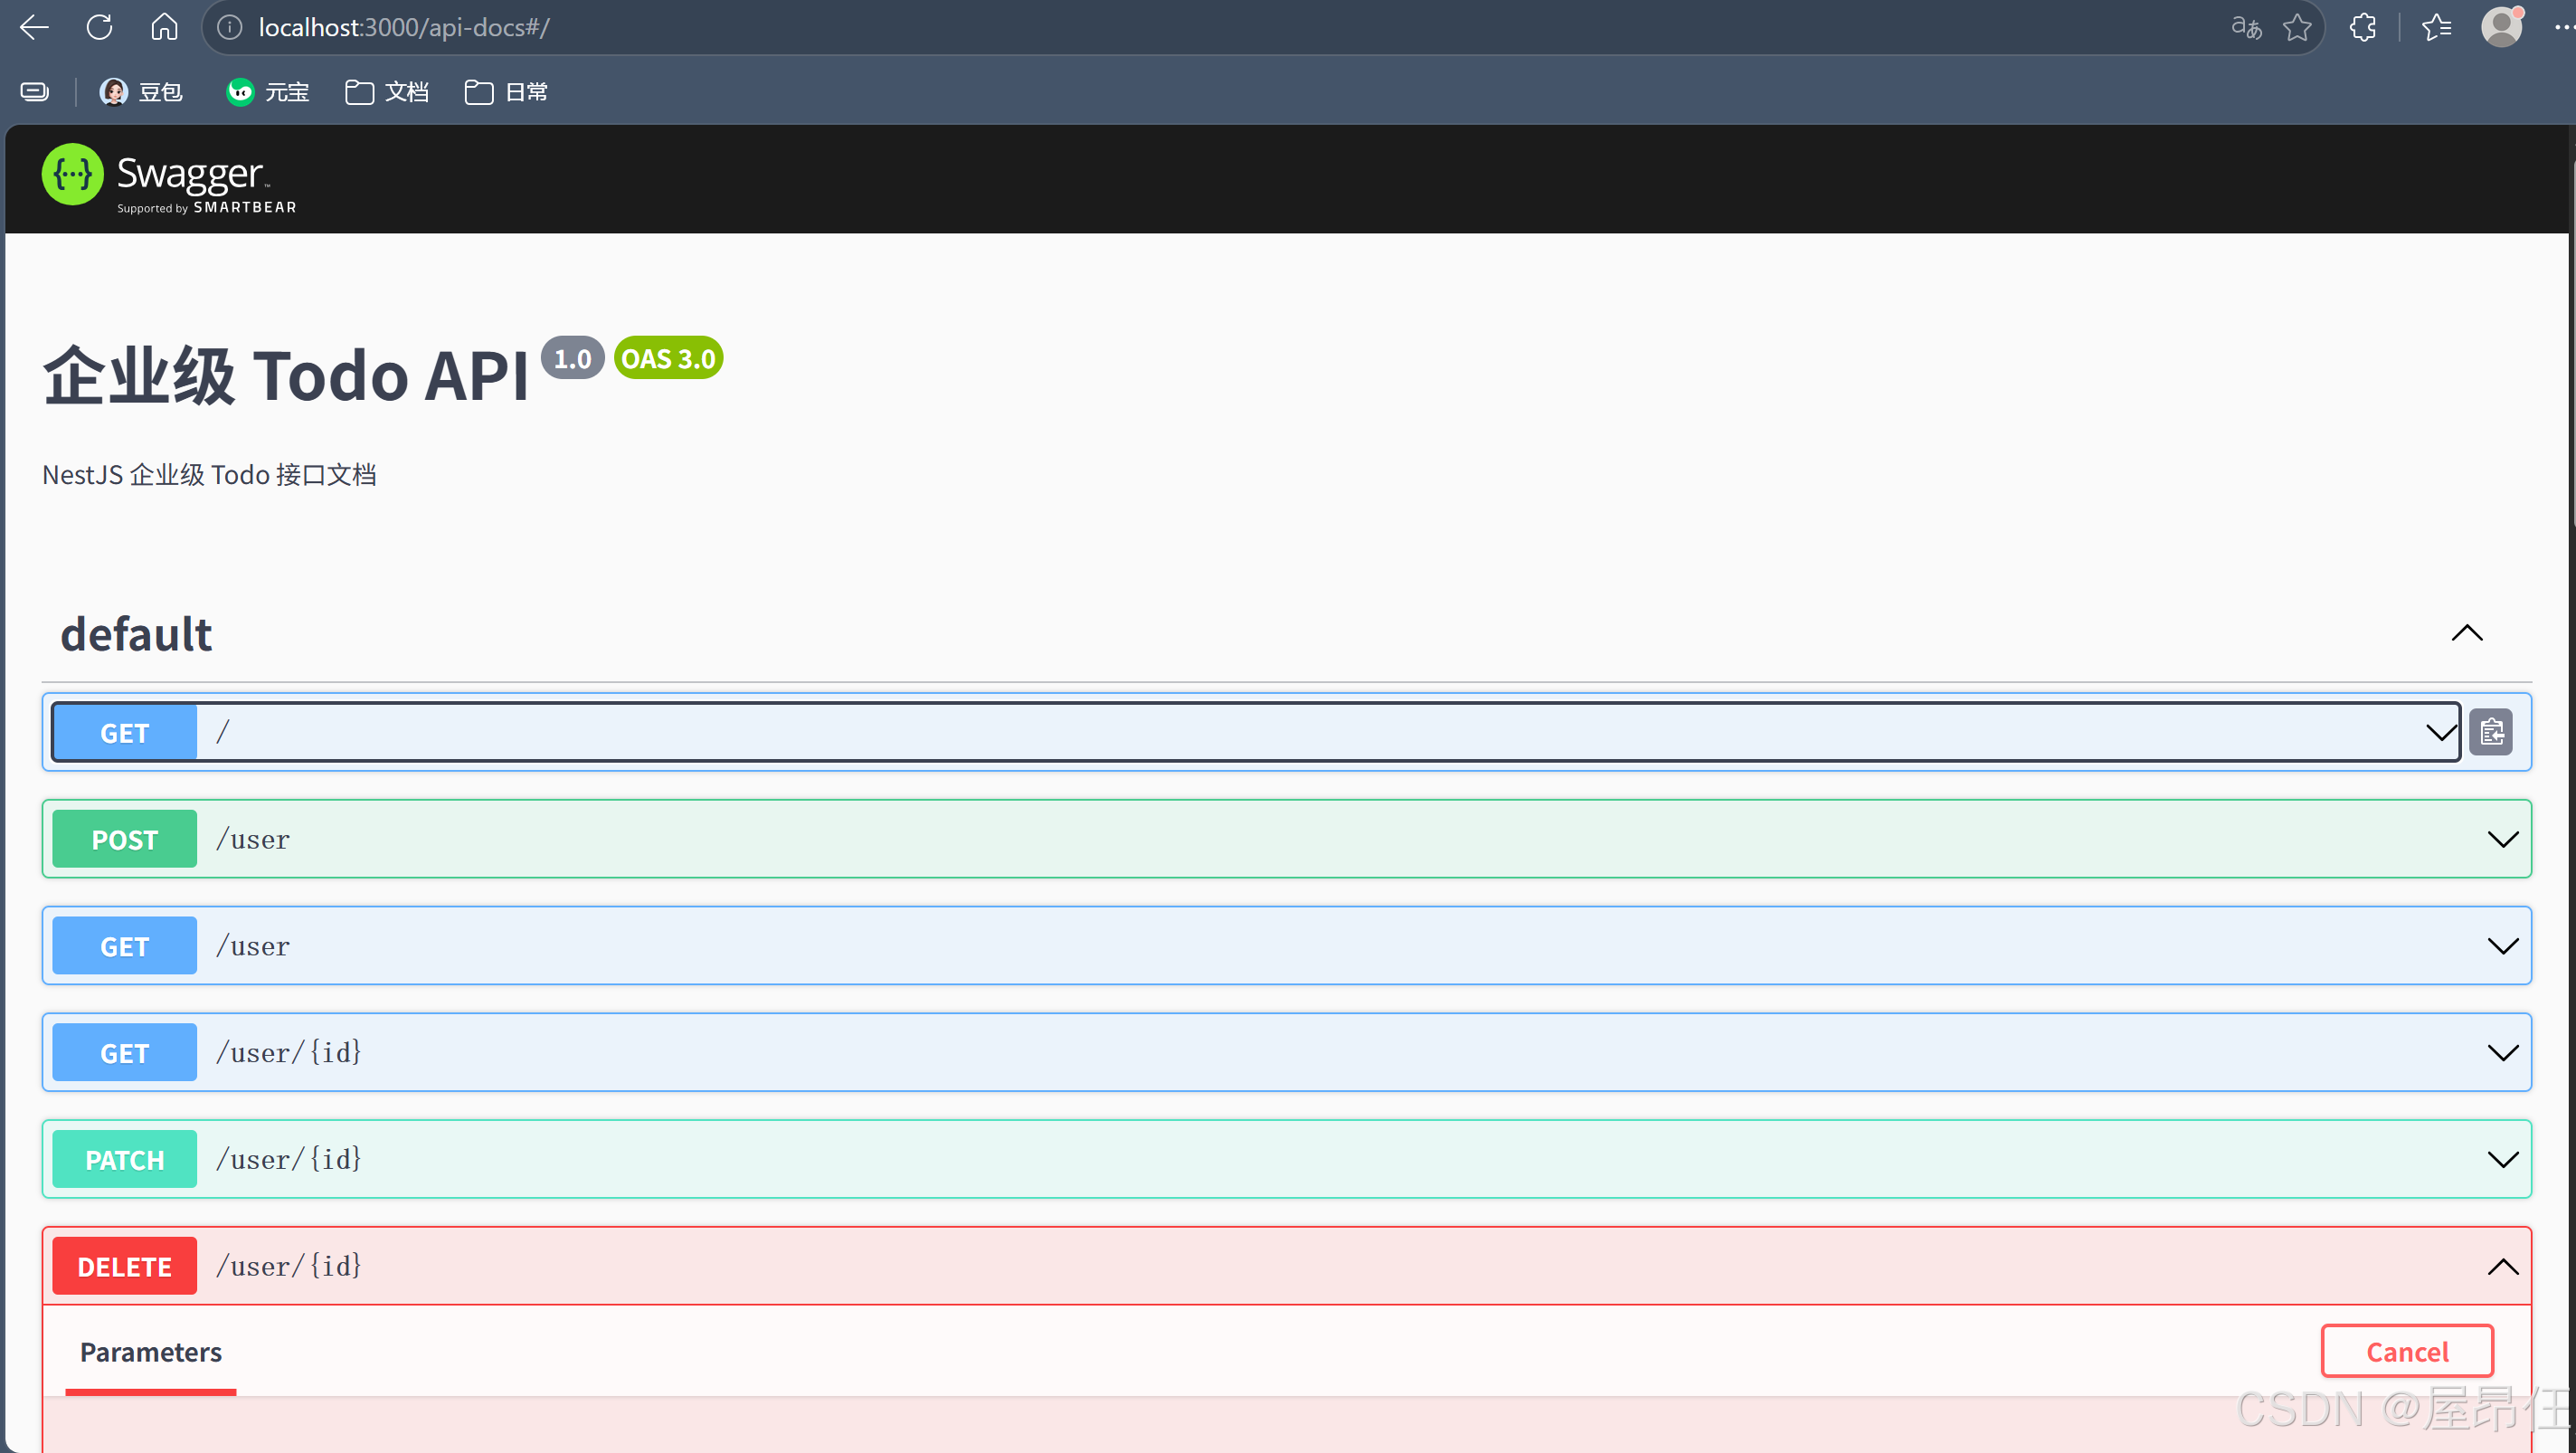
十、ESM 踩坑:@nestjs/swagger v8+ 报错
如果你安装的是 @nestjs/swagger v8 或更高版本,启动时可能会遇到这个报错:
Error [ERR_REQUIRE_ESM]: require() of ES Module ... not supported.
Instead change the require of ... to a dynamic "import()" call.
原因:@nestjs/swagger v8+ 改成了纯 ESM 模块,而 NestJS 默认编译为 CommonJS(CJS)。CJS 无法用 require() 加载 ESM 模块。
解决方案(三选一):
方案一:降级到 v7(推荐,最稳妥)
npm uninstall @nestjs/swagger
npm install @nestjs/swagger@7
安装完成后无需改任何代码,直接 npm run start:dev 即可正常运行。
方案二:修改 tsconfig.json
打开 tsconfig.json,将 module 改为 NodeNext 或 Node16:
{
  "compilerOptions": {
    "module": "NodeNext",
    "moduleResolution": "NodeNext"
  }
}
⚠️ 注意:此改动可能影响项目中其他依赖的导入方式,对新手来说容易引发连锁问题。
方案三:Node.js v22+ 实验性标志
如果你使用的是 Node.js v22 或更高版本,可以在 package.json 的启动脚本中添加 --experimental-require-module 标志:
{
  "scripts": {
    "start:dev": "nest start --watch -e 'node --experimental-require-module'"
  }
}
建议:直接采用方案一降级,这是最省心的方式。
十一、常见报错与解决方案
报错 1:Cannot find module 'class-validator'
原因:依赖没有安装。
解决:
npm install class-validator class-transformer
报错 2:参数校验没有生效
原因:忘记在 main.ts 中启用 ValidationPipe。
解决:确保 app.useGlobalPipes(new ValidationPipe(...)) 在 app.listen() 之前调用。
报错 3:Swagger 文档页面空白
原因:没有给 Controller 或 DTO 添加 Swagger 装饰器。
解决:至少给 Controller 添加 @ApiTags(),给 DTO 添加 @ApiProperty()。
报错 4:ERR_REQUIRE_ESM 报错
原因:@nestjs/swagger v8+ 是纯 ESM 模块,与 CJS 不兼容。
解决:降级到 v7,或按上面的方案二/三处理。
十二、完整项目结构
到这里,第一阶段的项目结构如下:
src/
├── common/
│   ├── filters/
│   │   └── http-exception.filter.ts    # 全局异常过滤器
│   └── interceptors/
│       └── transform.interceptor.ts    # 全局响应拦截器
├── user/
│   ├── dto/
│   │   └── create-user.dto.ts          # 用户创建 DTO
│   ├── user.controller.ts              # 用户控制器
│   └── user.module.ts                  # 用户模块
├── app.controller.ts
├── app.module.ts
├── app.service.ts
└── main.ts                             # 入口文件
十三、本篇总结
- 参数校验:用
class-validator+ValidationPipe实现,DTO 中用装饰器定义规则。 - DTO:数据传输对象,定义接口参数的结构和校验规则。
- Swagger:自动生成接口文档,用
@ApiTags()、@ApiOperation()、@ApiProperty()等装饰器描述接口。 - ESM 踩坑:
@nestjs/swaggerv8+ 与 CJS 不兼容,推荐降级到 v7。
一句话总结:参数校验保证数据干净,Swagger 保证前后端对接顺畅,两者都是企业级项目的标配。


 扫一扫
扫一扫


:参数校验 + Swagger 接口文档 + ESM 踩坑&spm=1001.2101.3001.5002&articleId=164169457&d=1&t=3&u=d297fe0d8bd44302bcab726680b71bdd)
 538
538

 被折叠的 条评论
为什么被折叠?
被折叠的 条评论
为什么被折叠?
 到【灌水乐园】发言


