转载:https://www.cnblogs.com/pinking/p/7788447.html
Scintilla是一个免费、跨平台、支持语法高亮的编辑控件。它完整支持源代码的编辑和调试,包括语法高亮、错误指示、代码完成(code completion)和调用提示(call tips)。能包含标记(marker)的页边(margin)可用于标记断点、折叠和高亮当前行。而QScintilla是Scintilla在QT上的移植。使用该库可以更为方便的开发Qt程序。
下面以windows开发为例:
Qscitinlla下载地址: https://riverbankcomputing.com/software/qscintilla/download
解压,在Qt4Qt5目录,用QtCreator打开qscintilla.pro,构建项目。
生成qscintilla2_qt5.lib或.a文件(本例子使用Qt5.7.1 MSVC2013)
1、创建QWidget工程
在.pro文件添加头文件以及动态链接库的引用:
INCLUDEPATH += C:/Users/pan/Desktop/QScintilla_gpl-2.10.1/Qt4Qt5
LIBS += -LC:/Users/pan/Desktop/QScintilla_gpl-2.10.1/build-qscintilla-Desktop_Qt_5_7_1_MSVC2013_64bit-Debug/debug/ -lqscintilla2_qt5d
或者不用添加INCLUDEPATH,直接将Qt4Qt5目录中的Qsci目录拷贝到工程中。
2、添加用到的头文件
| 1 2 3 4 5 6 | //QsciScintilla作为QWidget的控件,需要添加该控件的头文件
#include <Qsci/qsciscintilla.h>
//以python语法作为例子,该语法分析器的头文件
#include <Qsci/qscilexerpython.h>
//设置代码提示功能,依靠QsciAPIs类实现
#include <Qsci/qsciapis.h>
|
3、设置具体功能代码
| 1 2 3 4 5 6 7 8 9 10 11 12 13 14 15 16 17 18 19 20 21 22 23 24 25 26 27 28 | Widget::Widget(QWidget *parent)
: QWidget(parent)
{
QsciScintilla *editor=new QsciScintilla(this);
//设置语法
QsciLexerPython *textLexer = new QsciLexerPython;//创建一个词法分析器
editor->setLexer(textLexer);//给QsciScintilla设置词法分析器
//行号提示
editor->setMarginType(0,QsciScintilla::NumberMargin);//设置编号为0的页边显示行号。
editor->setMarginLineNumbers(0,true);//对该页边启用行号
editor->setMarginWidth(0,15);//设置页边宽度
//代码提示
QsciAPIs *apis = new QsciAPIs(textLexer);
apis->add(QString("import"));
apis->prepare();
editor->setAutoCompletionSource(QsciScintilla::AcsAll); //设置源,自动补全所有地方出现的
editor->setAutoCompletionCaseSensitivity(true); //设置自动补全大小写敏感
editor->setAutoCompletionThreshold(1); //设置每输入一个字符就会出现自动补全的提示
pLayout = new QVBoxLayout(this);
pLayout->addWidget(editor);
pLayout->setContentsMargins(0,0,0,0);
}
|
说明:
行号显示功能:
QsciScintilla左边可显示页边(Margins)和标记(Markers)。
页边是位于文本显示区左边的一竖条区域,它可以用于显示行号、书签、断点标记等, Scintilla最多可以有5个页边(从左到右的编号为0~4)。
标记用来标记文本位置,如显示自定义的内容,譬如断点、错误位置等等,对于具有折叠功能的,可以使用32种标记(0-31),如果编辑器要支持代码折叠功能,需要预留25-31,这7个作为专用折叠标记。
自动补全功能:
a 定义一个QsciAPIs类,构造函数中将父类指向你前面定义的lexer类。
b 调用其中的类对应的add方法或者load方法想要补全的关键字。
对于补全的关键字比较少的可以通过add添加,如果补全内容比较多,可以通过load添加。
| 1 2 3 4 5 | QsciAPIs*apis = new QsciAPIs(textLexer);
if(!apis->load(QString("D://api.txt")))
QMessageBox::warning(this,QString("提示"),QString("读取文件失败"));
else
apis->prepare();
|
c 调用类对应的prepare方法来准备好关键字。
d 在你前面定义的QsciScintilla类中的相关方法,常见的方法包括:
setAutoCompletionSource、setAutoCompletionCaseSensitivity、setAutoCompletionThreshold
其中,setAutoCompletionSource可设的属性包括:
| 枚举类型 | 描述 |
|---|
| QsciScintilla::AcsNone | 没有自动补全的资源,即禁用自动补全提示功能 |
| QsciScintilla::AcsAll | 所有可用的资源都要自动补全提示,包括当前文档中出现的名称和使用QsciAPIs类加入的名称 |
| QsciScintilla::AcsDocument | 当前文档中出现的名称都自动补全提示 |
| QsciScintilla::AcsAPIs | 使用QsciAPIs类加入的名称都自动补全提示 |
至此,可以完成一个简单的python脚本编辑器。
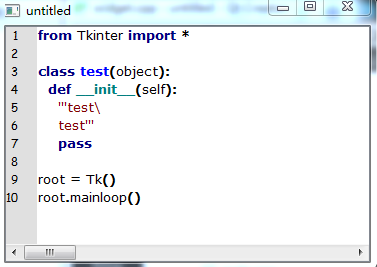
4、编码问题
Scintilla默认编码是ANSI ,所以输入中文字符会出现乱码
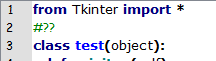
可以给它设置为UTF-8,即添加代码:(顺便设置文本的字体)
| 1 2 3 4 | //设置显示字体
editor->setFont(QFont("Courier New"));
//设置编码方式
editor->SendScintilla(QsciScintilla::SCI_SETCODEPAGE,QsciScintilla::SC_CP_UTF8);//设置编码为UTF-8
|
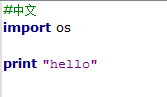
5、高亮配色补充
然而,使用的过程中,对比一些其他的编辑器,发现存在问题:
该控件不支持python中的内置函数、以及一些编辑器通常把self也高亮实现。
可以看到源码中支持的高亮类型:
| 1 2 3 4 5 6 7 8 9 10 11 12 13 14 15 16 17 18 19 20 21 22 23 24 25 26 27 28 29 30 31 32 33 34 35 36 37 38 39 40 41 42 43 44 45 46 47 48 49 50 | // Returns the foreground colour of the text for a style.
QColor QsciLexerPython::defaultColor(int style) const
{
switch (style)
{
case Default:
return QColor(0x80,0x80,0x80);
case Comment:
return QColor(0x00,0x7f,0x00);
case Number:
return QColor(0x00,0x7f,0x7f);
case DoubleQuotedString:
case SingleQuotedString:
return QColor(0x7f,0x00,0x7f);
case Keyword:
return QColor(0x00,0x00,0x7f);
case TripleSingleQuotedString:
case TripleDoubleQuotedString:
return QColor(0x7f,0x00,0x00);
case ClassName:
return QColor(0x00,0x00,0xff);
case FunctionMethodName:
return QColor(0x00,0x7f,0x7f);
case Operator:
case Identifier:
break;
case CommentBlock:
return QColor(0x7f,0x7f,0x7f);
case UnclosedString:
return QColor(0x00,0x00,0x00);
case HighlightedIdentifier:
return QColor(0x40,0x70,0x90);
case Decorator:
return QColor(0x80,0x50,0x00);
}
return QsciLexer::defaultColor(style);
}
|
其中的关键字定义:
| 1 2 3 4 5 | // The list of Python keywords that can be used by other friendly lexers.
const char *QsciLexerPython::keywordClass =
"and as assert break class continue def del elif else except exec "
"finally for from global if import in is lambda None not or pass "
"print raise return try while with yield";
|
| Enumerator |
|---|
| Default | The default. |
| Comment | A comment. |
| Number | A number. |
| DoubleQuotedString | A double-quoted string. |
| SingleQuotedString | A single-quoted string. |
| Keyword | A keyword. |
| TripleSingleQuotedString | A triple single-quoted string. |
| TripleDoubleQuotedString | A triple double-quoted string. |
| ClassName | The name of a class. |
| FunctionMethodName | The name of a function or method. |
| Operator | An operator. |
| Identifier | An identifier. |
| CommentBlock | A comment block. |
| UnclosedString | The end of a line where a string is not closed. |
| HighlightedIdentifier | A highlighted identifier. These are defined by keyword set
- Reimplement keywords() to define keyword set 2.
|
| Decorator | A decorator. |
可以看到,该插件中应该是不支持python的内置函数的,这个内置函数和版本有关。
在自己的python中输入dir(__builtins__),可将其重定向到文本中,记录好这些需要高亮的语句。
#################################
对于print,由于在python2中,print "xxx"是作为关键字存在的,而使用print("xxx")的方式其为一个内置函数。
故,在python中输入:
| 1 2 3 | import keyword
print keywold.kwlist
|
可以在输出结果中看到print,而内置函数中也可以看到。
#################################
参考上表中对于HighligetedIdentifier的介绍,可以知道,其对于自定义的值,kewords()函数传递的set值为2,重写keywords()函数,定义类如下:
pythontest.h
| 1 2 3 4 5 6 | class QsciLexerPythonTest : public QsciLexerPython
{
//Q_OBJECT
public:
const char *keywords(int set) const;
};
|
pythontest.cpp
| 1 2 3 4 5 6 7 8 9 10 | const char * QsciLexerPythonTest::keywords(int set) const
{
if(set == 2)
{
return "self str";
}
return QsciLexerPython::keywords(set);
}
|
注意,继承的类中不要有Q_OBJECT宏,否则会出现:error LNK2001: 无法解析的外部符号
在Widget类中定义颜色:
| 1 2 3 4 5 6 | textLexer->setColor(QColor(Qt::gray),QsciLexerPython::Comment); //设置自带的注释行为灰色
textLexer->setColor(QColor(Qt::black),QsciLexerPython::FunctionMethodName);
textLexer->setColor(QColor(Qt::black),QsciLexerPython::ClassName);
textLexer->setColor(QColor(Qt::darkBlue),QsciLexerPython::Keyword);
textLexer->setColor(QColor(Qt::red),QsciLexerPython::HighlightedIdentifier);
|
这样,对于self、str两个自定义的关键字就可以用红色高亮。
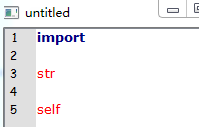
可以看到,使用这个库开发是比较方便的,对比Qt自带的QSyntaxHighlighter控件要好很多!




 本文详细介绍如何使用QScintilla库在Qt中构建一个具备语法高亮、代码补全和行号显示等功能的Python脚本编辑器。文章涵盖QScintilla的下载、配置、功能实现步骤及编码问题解决方法。


 扫一扫
扫一扫


,脚本语言编译器&spm=1001.2101.3001.5002&articleId=100581958&d=1&t=3&u=0135c12e641b49919e89161d86dc8d8d)
 2475
2475

 被折叠的 条评论
为什么被折叠?
被折叠的 条评论
为什么被折叠?
 到【灌水乐园】发言


