




 本文提供了一步一步的教程,详细介绍如何在Visual Studio 2015 (VS2015)上安装和配置机器学习库Dlib。首先从Dlib官网下载并解压,接着使用CMake生成Dlib.lib文件,然后在VS2015中添加DLib库,包括设置附加库目录和附加依赖项。最后通过一个Canny边缘检测示例程序验证安装是否成功。
简介
Dlib库是一个基于C++开发的机器学习算法的工具库,广泛应用在机器人、嵌入式设备、移动手机和高性能计算设备中,以用于解决实际问题。
下面给出Dlib库的官网连接:
由于最近打算在VS平台上实现fhog特征,发现该库含有该特征,故打算安装试试效果。
安装步骤
1.解压Dlib
1.首先将Dlib-19.2下载到D盘中(其他盘亦可)。
2.解压放置在D盘目录下。
2.使用CMake制作Dlib.lib
解压得到的文件不包含lib文件,需要用CMake制作出来,建立一个空的build文件夹作为输出文件夹。
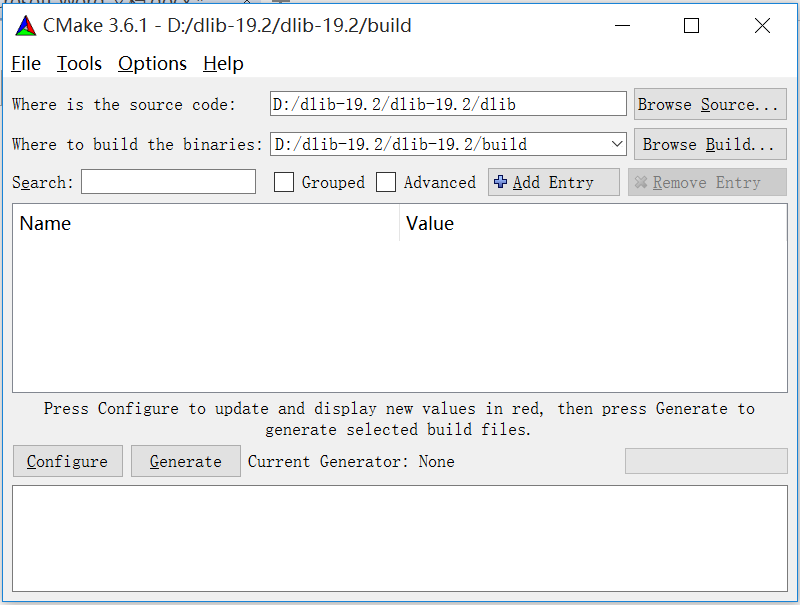
点击Generate,选择对应的VS版本,19.2只支持VS2015,故选择VS2015 64,使用默认Compliers。
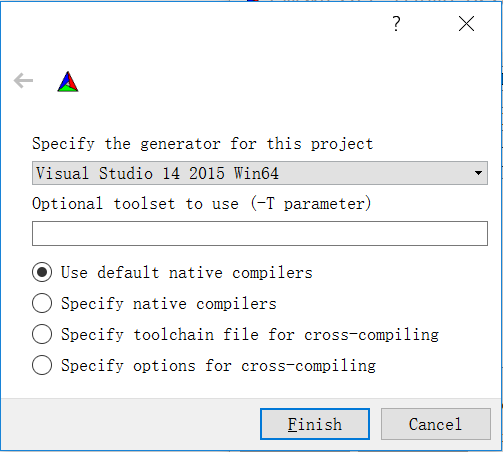
点击finish,最后编译完成
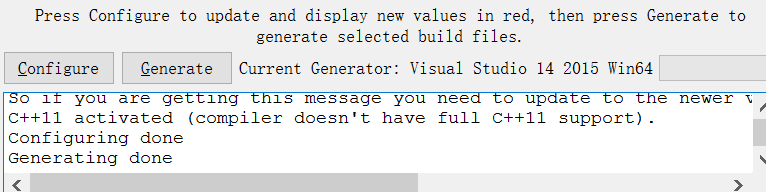
提醒:它会报一个跟CUDA相关的错误,不用管它,我猜测是关于深度学习的应用,我电脑没有安装深度学习相关的东西所以就没理这个错误,最后结果表明确实这个错误不影响使用。
3.VS2015添加DLib库
编译完成后在build里出现一个dlib工程项目,用VS2015打开dlib.sln。
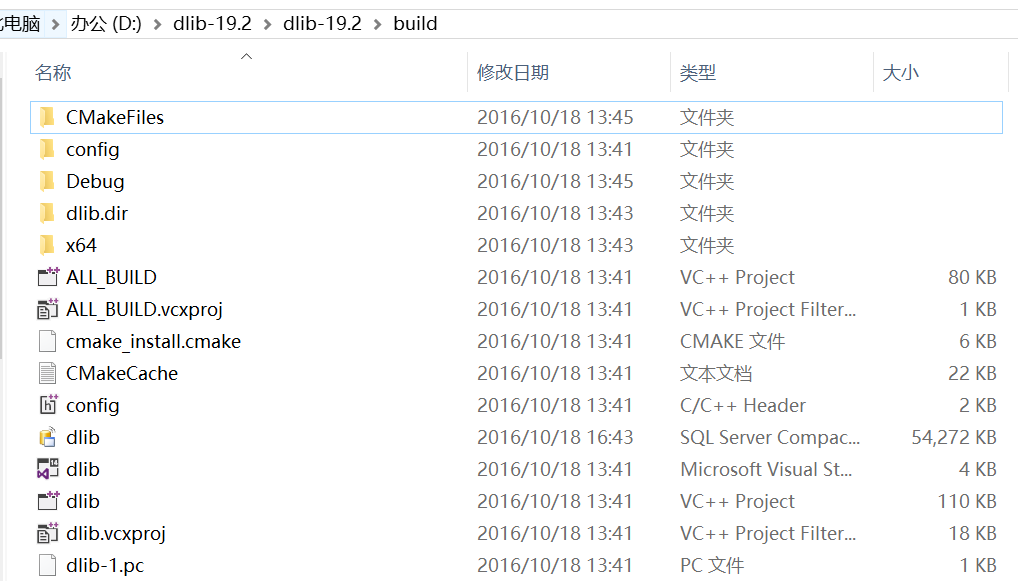
生成解决方案得到debug文件夹,里面既是所需要的dlib。

接着在VS2015中添加DLib附加库,随便新建一个Win32控制台程序,为保证对所有工程都有效,在属性管理器里进行全局更改。
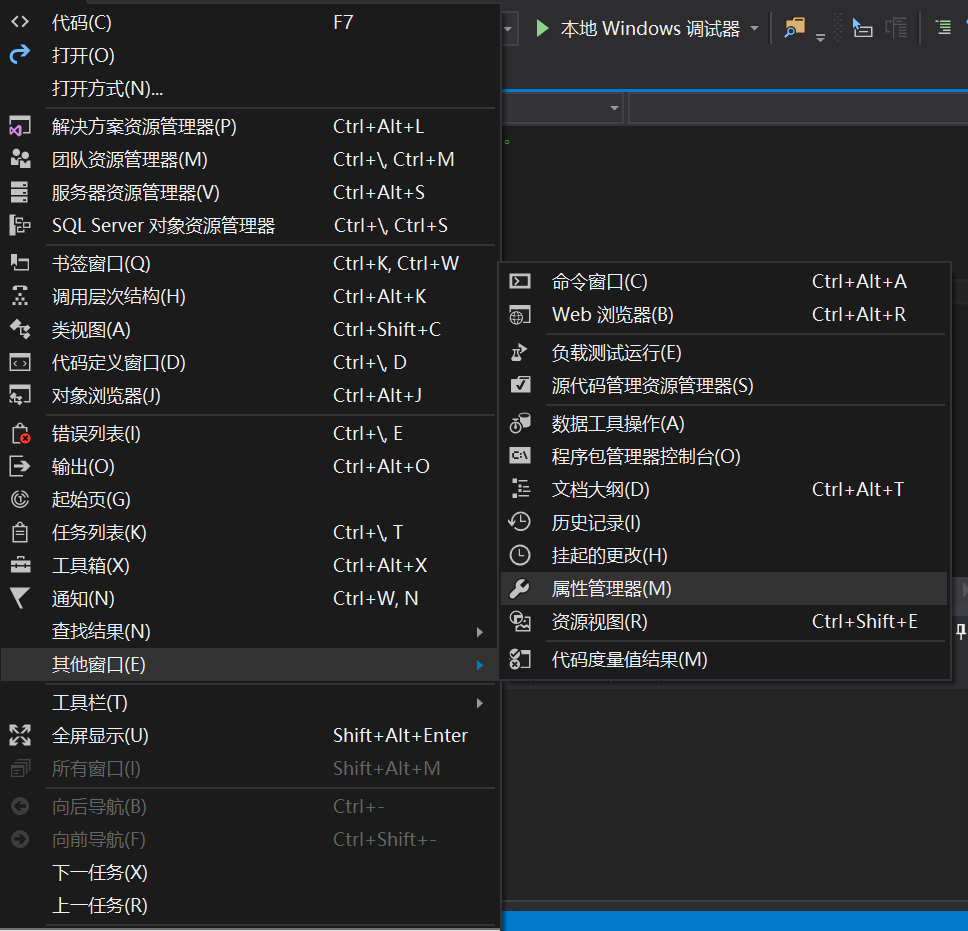
双击Microsoft.Cpp.x64.user弹出属性页,在链接器-常规里添加附加包含目录(注意路径名字)
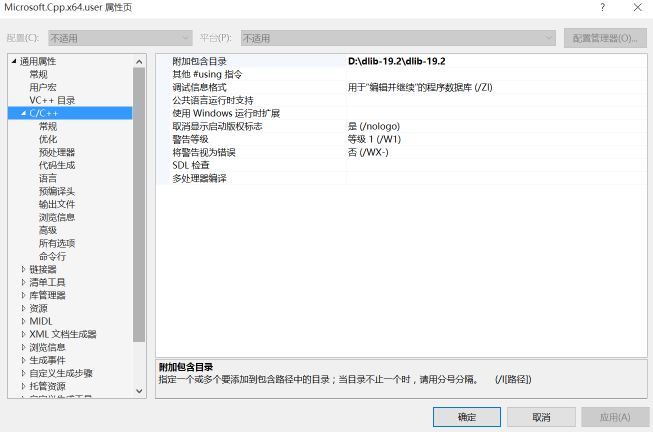
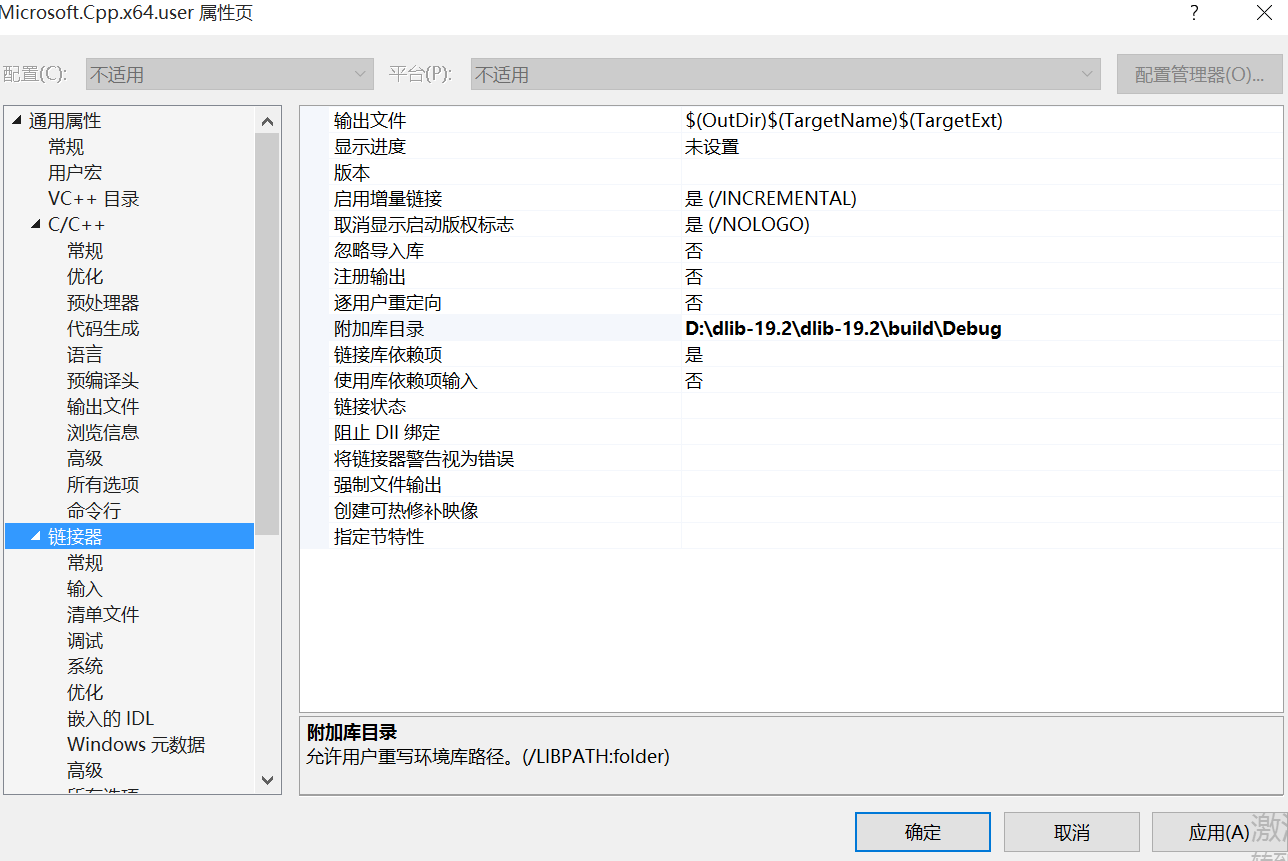
然后附加库目录
以及附加依赖项
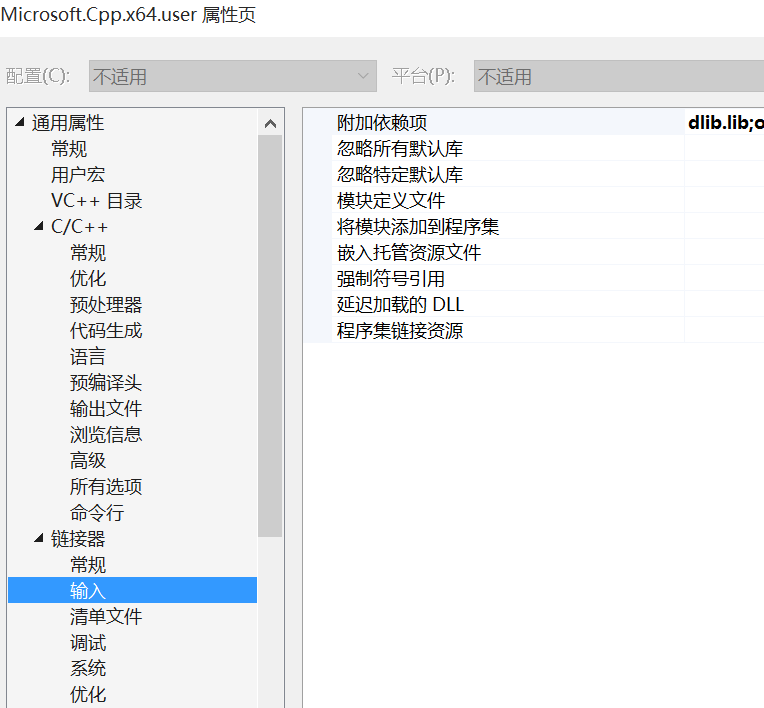
以上就是dlib的库添加过程。上述包含目录和附加库目录添加过程也可在VC++目录完成。
4.示例测试
最后写个程序来测试是否成功,程序为一个简单的Canny边缘检测示例程序,是examples里的示例程序。
// face.cpp : 定义控制台应用程序的入口点。
//

#include "stdafx.h"
#include <dlib/gui_widgets.h>
#include <dlib/image_io.h>
#include <dlib/image_transforms.h>
#include <fstream>


using namespace std;
using namespace dlib;

//  ----------------------------------------------------------------------------

int main(int argc, char** argv)
{
    try
    {

        // 声明图像
        array2d<rgb_pixel> img;

        string img_path = "lena.jpg";
        load_image(img, img_path);

        // 高斯模糊
        array2d<unsigned char> blurred_img;
        gaussian_blur(img, blurred_img);

        // sobel边缘检测
        array2d<short> horz_gradient, vert_gradient;
        array2d<unsigned char> edge_image;
        sobel_edge_detector(blurred_img, horz_gradient, vert_gradient);

        //非极大边缘抑制
        suppress_non_maximum_edges(horz_gradient, vert_gradient, edge_image);

        // 显示结果
        image_window my_window(edge_image, "Normal Edge Image");

        // We can also easily display the edge_image as a heatmap or using the jet color
        // scheme like so.
        image_window win_hot(heatmap(edge_image));
        image_window win_jet(jet(edge_image));

        // also make a window to display the original image
        image_window my_window2(img, "Original Image");

        // Sometimes you want to get input from the user about which pixels are important
        // for some task.  You can do this easily by trapping user clicks as shown below.
        // This loop executes every time the user double clicks on some image pixel and it
        // will terminate once the user closes the window.
        point p;
        while (my_window.get_next_double_click(p))
        {
            cout << "User double clicked on pixel:         " << p << endl;
            cout << "edge pixel value at this location is: " << (int)edge_image[p.y()][p.x()] << endl;
        }

        // wait until the user closes the windows before we let the program
        // terminate.
        win_hot.wait_until_closed();
        my_window2.wait_until_closed();


        // Finally, note that you can access the elements of an image using the normal [row][column]
        // operator like so:
        cout << horz_gradient[0][3] << endl;
        cout << "number of rows in image:    " << horz_gradient.nr() << endl;
        cout << "number of columns in image: " << horz_gradient.nc() << endl;
    }
    catch (exception& e)
    {
        cout << "exception thrown: " << e.what() << endl;
    }
}

//  ----------------------------------------------------------------------------
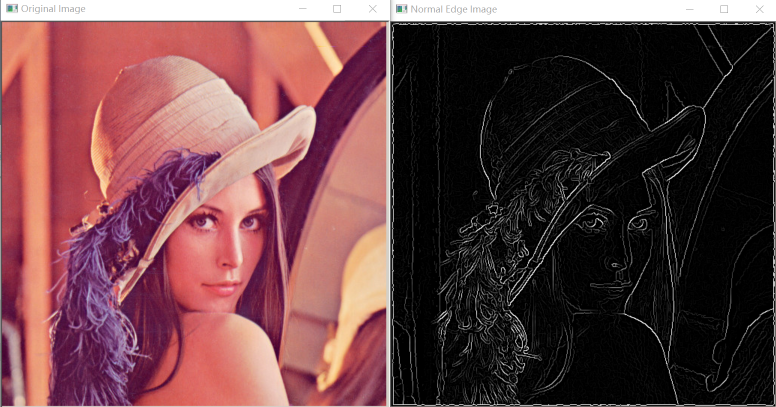
结果如上图所示。
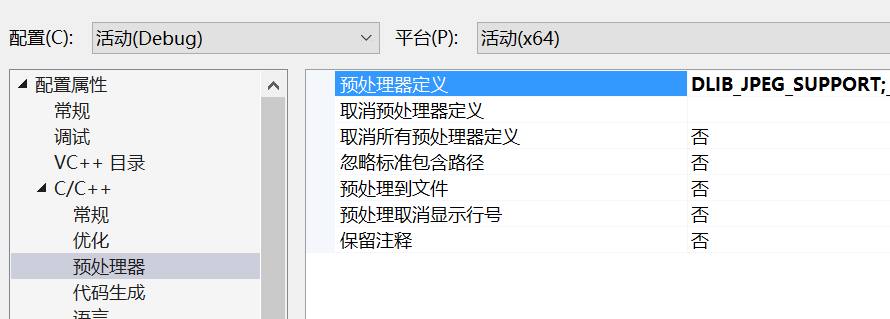
提示:复制的时候别忘了stdafx.h加回去。由于dlib库对于不同的图像格式不同于opencv包含广泛,需要在项目属性页里-C/C++-预编译器中添加DLIB_JPEG _SUPPORT方可读入jpg格式的图像,其他类似,其默认格式是bmp格式。
总结
至此,关于Dlib机器学习库如何安装到VS上已结束,我也费了老大功夫才看懂的,具体如何运用就自己摸索这里不做讲解了。


 扫一扫
扫一扫


 1921
1921

 被折叠的 条评论
为什么被折叠?
被折叠的 条评论
为什么被折叠?
 到【灌水乐园】发言


