


Cactus Configuration
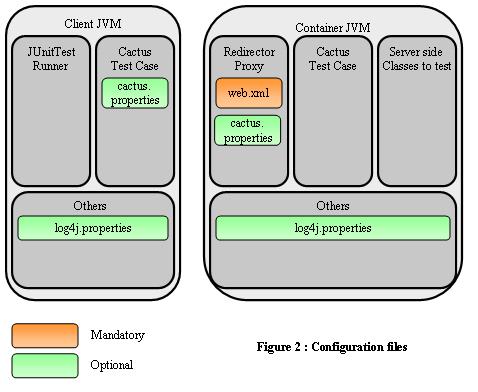
1.Client side configuration
The following table lists the properties that can be defined on Cactus client side:
| Property Name | cactus.contextURL |
|---|---|
| Required | Yes |
| Description | Webapp Context under which the application to test runs. |
| Example | cactus.contextURL = http://localhost:8080/test |
| Property Name | cactus.servletRedirectorName |
|---|---|
| Required | No. Defaults to "ServletRedirector". |
| Description | Name of the Cactus Servlet Redirector as it is mapped on the server side in web.xml (see below). This property is needed only if your test classes are extending ServletTestCase (see the TestCase Howto tutorial). |
| Example | cactus.servletRedirectorName = ServletRedirector |
| Property Name | cactus.jspRedirectorName |
|---|---|
| Required | No. Defaults to "JspRedirector". |
| Description | Name of the Cactus JSP Redirector as it is mapped on the server side in web.xml (see below). This property is needed only if your test classes are extending JspTestCase (see the TestCase Howto tutorial). |
| Example | cactus.jspRedirectorName = JspRedirector |
| Property Name | cactus.filterRedirectorName (For J2EE API 1.3 only) |
|---|---|
| Required | No. Defaults to "FilterRedirector". |
| Description | Name of the Cactus Filter Redirector as it is mapped on the server side in web.xml (see below). This property is needed only if your test classes are extending FilterTestCase (see the TestCase Howto tutorial). |
| Example | cactus.filterRedirectorName = FilterRedirector |
2.Server side configuration
On Cactus server side, you only need to properly configure your application web.xml file to include definitions
for Cactus Redirectors (see How it works if you don't know what a Cactus Redirector is).
You need to register the Cactus Redirectors that you use, and you need to map them to the
cactus.servletRedirectorName, cactus.jspRedirectorName and cactus.filterRedirectorName
that you have configured on the client side (or simply make sure that you use the default names, i.e.
ServletRedirector, JspRedirector and FilterRedirector respectively).
Here is a sample web.xml that defines the 3 Cactus Redirectors:
 <?
xml version="1.0" encoding="ISO-8859-1"
?>
<!
DOCTYPE web-app PUBLIC "-//Sun Microsystems, Inc.//DTD Web Application 2.3//EN" "http://java.sun.com/j2ee/dtds/web-app_2_3.dtd"
>
<
web-app
>
<
filter
>
<
filter-name
>
FilterRedirector
</
filter-name
>
<
filter-class
>
org.apache.cactus.server.FilterTestRedirector
</
filter-class
>
</
filter
>
<
filter-mapping
>
<
filter-name
>
FilterRedirector
</
filter-name
>
<
url-pattern
>
/FilterRedirector
</
url-pattern
>
</
filter-mapping
>
<
servlet
>
<
servlet-name
>
ServletRedirector
</
servlet-name
>
<
servlet-class
>
org.apache.cactus.server.ServletTestRedirector
</
servlet-class
>
</
servlet
>
<
servlet
>
<
servlet-name
>
JspRedirector
</
servlet-name
>
<
jsp-file
>
/jspRedirector.jsp
</
jsp-file
>
</
servlet
>
<
servlet-mapping
>
<
servlet-name
>
ServletRedirector
</
servlet-name
>
<
url-pattern
>
/ServletRedirector
</
url-pattern
>
</
servlet-mapping
>
<
servlet-mapping
>
<
servlet-name
>
JspRedirector
</
servlet-name
>
<
url-pattern
>
/JspRedirector
</
url-pattern
>
</
servlet-mapping
>
</
web-app
>
<?
xml version="1.0" encoding="ISO-8859-1"
?>
<!
DOCTYPE web-app PUBLIC "-//Sun Microsystems, Inc.//DTD Web Application 2.3//EN" "http://java.sun.com/j2ee/dtds/web-app_2_3.dtd"
>
<
web-app
>
<
filter
>
<
filter-name
>
FilterRedirector
</
filter-name
>
<
filter-class
>
org.apache.cactus.server.FilterTestRedirector
</
filter-class
>
</
filter
>
<
filter-mapping
>
<
filter-name
>
FilterRedirector
</
filter-name
>
<
url-pattern
>
/FilterRedirector
</
url-pattern
>
</
filter-mapping
>
<
servlet
>
<
servlet-name
>
ServletRedirector
</
servlet-name
>
<
servlet-class
>
org.apache.cactus.server.ServletTestRedirector
</
servlet-class
>
</
servlet
>
<
servlet
>
<
servlet-name
>
JspRedirector
</
servlet-name
>
<
jsp-file
>
/jspRedirector.jsp
</
jsp-file
>
</
servlet
>
<
servlet-mapping
>
<
servlet-name
>
ServletRedirector
</
servlet-name
>
<
url-pattern
>
/ServletRedirector
</
url-pattern
>
</
servlet-mapping
>
<
servlet-mapping
>
<
servlet-name
>
JspRedirector
</
servlet-name
>
<
url-pattern
>
/JspRedirector
</
url-pattern
>
</
servlet-mapping
>
</
web-app
>
If you are using the JSP Redirector (i.e. you have test classes that extend JspTestCase), you must copy the
jspRedirector.jsp file (found in the sample/web directory where you unpacked your Cactus distribution) in
a directory in your webapp and you need to put its relative path in the mapping defined above (here we have put
it in the webapp root
If you want to provide some initialisation parameters that will be available to the config implicit object available
in your test case, simply use the standard <init-param> tags.
For example, for the Servlet Redirector (same principle applies to all other redirectors):
[...]
<
servlet
>
<
servlet-name
>
ServletRedirector
</
servlet-name
>
<
servlet-class
>
org.apache.cactus.server.ServletTestRedirector
</
servlet-class
>
<
init-param
>
<
param-name
>
param1
</
param-name
>
<
param-value
>
value1 used for testing
</
param-value
>
</
init-param
>
</
servlet
>
[...]
testXXX() code, you can also call the
config.setInitParameter() method (
config being the
ServletConfig) to simulate initialisation parameters as if they had been defined in your
web.xml.
Last, if you need to unit test code that uses the Servlet Security API, please check the Security Howto.
3.Cactus logging configuration
Since Cactus 1.4, we have switched to using the Jakarta Commons Logging framework for Cactus internal
logs (and any log you may wish to output as part of your test).
This allow Cactus to use any underlying logging framework such as: Log4J, LogKit, JDK 1.4 Logging or even a
Simple Logger provided as part of Commons Logging (it outputs to the console).
Cactus is completely agnostic with regards to the logging framework configuration, so you will have to learn
how to configure your favorite logging yourself. However here are some tips to help set up a Cactus logging
configuration.
a.'cactus.logging.config' property
Cactus provides an optional cactus.logging.config configuration property. If set, Cactus will load the
properties file pointed by this property and will set each property as a system property. This allowsw putting all
logging-related properties into a single place, as demonstrated below.
<cactus> task, please refer to the
documentation for that task to set up Cactus logging.
#
-----------------------------------------------------------------------------
# Logging properties#
-----------------------------------------------------------------------------
# Disable logging by
default
when running the tests. If you wish to use a # logging subsystem, uncomment the line below. That will let Commons logging# decide automatically of a suitable logging system
for
you. You can also force# commons
-
logging to use a specific logging system. For more info, see# http:
//
jakarta.apache.org/commons/logging
# Disable logging#org.apache.commons.logging.Log
=
org.apache.commons.logging.impl.NoOpLog# Force to use JDK
1.4
logging#org.apache.commons.logging.Log
=
org.apache.commons.logging.impl.Jdk14Logger# Force to use Log4J logging#org.apache.commons.logging.Log
=
org.apache.commons.logging.impl.Log4JLogger# Force to use Simple logging#org.apache.commons.logging.Log
=
org.apache.commons.logging.impl.SimpleLog#
----
JDK
1.4
logging properties# Following properties are useful
if
you
'
re using the JDK 1.4 logging subsystem
# and wish to output logs to a file. Make sure to comment out the NoOpLog line # above.java.util.logging.config.file
=
@target.dir@
/
logging_client.propertieshandlers
=
java.util.logging.FileHandlerjava.util.logging.FileHandler.pattern
=
@target.dir@
/
test_client.logjava.util.logging.FileHandler.formatter
=
java.util.logging.SimpleFormatter# If you want to provide finer grained logging, restrict the level
for
the # specific
package
name. # For example: # org.apache.cactus.server.level
=
ALL# org.apache.commons.httpclient.level
=
ALL# .level
=
ALLorg.apache.cactus.level
=
ALL#
----
Log4J logging properties# Following properties are useful
if
you
'
re using the Log4J logging subsystem
# and wish to output logs to a file. Make sure to comment out the NoOpLog line # above.log4j.configuration
=
file:
/
@target.dir@
/
logging_client.propertieslog4j.appender.cactus
=
org.apache.log4j.FileAppenderlog4j.appender.cactus.File
=
@target.dir@
/
test_client.loglog4j.appender.cactus.Append
=
false
log4j.appender.cactus.layout
=
org.apache.log4j.PatternLayout
 log4j.appender.cactus.layout.ConversionPattern
=
%
d
...
{ABSOLUTE}
[
%
t]
%-
5p
%-
30
.30c
...
{2}
%
x
-
%
m
%
n# Any application log which uses Log4J will be logged to the Cactus log filelog4j.rootCategory
=
DEBUG, cactus# Debug logs
for
Cactuslog4j.category.org.apache.cactus
=
DEBUG, cactuslog4j.additivity.org.apache.cactus
=
false
# Debug logs
for
HttpClientlog4j.category.org.apache.commons.httpclient
=
DEBUG, cactuslog4j.additivity.org.apache.commons.httpclient
=
false
log4j.category.httpclient
=
WARN, cactuslog4j.additivity.httpclient
=
false
#
----
SimpleLog logging propertiesorg.apache.commons.logging.simplelog.showlogname
=
true
org.apache.commons.logging.simplelog.log.org.apache.cactus
=
traceorg.apache.commons.logging.simplelog.log.org.apache.commons.httpclient
=
trace
log4j.appender.cactus.layout.ConversionPattern
=
%
d
...
{ABSOLUTE}
[
%
t]
%-
5p
%-
30
.30c
...
{2}
%
x
-
%
m
%
n# Any application log which uses Log4J will be logged to the Cactus log filelog4j.rootCategory
=
DEBUG, cactus# Debug logs
for
Cactuslog4j.category.org.apache.cactus
=
DEBUG, cactuslog4j.additivity.org.apache.cactus
=
false
# Debug logs
for
HttpClientlog4j.category.org.apache.commons.httpclient
=
DEBUG, cactuslog4j.additivity.org.apache.commons.httpclient
=
false
log4j.category.httpclient
=
WARN, cactuslog4j.additivity.httpclient
=
false
#
----
SimpleLog logging propertiesorg.apache.commons.logging.simplelog.showlogname
=
true
org.apache.commons.logging.simplelog.log.org.apache.cactus
=
traceorg.apache.commons.logging.simplelog.log.org.apache.commons.httpclient
=
trace
Tips
JUnit uses a different classloader to load each test of a TestCase class. Thus, Log4j will reinitialise for each
test, which may lead to overwriting the test_client.log file each time (this is because we have set
log4j.appender.cactus.Append to false. You can set it to true if you wish to keep all the logs but the file
size will grow quickly. In addition logs are really only useful when there is a failure and thus not appending is
usually a good choice.

 435
435


 扫一扫
扫一扫


 被折叠的 条评论
为什么被折叠?
被折叠的 条评论
为什么被折叠?
 到【灌水乐园】发言


