



 本文详细介绍了Android DataBinding的使用,包括环境配置、布局转换、数据绑定以及DataBinding文件的生成方式。通过实例展示了如何在布局中进行数据绑定,并在MainActivity中直接修改UI内容。同时,文章还探讨了DataBinding文件的不同生成方法和在不同场景下的应用,如在RecyclerView.Adapter中的使用。最后,提供了BR类在数据绑定中的作用和参考链接。
一、前言
DataBinding是JetPack中用来进行双向绑定的库,可以使数据和UI进行解耦合。这里对其进行使用进行简单的记录
二、环境配置
在以前的旧版上使用DataBinding还需要添加插件和依赖库,不过目前来说无需如此复杂,只需要在build.gradle中进行简单的配置即可。这里有两种配置方式,如下:
方式一:
android {
        ...
        dataBinding {
            enabled = true
        }
    }
方式二:
 android {
        ...
     buildFeatures {
            dataBinding = true
            //viewBinding = true
        }
 }
三、将现有布局转换为databinding布局
如果我们要使用databinding的话,布局需要使用以下格式:
<layout xmlns:android="http://schemas.android.com/apk/res/android"
            xmlns:app="http://schemas.android.com/apk/res-auto">
        <data>
            <variable
                name="viewmodel"
                type="com.myapp.data.ViewModel" />
        </data>
        <ConstraintLayout... /> <!-- UI layout's root element -->
    </layout>
可以看到相较于以前的布局多了<layout></layout>标签。里面的<data></data>标签如果在实际中用不到赋值操作的话可以不写。如果我们手动改成这种布局还是稍微麻烦点的。官方提供了一种简单的方式。
首先需要使用上述方式开启databinding功能。然后在布局的中使用快捷键(MAC使用Alt+Enter),该快捷键在第6行之前的任意一处空白处即可调出
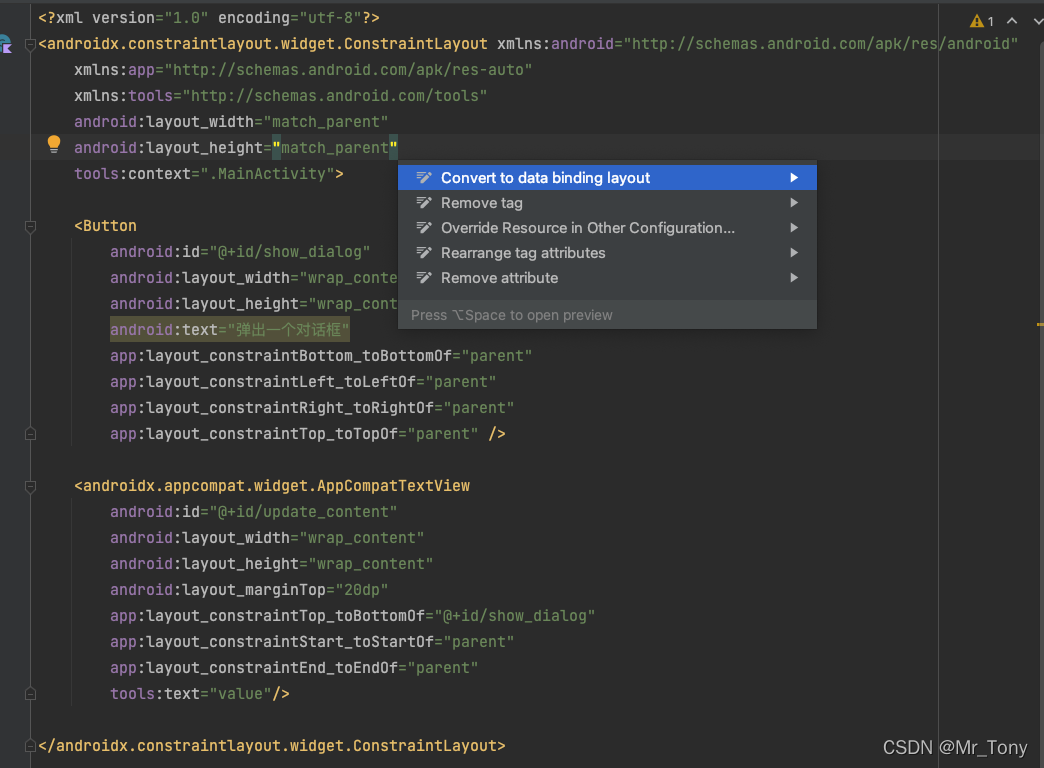
选择后进行确定即可变成以下代码
<?xml version="1.0" encoding="utf-8"?>
<layout xmlns:android="http://schemas.android.com/apk/res/android"
    xmlns:app="http://schemas.android.com/apk/res-auto"
    xmlns:tools="http://schemas.android.com/tools">

    <data>

    </data>

    <androidx.constraintlayout.widget.ConstraintLayout
        android:layout_width="match_parent"
        android:layout_height="match_parent"
        tools:context=".MainActivity">

        <Button
            android:id="@+id/show_dialog"
            android:layout_width="wrap_content"
            android:layout_height="wrap_content"
            android:text="弹出一个对话框"
            app:layout_constraintBottom_toBottomOf="parent"
            app:layout_constraintLeft_toLeftOf="parent"
            app:layout_constraintRight_toRightOf="parent"
            app:layout_constraintTop_toTopOf="parent" />

        <androidx.appcompat.widget.AppCompatTextView
            android:id="@+id/update_content"
            android:layout_width="wrap_content"
            android:layout_height="wrap_content"
            android:layout_marginTop="20dp"
            app:layout_constraintTop_toBottomOf="@+id/show_dialog"
            app:layout_constraintStart_toStartOf="parent"
            app:layout_constraintEnd_toEndOf="parent"
            tools:text="value" />

    </androidx.constraintlayout.widget.ConstraintLayout>
</layout>
四、数据绑定
将上述代码进行修改以便进行数据绑定
activity_main.xml
<?xml version="1.0" encoding="utf-8"?>
<layout xmlns:android="http://schemas.android.com/apk/res/android"
    xmlns:app="http://schemas.android.com/apk/res-auto"
    xmlns:tools="http://schemas.android.com/tools">

    <data>
        <variable
            name="change"
            type="String" />
    </data>

    <androidx.constraintlayout.widget.ConstraintLayout
        android:layout_width="match_parent"
        android:layout_height="match_parent"
        tools:context=".MainActivity">

        <Button
            android:id="@+id/show_dialog"
            android:layout_width="wrap_content"
            android:layout_height="wrap_content"
            android:text="弹出一个对话框"
            app:layout_constraintBottom_toBottomOf="parent"
            app:layout_constraintLeft_toLeftOf="parent"
            app:layout_constraintRight_toRightOf="parent"
            app:layout_constraintTop_toTopOf="parent" />

        <androidx.appcompat.widget.AppCompatTextView
            android:id="@+id/update_content"
            android:layout_width="wrap_content"
            android:layout_height="wrap_content"
            android:layout_marginTop="20dp"
            android:text="@{change}"
            app:layout_constraintTop_toBottomOf="@+id/show_dialog"
            app:layout_constraintStart_toStartOf="parent"
            app:layout_constraintEnd_toEndOf="parent"
            tools:text="value" />

    </androidx.constraintlayout.widget.ConstraintLayout>
</layout>
MainActivity.kt
class MainActivity : AppCompatActivity() {
    private val binding: ActivityMainBinding by lazy {
        ActivityMainBinding.inflate(layoutInflater)
    }
    override fun onCreate(savedInstanceState: Bundle?) {
        super.onCreate(savedInstanceState)
        setContentView(binding.root)
        binding.showDialog.setOnClickListener {
            LoginDialog().show(supportFragmentManager,"")
        }
        binding.change = "啦啦啦"
    }
}
可以看到布局生成了一个ActivityMainBinding类。通过修改该类的change就可以直接修改UI内容。
五、DataBinding文件
JetPack中有视图绑定和数据绑定,视图绑定省去了findViewById()的操作,数据绑定可以进行数据直接赋值。DataBinding文件有以下几种生成方式
第一种方式:
private val binding: ActivityMainBinding by lazy {
        ActivityMainBinding.inflate(layoutInflater)
    }
第二种方式:
val binding: ActivityMainBinding = DataBindingUtil.setContentView(
                this, R.layout.activity_main)
第三种方式:
如果是在自定义View中,则需要以下方式
constructor(context: Context) : super(context){
        initLayout(context)
    }
    /**
     * 初始化
     */
    private fun initLayout(ctx: Context){
        val layoutInflater = LayoutInflater.from(ctx)
        binding = ViewVirusResultBinding.inflate(layoutInflater,this,true)
    }
如果是在Fragment、ListView或者RecycleView适配器中使用数据绑定项。可以使用以下方式:
    val listItemBinding = ListItemBinding.inflate(layoutInflater, viewGroup, false)
    // or
    val listItemBinding = DataBindingUtil.inflate(layoutInflater, R.layout.list_item, viewGroup, false)
有时候我们不知道要绑定的具体类型。这时候可以使用以下方式进行绑定
    val viewRoot = LayoutInflater.from(this).inflate(layoutId, parent, attachToParent)
    val binding: ViewDataBinding? = DataBindingUtil.bind(viewRoot)
如果布局是使用其他机制扩充的,可单独绑定,如下所示:
val binding: MyLayoutBinding = MyLayoutBinding.bind(viewRoot)
什么时候会用到这种方式呢,比如布局里面使用了<include>、<ViewStub>等标签。或者需要动态添加布局。可以使用这种方式
动态变量:
有时,系统并不知道特定的绑定类。例如,针对任意布局运行的 RecyclerView.Adapter 不知道特定绑定类。在调用 onBindViewHolder() 方法时,仍必须指定绑定值。
在以下示例中,RecyclerView 绑定到的所有布局都有 item 变量。BindingHolder 对象具有一个 getBinding() 方法,这个方法返回 ViewDataBinding 基类。
    override fun onBindViewHolder(holder: BindingHolder, position: Int) {
        item: T = items.get(position)
        holder.binding.setVariable(BR.item, item);
        holder.binding.executePendingBindings();
    }
注意:数据绑定库在模块包中生成一个名为 BR 的类,其中包含用于数据绑定的资源的 ID。在上例中,该库自动生成 BR.item 变量。
针对该解释可以参考https://blog.csdn.net/cunchi4221/article/details/107478770
https://blog.csdn.net/mountain_eyes/article/details/80627037


 扫一扫
扫一扫


 2万+
2万+

 被折叠的 条评论
为什么被折叠?
被折叠的 条评论
为什么被折叠?
 到【灌水乐园】发言


